Today’s Free Game Analysis submission comes from Michael Chiflikyan, an up-and-coming Illinois native who has almost doubled his rating from 700 at the beginning of this year. Although he lost this game against a player much higher rated than him, Michael was able to cross 1400 for the first time after this tournament, so congratulations to him on the milestone!
This game starts off with a Queen’s Gambit Declined through a transposition, a fairly popular line among players of all strengths. Michael, who has the black pieces, played fairly solidly throughout the opening and middlegame, but a few inaccuracies in the endgame was all it took for his higher-rated opponent to pounce at the end. Let’s take a look for ourselves.
Kalghatgi (2138) – Chiflikyan (1397), CCC 2017
I was pleasantly surprised when I received this game from Isaac for today’s article, as Michael’s opponent was someone that I had played in a tournament game a few years ago! As aforementioned, this game starts with a Queen’s Gambit declined, which I have some experience playing with the black side, but probably not as much as others on Chess^Summit. So, I will attempt to analyze the opening to the best of my ability, but from the middlegame onwards it should be smooth sailing. You can use the game player provided (from the game title) to follow along or use the text and boards in the article itself.
- d4 Nf6 2. c4 e6 3. Nc3 d5
Completing the transposition to the 1. … d5 line that has been played maybe a billion times by now. The Nimzo, with 3. … Bb4, is more popular in this specific position, but the sole explanation for that is because this move order is one of only two realistic move orders to reach the Nimzo, while the QGD position can be reached in many different ways and thus the games are spread out over the database.
- cxd5
The exchange variation, which leads to one of the most popular and recognizable positions among QGD players from both sides. White gets a simple setup with a queen-bishop battery and aims his pieces towards Black’s kingside, while Black will attempt to counter in the center with a c5 push at some point.
- … exd5 5. Bg5 c6 6. Qc2

White will indeed go for this setup.
- … Nbd7
This move, along with Be7, is interchangeable, as they will all eventually end up on these squares. However, an interesting idea that has been tried more than a few times is the move Na6 in this position, which aims to swing the knight over to e6 via c7 and gain a tempo on the bishop.
- e3 Be7 8. Bd3 h6
This bishop kick can be helpful, but in my opinion, it’s probably too early for this. The move isn’t running away, as White won’t move his dark-squared bishop unless he has to. Notice that White’s g1-knight still has to be developed before White can castle kingside. It would be better to castle and let White make the decision as to where he wants to go with his last undeveloped minor piece before committing to a move like h6, which can never be taken back. The reasoning is that when White’s knight is on f3, the move h6 takes away the crucial g5 square from the knight; but, when White develops his knight to e2, this move permanently weakens the g6 square for black, which can become a problem when white plays an eventual move like Ne2-f4. It also inhibits Black’s ability to clog the b1-h7 diagonal with a move like Ng6.
- Bh4 0-0 10. Nge2

White chooses the correct square for the kingside knight.
- … b6
A step in the wrong direction for Black. With immense pressure from both of White’s bishops, Black’s usual plan in this position is to stuff the b1-h7 diagonal while simultaneously trading pieces. This is achieved by playing 10. … Re8, which is followed by 11. 0-0 Ne4 when the discovery tactic on White’s dark-squared bishop helps Black. With a move like b6, Black commits to this path of development for the light-squared bishop, giving White time to build up a center.
- 0-0 Bb7 12. f3 c5 13. Bf2 Rc8 14. Rc1

Up until now, all of the positions in this game have appeared in the database. But after Black’s next move, the players officially go out of book.
- … Re8 15. Ng3 Bf8 16. Rfd1
From an objective standpoint, I don’t really like this move for White. It’s unclear where the rook belongs right now, but it definitely doesn’t belong on the closed d-file, and it doesn’t seem like the file will be opened anytime soon, especially with Black’s queen still on it. I would have preferred a move like Qd2, which would move White’s queen off of the semi-open c-file and give more breathing room to the light-squared bishop. This would also keep the position flexible since it hasn’t become apparent where White should move his f1-rook.
- … a6 17. Qd2 Nb8?!
Here, Black should have seriously considered the move c4, temporarily locking the center and going for pawn play on the queenside. Black can follow up with b5, b4, a5, and if White attempts to counterstrike in the center with e4, it would finally open the diagonal for Black’s light-squared bishop, which has thus far not seen any action. Instead, Black opts for a knight maneuver that, frankly, doesn’t harmonize with the rest of the position.
- Bf5 Rc7

Black’s position is in a tangled mess, and White should have struck while the iron was hot with the immediate e4! which would create further disorder within Black’s camp. However, White fails to capitalize, leaving Black with an unattractive but surprisingly solid position.
- Na4 cxd4 20. cxd4 Rxc1 21. Rxc1 Bc6 22. Nc3 Bd7 23. Bb1 Nc6

- a3 Ne7?
Another somewhat puzzling move. Black’s knight is positioned fine for now on c6. It is, in fact, the f8-bishop that should be brought into the game at some point. The text move suffocates the bishop and creates disharmony within the position. A better plan would have been Bd6 followed by Qb8, taking control of the h2-b8 diagonal and eyeing the f4-square.
- Nce2?
Missing his chance. White should have played the practical Qd3! which simultaneously attacks the undefended a6-pawn and threatens Nh5, a move that would create chaos on the kingside with sudden mate threats.
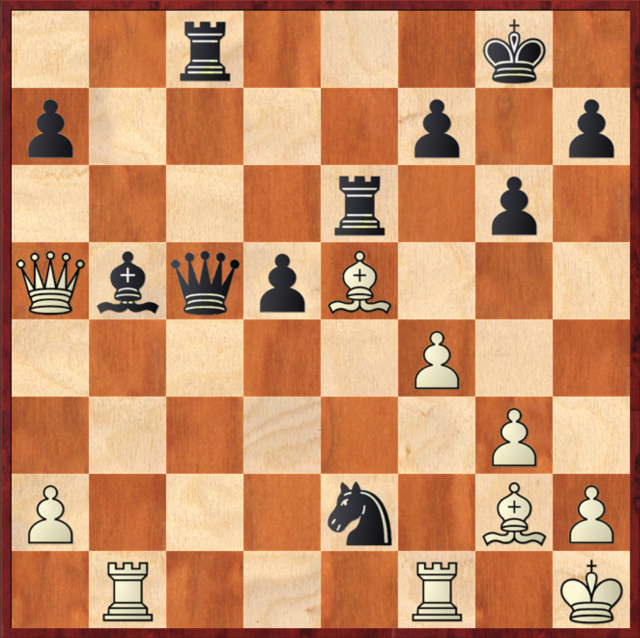
- … Qa8 26. Rc3 Rc8 27. Qc2 Rxc3 28. Qxc3 Qc6 29. Qxc6 Nxc6

Let’s stop for a moment and take stock. In a flurry, the remaining major pieces dropped off the board, and we are left with an endgame where all of the minor pieces are still left on the board, which is very rare. The black knight has returned to c6, allowing the f8-bishop to finally see light again. The pawn structure is virtually identical for both sides, with each side having 3 pawn islands, one of them being an isolated queen pawn. If a couple pair of minor pieces were already off the board, this game would be very close to a draw already. Yet, this is not the case, so there is still a game left.
- Nf4 Bd6 31. Nd3 Ne7
It shouldn’t make too much of a difference, but I do believe that it was important to prevent a piece from invading on e5. This knight maneuver voluntarily takes a defender off of the e5 square, and just like last time, it is unclear where exactly this knight is going from here.
- Ne5 Bb5 33. Bc2 Nd7?!
It’s almost like a mirage about Black’s light-squared bishop. It seems so wide open and that it controls a lot of space, but in reality, it only has one “safe” square other than the one it is occupying right now, and that is e8. And, unfortunately, Black probably had to play a move like Be8 in order to safeguard the bishop. Black must have played Nd7 believing that White had to do something about the e5-knight right then and there, but White capitalizes on this error cleanly.
- a4! Bc6 35. Nf5!

This is a funny looking position, not gonna lie. Discussing the geometry of it would be pretty cool, but at that point, we would be going off on a tangent. In all seriousness, Black is able to navigate the complications and find the best continuation, but White will emerge with the bishop pair in a positionally-superior position.
- … Nxf5
Another possible continuation would have been 35. … Nxe5 36. dxe5 Nxf5 37. exd6 Nxd6 38. Bxb6 where White is still slightly better.
- Nxc6 Ne7 37. Nxe7+ Bxe7 38. Bd3 a5 39. Bb5 Nf6 40. Bg3

White is positionally dominating this position. The bishops rake into Black’s position and there aren’t many useful squares for Black’s pieces. While this position isn’t completely lost for Black yet, he is certainly losing the thread on the position, as a single misstep will prove costly. It’s as if Black has to walk a tightrope for the rest of the game.
- … Bd8
Only move to avoid material loss.
- Kf2 Kf8
Maybe not the best plan, as the king still can’t progress very far. Perhaps black could have thought about activating the king with g5 and Kg7, but it still doesn’t change much. What’s unfortunate for Black is that he can’t even kick White’s dark-squared bishop off the h2-b8 diagonal with a move like Nh5 since the bishop can hide with Bb8 and absolutely nothing can touch it.
- Bd6+ Be7
This move loses a pawn, although it’s hard to criticize Black at this point. Moving the king right back to g8 would have saved material, but it doesn’t get Black anywhere. Even though this would have objectively been the better move, it’s no fun to sit around and wait for your opponent to walk his king over to the queenside and gobble up your pawns.
- Bc7 Bb4 44. Bxc7 Ne8 45. Ke3 g5 46. Bc5+

White trades into a pure bishop v. knight endgame where he has the superior minor piece and a pawn to the good. Now, it is just a matter of technique.
- … Bxc5 47. dxc5 Nc7 48. Kd4 Ke7 49. Bd3 Ke6 50. g3 f5 51. h3 h5 52. g4

Forcing open lines on the kingside and allowing the bishop to penetrate. With the d5 pawn on a light square and no way for black to protect the d5 pawn and simultaneously drive the White king away from d4 quickly enough, it is only a few moves until White will win more material.
- … fxg4 53. fxg4 h4 54. Bh7 Kd7 55. Bg8 Kc6 56. Bf7

Zugzwang. White is clearly winning now, so the rest of the game will be provided without notes.
- … Na6 57. Bxd5+ Kd7 58. Be4 Nb4 59. Ke5 Nc6+ 60. Bxc6+ Kxc6 61. Kd4 Kc7 62. Kd5 Kd7 63. c6+ Kc8 64. Kd6 Kd8 65. c7+ Kc8 66. b3 1-0
An unfortunate but very instructive loss for Michael, who went on to play a very nice rest of the tournament and gain rating. There were definitely a few key points that we can take away from today’s game.
- Endgames, endgames, endgames! It is perhaps the most important phase of the game, but it is also the least studied. Many games come down to the wire in the endgame, and one has to know as much as possible about the endgame in order to avoid making mistakes in textbook positions. We saw in this game how one mistake was all it took to take a potential draw into a loss.
- Bishop pair – It has been said an innumerable number of times in the past, but the bishop pair has a lot of value to it. In a relatively open position with weaknesses, the two bishops can come to life and can even decide the game in some cases. We saw in today’s game how White’s two bishops together restricted both of Black’s minor pieces and even the king to an extent.
- Middlegame plans/ideas – When playing an opening, it is important to know the specific ideas, maneuvers, and plans associated with the opening in the middlegame. In today’s game, we discussed how a common idea is to trade off at least a pair of minor pieces early with the Re8, Ne4 idea. Instead, Black went with a fianchetto of the c8-bishop, which led to a somewhat awkward position later in the middlegame.
Hopefully, the topics we covered today will help you in your future games! I wish Michael and everyone else good luck in their future games, and, as always, thanks for reading! I’ll see you next time.


 You may have heard of
  Growing up with chess.com, I grew up with videos from Grandmaster Eugene Perelshteyn! Luckily enough, GM Perelshteyn has started his own website,
  The last time we heard from Kostya was back in April for the Reykjavik Open when
  David is no stranger to Chess^Summit – in fact he’s been an author for us since last October! Since joining with us,