Short Stalemates!

Some of my friends on chess.com were discussing short stalemates a couple months ago, and I thought that you may find some of them interesting.

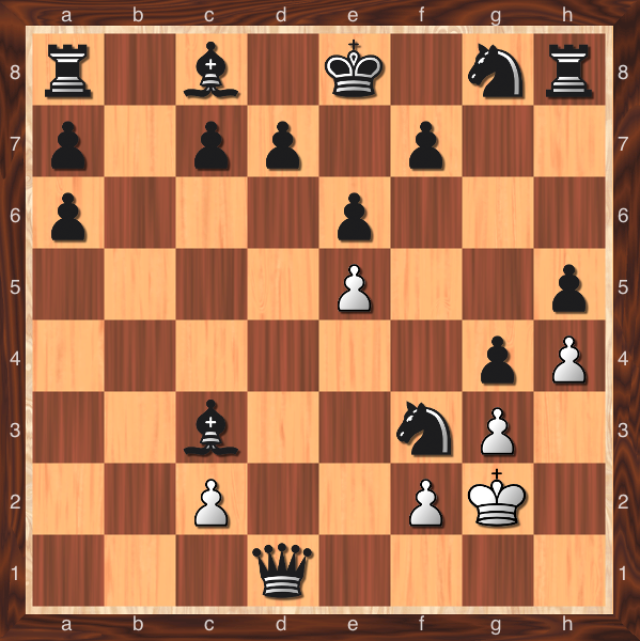
Rather than going over more games I decided to try something different before I leave for the Potomac Open tomorrow. Here’s a famous stalemate in just10 moves!

Screen Shot 2014-07-31 at 8.21.35

1.e3 a5 2.Qh5 Ra6 3.Qxa5 h5 4.h4 Rah6 5.Qxc7 f6 6.Qxd7+ Kf7 7.Qxb7 Qd3 8.Qxb8 Qh7 9.Qxc8 Kg6 10.Qe6 1/2-1/2

Crazy, right? Here’s another one where white gets stalemated and no pieces are captured!

Screen Shot 2014-07-31 at 8.26.31

1.e3 a5 2.Qh5 Ra6 3.Qxa5 h5 4.h4 Rah6 5.Qxc7 f6 6.Qxd7+ Kf7 7.Qxb7 Qd3 8.Qxb8 Qh7 9.Qxc8 Kg6 10.Qe6 1/2-1/2

This next one is under 20 moves, but still impressive.

Screen Shot 2014-07-31 at 8.38.30

1.e4 e6 2.b4 Bxb4 3.a3 Bxa3 4.Nc3 Bxc1 5.Ra3 Bxa3 6.Qc1 Bxc1 7.Ke2 Bxd2 8.Kf3 Bxc3 9.e5 Nc6 10.Ba6 bxa6 11.Ne2 Qh4 12.Nd4 Qxd4 13.h4 g5 14.g3 h5 15.Rd1 Qxd1+ 16.Kg2 g4 17.Kh2 Nxe5 18.Kg2 Nf3 1/2-1/2

Have some short stalemates that you would like to share? Feel free to enter them in the comments section!

Potomac Open This Weekend!

946579_293017720833904_911374092_n

Well, I’m playing in the Potomac Open this weekend, making it my first tournament since the World Open last month. I’m playing in the U2100 section, and shoud be a fun section for me. Here are some of my goals for myself in Rockville:

1) No more draws

Not that draws are bad, but when you’ve drawn 7 straight games, you kind of get bored of getting the same result. In my last 10 rated games, I haven’t lost a single round, but it would be nice to improve my tally in the win column.

2) Hat Trick or Better

I’m aiming for 3/5 and above, which would be the first time I’ve scored over 50% in an adult tournament since the Northern Virginia Open (excluding the World Open and small tournaments). I hope that as a result of playing higher rated competition, I can finally start climbing the Candidate Master barrier.

3) Play More Aggressively

Getting 7 draws in a row at my level is not a sign of two players playing brilliantly for 7 consecutive games, it means that opportunities were missed. If I want to do better, I’m going to have to push myself to find strong options every move. I broke 2000 this past week on chess.com, so hopefully that’s a good sign.

Are you playing in the Potomac Open? What are your goals for this weekend? Good Luck!

Going Out of Book

While some players focus on learning and memorizing opening theory, others look for shortcuts out of it. If you like less popular lines or even novelties, it is very important that you consider the main opening principles: develop, get the king safe, and find critical squares to control (A lot of coaches will say the center, but it may vary. For example in the Bg5 Najdorf lines, Black focuses more on queenside expansion). In this game, I caught my opponent by surprise with an odd knight move in the opening.


Steincamp – McDougall (Old Donation Fall Scholastic Quads, 2013)

Heading into this game, I knew two things: the time control is G/60 and my opponent was 2100+. For me, I knew that short–time controls were not optimal conditions for me, especially against a high rated player. After a couple moves, I elected to go out of book in order to head straight into the middle game without wasting time in the opening. This may not be the best mentality, but I had looked at this novelty before the tournament, so I was comfortable with the idea.

1. c4 Nf6 2. Nc3 c6 3. d4 d5

4. Bf4 I opted against the main line Tartakower 4. Bg5 to avoid theory. My idea is I want to trade dark squared bishops, making my opponent’s dark squares weak and emphasizing his bad c8 bishop. This positional idea is very similar to the Stonewall Dutch because while Black’s f7 pawn is not on f5, he still has the same bad c8 bishop. Against a Stonewall, White usually tends to trade off the dark squared bishop from a3 or f4, so here I opted for the same trade.

4…e6 5. e3 Bd6

6. Nh3?! This is the move. Up to this point, this game was a typical Slav Queen’s Gambit, but this changes the game a little bit. I figured that since the dark squared bishops were going to be traded, I might as well keep the tension than allow Black to develop his queen. If Black takes on f4, I will recapture with the knight, and if not I will take on d6 and then play Nf4. Perhaps from there, relocating the knight to d3 and then e5. The problem with Black’s position is that he has to take on f4 at some point to continue his development. In these QGD/Slav lines, Black usually plays Nbd7, but here, that is not possible until the bishops are traded.

6…Bxf4 7. Nxf4 Nbd7

8. cxd5 Probably too early. Right now, I have a positional advantage because my bishop on f1 is much better than Black’s on c8. While it is not a bad move, this allows for …exd5, opening up the bishop. Here both 8. Qc2 or 8. h4 would have been interesting waiting moves, as they both keep the tension in the center.

8…exd5 9. Bd3 Nb6 10. O-O

10…Qd6 While I went out of book with an unorthodox approach, I still have a respectable position. While Black has equalized, I got a very playable position using very little time on the clock.

11. Qf3

11…Bg4 Black’s problems begin now. If we go back to the main opening principles, one of the most critical points is to get the king safe. While this position has the famous Carlsbad pawn structure, Black should castle kingside, and attack on the queenside. In this position, my pieces are better placed than Black’s. My plan is to slide the queen over to g3, threatening Nfxd5 with discovery on the queen. Black will have to spend a tempo moving the queen, giving me time for a dramatic h–pawn push. While this will not win yet, it is clear I have faster play on the kingside, whereas the slow minority queenside attack doesn’t necessarily yield any benefits.

12. Qg3

12…g5?? Missing the point. Black was hoping to trade queens and perhaps reach a position where he has the better bishop but…

13. Nfxd5!! Qxg3 14. Nxf6+ Ke7

15. fxg3 Defending the knight! The game is over. I played very cautiously for the remainder of the game in order to limit my opponent’s counter play, but since he could not do much in the position, it was probably not necessary. When you reach a position like this and don’t see an immediate win, the key is to slowly improve your position and eliminate all hope for the opponent.

15…Be6 16. Nce4 h6 17. b3 Rad8 18. Nc5 Bc8 19. Bc4 a6 20. Rf2 g4 21. Raf1 h5 22. Nxh5 f5 23. Ng7 Rh7 24. Nxf5+ Ke8 25. Bg8 Rc7 26. Nd6+ Ke7 27. Rf7+ Kxd6 28. R1f6+ Be6 29. Rxe6+ Kd5 30. Rf5# 1-0

And in just thirty moves, I found victory. I wouldn’t say that it is all because 6… Nh3?! is aggressive (its probably more drawish), but, by playing consistently. My developed pieces were able to formulate a plan, and even made it possible to find a tactic! If you play coherent chess in the opening, you should always be able to reach a playable position. Note how in this game, I played and completed all of the basic opening principles, whereas my opponent never got his king safe. My opponent probably knew all of the main line Slav lines better than I do, but by going out of book, I got to focus more on playing good chess rather than relying on opening preparation.

How to Swindle

If you’ve been playing competitive chess for long enough, you’ve probably heard of  someone “swindling” their opponent. What does that mean? Swindling is winning or drawing a completely lost game. While rare at the Grandmaster level, often times in amateur play players will make catastrophic mistakes, throwing away winning games (this is why some coaches stress not resigning in scholastic play).

Making your opponent play out until a complete win is a good practice. However, if you are not finding ways to get back into the game, you are just wasting your time. In the game I will show, I played a absolutely atrocious opening, but found a way by creating opportunities. Remember, when you are losing, go crazy!

Steincamp – Thonglee (National High School Chess Championships, 2014)

1. c4 Nf6 2. Nc3 g6 3. d4

3…d5 A Grünfeld Defense. When I played this game, I liked the f3 systems against this opening, but because I did not follow the correct move order (1. c4 Nf6 2. d4 g6 3. f3), I will not get the same kinds of positions.

4. f3 c6 5. Bf4 Bg7 6. e3 O-O 7. Bd3 Nbd7 8. cxd5 Nxd5 9. Nxd5 cxd5 10. Qb3

10…Qa5+ Black already has won the opening battle. It is becoming clear that this position will become at least semi–open, leaving my king exposed.

11. Kf2

11…e5! The right idea!

12. dxe5 Nxe5 13. Bxe5 Bxe5 14. Rd1 Be6

15. Qa3 A sad concession. The threat of …d4 is overwhelming, and I need to get my opponent’s queen off the board.

15…Qxa3 16. bxa3 d4 17. exd4 Bxd4+

18. Kg3?! An odd try. However, from here, my king is not easily attacked.

18…Bxa2 19. Ne2 Be5+ 20. Kf2 Rad8 21. Be4 b6 22. h4 f5 23. Bc2 Bc4 24. Rhe1 Rfe8

25. h5! In this position it is clear that I am much, much worse. So I have to find ways to create weaknesses. By making this move, I aim to improve my light squared bishop.

25…Rxd1 26. Rxd1

26…Bxe2?? The pair of bishops is worth a lot more than my extremely weak a3 pawn. Here while my opponent wins material, heads into an opposite colored bishop ending. That being said, it is still not a draw, black has two strong passed pawns on the queenside. This will make it difficult to play for a draw. I need to avoid trading rooks and attack the light squares on the kingside. Remember, when you have an opposite colored bishop game, attack the color squares of you bishop, it will be much more effective. This by no means is a winning plan, by I can create respectable counter play at the least.

27. Kxe2 Bd6+ 28. Kf2 Bxa3

29. Rd7 Goal #1 is complete – Activating my pieces. In a worse position, you cannot afford to sit back and play passively. In this position, my opponent would just push his pawns. Note that a1 is the color of his bishop so that makes my life so much more difficult.

29…Bc5+ 30. Kg3 a5

31. Bb3+  Goal #2 is complete – Make forcing moves. Here if Black opts for …Kf8, I can score a quick draw, which considering the position, will be a good result for me. These kinds of positions tell you a lot about your opponent. 31… Kh8 is not a fun move to make, but means that my opponent wants to win (and should). However, by making forcing moves like this I have now created a box for my opponent’s king. If I can’t get a draw in this ending, then I should at least try to checkmate my opponent!

31…Kh8

32. h6! Goal #3 is complete – Put pieces around the enemy king. I’m still not able to make any concrete threats, but at least I can control more squares around the enemy king. Note that if the rook leaves the 8th rank I can checkmate him.

32…Be3?  I was expecting 32… Bf8 which is much stronger. Again, I am still losing, so my opponent should find ways to breakdown my counter play most effectively. If he played this, I would have responded 33. Rb7, with a pawn trade maximizing my drawing chances. My computer seems to think 33… b5 is the best move, as it taunts my limited play here.

33. Bf7!  The critical intermezzo, getting the rook off the e–file for the following sequence of moves.

33… Rf8 34. f4 g5

35. Kf3! The only way to attack black. It is becoming clear that if I do not win now, I will lose the game entirely. By attacking the bishop, I force 35… Bxf4, giving me the tempo to play 36. g4! holding Black’s pawn on g5, making it impossible to win the h6 pawn.

35…Bxf4 36. g4 fxg4+

37. Kxg4 Goal #4 is accomplished – Open the enemy king! Now I can attack h7 (which is a light square) and perhaps create a passed pawn of my own! In this position, I have improved my chances of getting a result significantly.

Rb8 38. Bb3 b5 39. Bc2

39…Rc8 My opponent offered a draw here. And well, as tempting as it was, I decided against taking the draw. In a position like this, if your opponent offers a draw, it is a clear sign that he has given up on winning. Because of that, I decided to see what I could do to change the position.

40. Bf5! Not 40. Bxh7. I need to keep my pieces coordinated. Putting my bishop on h7 means putting it out of the game for one move. I need to take the h7 pawn with my rook, and I don’t need to worry, its not going anywhere.

40…Rb8 41. Rxh7+ Kg8

42. Rg7+ According to my computer, I have achieved complete equality, yet it seems like its easier to play with White now.

42… Kh8 If I were Black, I may tried in going in the other direction with 42… Kf8, the only problem is that then my h–pawn becomes a serious factor.

43. Ra7 My last few moves have all been forcing, allowing me to really improve my position.

43…a4

44. Kh5! Bringing in the last piece. I’m going to need all of my pieces to checkmate my opponent, even my king.

Be3 45. Re7

45…Bf4??  The critical mistake I needed to complete the comeback. Now my king can get to f6 without worrying about an annoying bishop. Mate is around the corner.

46. Kg6 Goal #5 Complete – Create a Mating Net. 46. Be6 first would have been much better since it takes away the option of …Rg8+.

46…Rb6+ 47. Be6 1-0 Checkmate is inevitable, so my opponent resigned.

I didn’t win this game because of opening preparation or perfect endgame play. I won because after 26… Bxe2 I identified a plan that created active play, and stuck to it. In order to be successful at going crazy, you have to find basic principles that can help you find an edge. For me, it was identifying that opposite colored bishops made my opponent’s light squares very weak, and then making my pieces active enough that I could control them.

Feel like I missed something? Feel free to comment below!

Building Up Your Tactical Arsenal

Rather than going over another game today, I figured that it might be better to give a study recommendation. I’m sure that everyone has heard of Lazlo Polgar’s famous book, 5334 Problems, Combinations, and Games, and furthermore, I’m willing to bet a fair number of people own it! The reason why I want to talk about this book today is to break down how you should use it.

If you are a student of mine, you know I emphasize that you should study from this book every day. Polgar’s puzzle book offers puzzles, but if done consistently, teaches patterns as well. Write down your answers on a sheet of paper, and then check your answers when you are done. Below is my breakdown of how many of each type of puzzle to do. Keep in mind, you do not have to limit yourself to 16 puzzles, feel free to do more, but I recommend keeping these proportions on a day to day basis.

Rating: unr – 300 (20 minute time limit)

Mate in 1s: 13

Mate in 2s: 3

Mate in 3s: 0

If you fit in this rating range, its really important to understand all of the basic checkmates. By doing 13 mate in 1s everyday, you will force yourself to look for forcing moves, which is critical for improvement. Three mate in 2s everyday will allow you to apply your knowledge of forcing moves to slightly more complicated puzzles.

Rating: 300 – 550 (25–30 minute time limit)

Mate in 1s: 6

Mate in 2s: 10

Mate in 3s: 0

Getting into this rating range means that you recognize basic mating patterns and are ready for a bigger challenge. Mate in 2s may seem easy at first, but the further you get into the section, the more difficult the problems become.

Rating: 550 – 750 (40 minute time limit)

Mate in 1s: 0

Mate in 2s: 13

Mate in 3s: 3

Tactical patterns are now the most important aspect of your improvement. Continue doing mate in 2s but dabble in the mate in 3s section a bit! Try to become more efficient, you need to average 2.5 minutes a problem!

Rating: 750 – 900 (50 minute time limit)

Mate in 1s: 0

Mate in 2s: 8

Mate in 3s: 8

Odds are you’re starting to win games thanks to your tactical expertise, but that doesn’t mean you are done! Mate in 3s should prove far more challenging, but will help you understand famous mating patterns. I would say aim for under 2 minutes for the mate in 2s, a little over 4 minutes for the mate in 3s. If you have both leftover time and 100% accuracy, that is a sign for great things to come!

Rating: 900 – 1100 (65 minute time limit)

Mate in 1s: 0

Mate in 2s: 4

Mate in 3s: 12

Studying chess is time well spent, but you have to make the most out of it. Skip to the last few mate in 2s (Puzzle #3169 is a good starting point) if you haven’t gotten that far yet, as some of those problems are trickier than the mate in 3s (Hint– Not all the first moves have to be forcing)! As you do more mate in threes, you’ll learn more patterns, meaning more wins. I would shoot for less than 3 minutes for mate in 2s, roughly 4 minutes for mate in 3s.

Rating: 1100 – 1300 (48 minute time limit)

Mate in 1s: 0

Mate in 2s: 0

Mate in 3s: 16

Learning these patterns is integral to becoming 1400. At this point you need to only focus on mate in 3s, but here’s the catch: 3 minutes a puzzle for a total of 48 minutes! Hopefully you’ve seen many of the patterns already, as they will be repeated over and over again throughout the book. Efficiency eclipses tactical vision now, as you have to imagine you are in a tournament game and facing time trouble.

Rating: 1400+

If you’ve been using this book correctly, you have a solid base of tactical knowledge. However, as you may have already found out, you need to expand your studying beyond tactics: openings, endgames, positional play. If you want to keep tactics in your studies (like you should!) I’d recommend Artur Yusupov’s nine book series Build Up Your Chess! This is a good next step as it challenges you with tactics, endgames, and some intriguing positional concepts.

Have your own way of breaking down your studies? Feel free to comment below!

The Weakness on the Kingside

In some openings, a player may play h3/h6 to prevent the bishop from pinning a knight to the queen. For many openings, this is standard, but once that player castles on the kingside, h3 becomes a target. When I coach any chess player, I make sure he knows to avoid moving pawns in front of their castled king, because it begs for trouble (except for fianchettoing of course). Don’t believe me? Here is some proof of some botched kingside pawn structures:

Wang – Steincamp (Virginia Open, 2012)

1. e4 c5 2. Nf3 d6 3. d4 cxd4 4. Nxd4 Nf6 5. Nc3 a6 6. Be3 e5

7. Nf3 This is not typical, main line is 7. Nb3. This gives white the option to play f2–f3 and g2–g4 to attack the kingside.

7…Be7 Because my opponent has deviated from book, 7… Be6 is a positional mistake because 8. Ng5 results in either a loss of a tempo or the loss of the bishop pair.

8. Bc4! Good move, my opponent immediately takes control of the g8–a2 diagonal, making it difficult for me to develop my bishop.

8…Nc6

9. h3 This move is strong as long as white castles queenside. The idea is obviously to eliminate …Bg4, so I can’t say this is a mistake.

9…O-O

10. O-O? A strategic mistake, as now h3 is a target for my poor light squared bishop. 10. Qd2 would have been an interesting try for white.

10…Bd7 11. Nd5 Nxd5 12. Bxd5

12…Qc8 Without any hesitation, I immediately created a battery to attack h3. I’m not threatening to take yet, but I’m planning …Kh8, …f7–f5, and potentially a rook lift.

13. h4?? My opponent flinches. There was no need to try this yet, 13. Qd2 would have been interesting.

13…Bg4 14. Bg5 Bxg5 15. hxg5

15…Nd4 Right now, my game plan is just to ruin my opponent’s kingside. Forcing him to move pawns in front of his king will win me this game.

16. Qd3 Bxf3 17. gxf3 Qh3!! 18. Bxb7 Rab8 19. Bxa6 Nxf3+ 20. Qxf3

20…Qxf3 –+ The game continued for a few more moves before I found checkmate. 0-1

While my opponent helped my attack, I was able to win because he created holes in front of his king. What many players don’t understand about playing h2–h3 in front of the castled king is that it creates 2 targets, the h3 pawn AND the h2 square.

This next game I played against a much stronger opponent, and while I should have lost, a weak kingside gave me a thematic tactical resource.

Katz – Steincamp (Maryland Open, 2012)

1. Nf3 c5 2. c4 Nc6 3. b3 g6 4. Bb2 Nf6 5. e3 Bg7 6. d4 cxd4 7. Nxd4 O-O 8. g3 Nxd4 9. Qxd4

9…Nh5?! Not necessary at all. If I were to play this position now, I would opt for 9… d7–d5, taking advantage of the undeveloped b1 knight.

10. Qd2 Bxb2 11. Qxb2 d5 12. Qc3 dxc4 13. Bxc4 Bg4 14. Nd2 Rc8 15. Qb4

15…a5 This move shows that I was worried about Bxf7+ with the discovered threat on the g4 bishop. What I didn’t see was 15… b6 16. Bxf7+ Rxf7 17. Qxg4 Rxf2!! and if White tries to take the rook, Qxd2+ followed by Qxe3 will blow open the position in my favor decisively.

16. Bxf7+ Rxf7 17. Qxg4 Rc2 18. Qd4 Qc8

19. O-O Here we go. White has a weakness on the kingside because he doesn’t have a light squared bishop. As of right now, White has weakness on f3, h3, and g2.

19…e5?! Not necessary. The idea is to remove the defender on the knight. One key idea I heard a few years later was to not try silly tactics on your opponent. This move weakens me more than my opponent.

20. Qd6 Qf5 21. e4

21…Qh3 Not threatening anything yet. 22. Rfc1 should solve any problems, but like last game, pressure on a weak king results in passive play, and passive play leads to blunders!

22. Qd3?? Nf4!! 0-1 My opponent resigns on the spot, the knight controls all of the weak squares in white’s kingside. Meanwhile white cannot take the knight or the rook.

This game was very scrappy, and frankly I played subpar, but that being said, recognizing the weaknesses on the kingside won me this game.

The next (and final) game, is probably the most strategic of the three. I personally believe that this is one of the best games I’ve played in my career.

Steincamp – Chrisney (Eastern Open, 2013)

1. c4 Nf6 2. d4 e6 3. Nc3 Bb4 4. a3 Bxc3+

5. bxc3 This is not my line of choice, but I knew how my opponent would respond, so for the most part, this is preparation.

5…O-O 6. f3 d6 7. e4 Nbd7 8. Bd3 e5 9. Ne2 c5

10. d5 Waiting for my opponent to play c7–c5 is essential. If I had not waited, my opponent would have the resource of Nc5.

10…Kh8 11. O-O Ng8 12. f4 Qe7

13. f5 My opponent has played very passively, allowing me to have a significant space advantage.

13…Ndf6 14. Ng3 Bd7

15. Bg5! This key idea is called a provocation. The idea is to provoke my opponent to play h7–h6, creating a weakness in front of the king.

15…h6 16. Be3 Nh7 17. Qd2 Qh4

18. Nh1! The best idea from me in the game. My goal is to attack h6 so I will rook lift, and maneuver my knight to f2 and then g4.

Qe7 19. Rf3 Nhf6 20. Nf2 Rfb8 21. Rh3 Qf8

22. g4 A dream position for me. I will attack the h6 pawn with my g–pawn.

22…Kh7 23. g5 Ne8

24. gxh6 I think I could have waited and played 24. Ng4, but this works well.

24…g6 25. fxg6+ fxg6

26. Rf1 Not even worrying about my rook on h3. I am inviting 26… Bxh3 27. Nxh3 rerouting the knight on g5.

26…Nef6 27. Rf3 Qe7 28. Nh3 Bxh3 29. Rxh3 Rf8 30. Bg5 Qd7 31. Rhf3 Qg4+ 32. Qg2 Qxg2+ 33. Kxg2 Rf7 34. Bxf6 1–0

An easy, but fun win for me. By creating holes in my opponents position, I was able to win a piece. This was a much more thematic and strategic way to attack the weaknesses on the kingside. If you bring over pieces to attack, then your opponent will buckle and crack under pressure. FM Mike Klein once said in a seminar I was in, “If you put pieces near the enemy king, good things will happen.” I think that this mentality is exactly what is needed when attacking weak pawn structures in front of the king.

Feel like I missed something? Feel free to comment!

Need a Little Crazy?

Freiberg Study

The following is a study from Christoph Freiberg in 2006. While the likelihood of this kind of position occurring in an actual game is highly unlikely, I think this puzzle does a great job of showing the power of forcing moves. Before you look at the answer, its White to move and win, do you think you can solve it?

Answer:

1.Nd6+! Bxd6 2.Rc4+! dxc4 3.Qd4+!! Kxd4 4.Ne2+ Ke4 5.Nxg3+ Kd4 6.Ne2+ Ke4 7.Nxc3+ Kd4 8.Nxb5+ Ke4 9.Nxd6+ Kd4

10.Nb5+! Not 10. Nxf5+??, the bishop on f5 actually limits the black king’s mobility, eliminating it would give black an escape square.

Ke4 11.Nc3+ Kd4 12.Ne2+ Ke4 13.Ng3+ Kd4

14.Nxh1 While there is still chess to play, white’s passed pawns are simply too much for black to handle 1-0

Due to the limited space of Black’s king, White can impose his will onto the position despite a significant material disadvantage.

Learning from a Tough Loss

Everybody loses, but learning from those games makes you a winner. In today’s post I want to show a game that I lost but in return taught me the fundamental thematic ideas in the King’s Indian Defense.

Heading into this game, I was 1.5/3 at the National Chess Congress in Philadelphia, so for me, this was a must win game. Back then, I didn’t play as aggressively, but in this round I just attacked and attacked. While I lost, I discovered the importance of thematic ideas.

Adelson–Steincamp (National Chess Congress, 2012)

1. d4 Nf6 2. c4 g6 3. Nc3 Bg7 4. e4 d6 5. Nf3 O-O 6. Be2 Nbd7 7. O-O e5 8. d5 Nc5 9. Qc2

9…Ne8 Up to this point so far so good. Unfortunately, my knight on c5 was easily attacked later in the game, and cost me a bunch of tempi. Because of this game, I learned that I should play a7–a5 to solidify my knight on c5 and sustain pressure on e4.

10. Nd2 f5 11. f3

11…f4! This is a critical pawn push in many closed positions. The idea is to close off the White pieces from the kingside.

12. b4 Na6 13. a3

13…h5?! This is in the right spirit, but not the most efficient or orthodox way to attack the kingside. I need to play …Nf6 followed by a g–pawn push. By moving the knight, I would have brought in an additional piece.

14. Nb3

14…h4? Not a blunder, but terribly inefficient. Having moved the h–pawn, it makes my kingside attack awkward.

15. Na4 Nf6 16. b5

16…Nb8 Not a fun concession. By allowing White to attack my knight, he has successfully expanded the queenside and is ready to attack. If anything, he is slightly better.

17. c5 Nh5 18. Bc4 h3 19. Na5 b6 20. Nc6 Nxc6 21. dxc6+ Kh7 22. cxd6 Qxd6 23. Rd1 Qe7 24. Bd2

24…hxg2? White doesn’t have to take. In fact, by keeping his king on g1, he is perfectly safe. Meanwhile I had missed 25. Bb4.

25. Bb4 Qh4

26. Nc3? A good bluff from me scared my opponent. White should have taken the rook since my bishop would not be able to go from f8 to c5 because of the knight. However, by moving the knight to c3, White actually makes it impossible to take the rook. 

Bh3 27. Nd5 Rac8 28. Be7 Nf6 29. Qb3 Rfe8 30. Bb4 Bf8 31. Nxf6+ Qxf6 32. Rd7+ Kh6 33. Rf7 Qh4 34. Bxf8+ Rxf8 35. Qb4

35…Qd8?? While there is no easy win for me I am slightly better. By trading queens, I have no active pieces left, making the endgame an easy conversion for white.

36. Qxf8+ Qxf8 37. Rxf8 Rxf8 38. Rd1 Rf6 39. Rd8 Kh7 40. Ra8 Rd6 41. Bd5 g5 42. Rxa7 g4 43. Rxc7+ Kg6 44. Rd7 Rf6 45. c7 gxf3 46. c8=Q f2+ 47.Kxf2 g1=Q+ 48. Kxg1 f3 49. Qg8+ 1-0

While I lost, I learned a lot about attacking chess in this game. I saw how playing a7–a5 would have been a game changer for me, and I saw how a g–pawn push would have been much more methodical. By learning these ideas, I was able to win many games, this one a year later in Atlanta.

Jie – Steincamp (Castle Grand Prix, 2013)

1. d4 Nf6 2. c4 g6 3. Nc3 Bg7 4. e4 d6 5. Nf3 O-O 6. Be2 Nbd7 7. O-O e5 8. d5

8…a5! Not a brilliancy, but this move shows that I had learned from the previous game.

9. Rb1 Nc5 10. Nd2

10…Ne8 Unlike the other game, I can attack without worrying about my knight on c5. My position is a lot more simple.

11. b3 Because I played a7–a5, my opponent has to play the much slower b3, a3, b4 idea. This gives me more time to expand on the kingside.

11…f5 12. f3 f4 13. a3

13…b6! The simple solution. My knight will go back to b7, covering c5, making my opponent’s life even more difficult.

14. b4 axb4 15. axb4 Nb7 16. Nb3 Nf6 17. Bb2

17…g5! Again this is a much more effective way of undermining f3.

18. Ra1 Rxa1 19. Qxa1 g4 20. Rc1 gxf3 21. Bxf3 Ng4 22. h3

22…Ne3 Because I played the right idea, my attack is much more effective. Now I have an outpost on e3.

23. Ne2 Qg5 24. Kh2 Qh4 25. Nd2 Nd8 26. c5 bxc5 27. bxc5 Nf7 28. cxd6 cxd6 29. Rg1 Ng4+ 30. Bxg4 Bxg4 31. Qe1 Qh5 32. Nc3

32…Ng5 I have more active pieces, and while the game isn’t won yet, its much easier to play with black.

33. h4 f3 34. gxf3 Rxf3 35. Kg2 Rf8

36. Rh1 If 36. hxg5? Qh3# 

36…Nf3 37. Nxf3 Bxf3+ 38. Kh2

38…Bxh1 –+ By eliminating White’s defender, I now have much more play. The knight and bishop on b2 and c3 are doing absolutely nothing.

39. Kxh1 Rf4 40. Kg2 Rxh4 41. Qe3 Rh2+ 42. Kf1 Rxb2 43. Kg1 Qh2+ 44. Kf1 Qg2+ 45. Ke1 Qh1+ 46. Qg1 Qxg1# 0-1

By learning from an earlier loss, I actually became a better player, and my understanding of the King’s Indian grew substantially. If you think the game was a tough loss, then you probably were doing something right. Analyze and figure out what you need to tweak.

Feel like I missed something? Feel free to comment below!


Playing a Good Game of Chess

In my experience, chess is defined by wins and losses, not by quality of play, especially at the scholastic level. Unfortunately, this is a grave misconception. A competitive player should let every game be a stepping stone, or a lesson. Often times I find that parents of young players react more to a result than a quality game or best effort. Typically, these parents aren’t exactly chess masters. They know what ratings are and what they mean, and they see each game as a statistic; being 100 rating points lower than the opponent is a huge disadvantage, and the higher player should always convert. This is exactly the wrong mentality, things happen and players make mistakes. For any chess parents out there reading my blog, let the coach decide if the match was well played, especially if your child is higher rated than you.

I began this post with this intro because I wanted to show that you do not have to win to play a respectable game. Today’s game is a match I played in November 2013 at the Northern Virginia Open. I was playing a 2000+ rated player, so for me, it was of the upmost importance to focus on playing the best chess I could. Even though I had just broken 1900, playing expert players was a rare opportunity. While I drew this game, it is extremely important to understand that at no point I was playing for a draw. If you play for a draw against a strong opponent, you will lose. If you play for a win against a strong opponent, anything can happen. Just make the best moves you can make and play along.

Steincamp – Lohr (Northern Virginia Open 2013)

1. c4 c5 2. Nc3 Nc6 3. g3 g6 4. Bg2 Bg7 5. e3 e6 6. Nge2 Nge7 7. O-O d5 8. cxd5 exd5 9. d4 cxd4

10. Nxd4 A different idea for me. If you read my last post, I got the idea from the Franco–Steincamp game in which I failed to find a strong defense. By playing this move, I avoid immediately accepting isolated pawns. This is important because now if Black exchanges on d4, my bishop from g2 is not blocked by the knight from f3.

10…O-O

11. Nce2 Perhaps not the best way of going about things. The bishop on g7 is becoming stronger and I didn’t accomplish anything substantial with this move. In reflection, I would have considered 11. Qb3, with the idea of attacking d5. Nonetheless, the game is still very much in the balance.

11…Qb6

12. b3?! A risky idea, but one worth trying. I have to keep an eye out for any tactics as a result of the pin. If I were a more passive player, I think I would have further delayed the development of the c1 bishop, but this position mandates rapid development.

12…Bf5

13. Ba3 Black’s pieces are better placed, but this move is certainly more challenging to deal with than 13. Bb2. By pinning the knight, I give myself time to move my rook from a1.

13…Rfd8 14. Rc1 Qa5 15. Bc5

15…b6 Black cannot take on a2, as the queen will be trapped after Ra1,  followed by Ba3. By playing b7–b6, my g2 bishop gets some more scope, and with the exception of my opponent’s isolated pawn, the pawn structures for both sides are identical. I have solved all of my opening problems, and could even be slightly better.

16. Bxe7 Nxe7 17. Rc7 Rd7 18. Qc1 Be5 19. Rxd7 Bxd7 20. f4 Rc8 21. Qb2

21…Bd6 I was fairly surprised to see this move, as the bishop was far better placed on g7. While black has the pair of bishops, it is not quite clear how his light squared bishop will join the fight.

22. a4 Qb4 23. Rc1 Rc5

24. Nc3 An important idea, as black has no entry into my position. Meanwhile, it is clear that the pawn on d5 will weigh him down.

24…a6 25. Na2 Rxc1+ 26. Qxc1 Qc5 27. Bf1

27…a5 In this position, it is very clear that the pair of bishops does not yield any advantage. This position is probably equal, but I played along to see if I could undermine his isolated pawn.

28. Qd2 Nf5 29. Nxf5 Bxf5 30. Bg2 Be6 31. Nc3 Qb4

32. Qd4 Getting out of the pin and protecting the a4 pawn in the case that b3 pawn falls. In this position, While I may finally win the d5 pawn, black will win the b3 pawn. If black trades the queen, I will have an isolated pawn, but my king and knight can protect it with ease. If 32… Qxb3 33. Nxd5 = If black takes the knight, it will be an opposite colored bishop ending, and if he refuses to trade, his b6 pawn will become a target. 1/2-1/2

I hope by showing this game I conveyed that it is perfectly possible to play a strong game of chess without getting a winning result. In this game, I challenged myself to find ways to eliminate the pressure of the g7 bishop while undermining the d5 pawn. It is extremely important to plan in chess. Find a solid plan and execute it. In this game, while I was happy with a draw, I knew that I did everything I could and a better result was not possible. Always play your best.


Beating the Lower Rated Player

Chess is tough, and a lot of it has to do with ratings. Personally, I find facing lower rated opponents more intimidating than higher rated players because there is an expectation that you win. Meanwhile, as you slowly chip away at your position, the lower rated player solidifies and plays for a draw. This can be frustrating (trust me, I know), but there are simple ways to prepare for these games without taking too much time. By going over games in which you are the lower rated player, try to understand how the opponent broke your position down, especially if they play a similar opening. Odds are, you take the same mentality when playing a higher rated player as the lower rated player takes against you.

Below I have two games, the first, in which I was the underdog (2153 v. 1799), and the other where I was the favored player (1941 v. 1476). Hopefully by reading this post, you too can learn how to strengthen your play against stronger players.

Franco – Steincamp (2013)

1. c4 Nf6 2. g3 g6 3. Bg2 Bg7 4. Nc3 c5 5. e3

5… e6 Already, this is a passive idea. This would make more sense if I could put a knight on e7, put preparing the d7–d5 push will likely leave me with an isolated pawn in the center.

6. Nge2 d5 7. cxd5 exd5 8. d4 cxd4 9. Nxd4 I think I would prefer taking with the pawn, but I actually used this line a month later at the Northern Virginia Open and drew a 2000+ rated player. By taking with the knight, white does not have a isolated pawn. However, in exchange he has a passive bishop on c1. If white can make this bishop active, then I have no compensation for my isolated pawn.

9…Nc6 10. O-O O-O

11. a4 This is an interesting idea. Usually this move prevents a b7–b5 push, but seeing as the position is open, this attack would not be a strong idea for me. White typically opts for Qb3, immediately putting pressure on my d5 pawn.

11…Nxd4 By exchanging the knights, White’s c1 bishop can get in the game. While White now has an isolated pawn, his g2 bishop is better than my g7 bishop since there is no knight on f3. Seeing that my opponent has more flexibility, he is definitely slightly better.

12. exd4

12…Be6  While it may not have been my intention, this move is not only passive, but communicates that I want a draw. 12… Qb6 may have yielded more play since 13. Nxd5 Nxd5 14. Bxd5 Qxd4 = solves my problems. White will most likely ignore the d5 pawn, but this queen move gives me some much needed development and flexibility.

13. Bf4 Nh5 14. Be3 Qd7

15. a5?! At this point I didn’t really see the idea. White is trying to open the queenside by bringing a knight to c5. This is an interesting thought, but white has plenty of time to do whatever he wants. My knight on h5 is doing very little, and my queen–bishop battery is doing nothing.

15…Rac8 16. Re1 Rfe8 17. Na4

17…Qd6 This move accomplishes nothing. For my opponent, he can take away two things. First, I don’t see his plan. Second, I don’t really know what I need to do in this position.

18. Nc5 b6 19. Nxe6 Qxe6 20. Qb3 Rc4 21. Bd2 Qd7 22. Rxe8+ Qxe8 23. Bxd5 Rc7 24. axb6 axb6

25. Ra8 White has opened this position, and has found far more active play. My passive play has resulted in an easy win for white.

25…Rc8 26. Bxf7+ 1-0

So for me, a game against such a highly rated player was rare, but my performance was extremely disappointing. However, since I play the English, I got some key take aways from this game. First, I learned that in these open isolated pawn positions, it is extremely important to activate as many pieces as possible. My opponent did a great job of rendering my pieces obsolete throughout the game, and made it hard for me to plan. Secondly, when both kingside bishops have been fianchettoed in an open position, having a knight on the f3/f6 square drastically reduces the play of the bishop. When I played this game, I should have considered this disadvantage when trying my e6–d5 pawn pushes in the opening.

These observations seem fairly basic, but in turn, I now know how to break down passive players in these kinds of pawn structures. The other thing is to keep in mind is that if I were to play a passive lower rated player as white in this kind of position. My performance in the game above is likely better than his will be. This doesn’t mean underestimate the opponent, it just means that in all likelihood that more tactical ideas will be possible in this game. After reviewing this blowout loss, I took what I learned into a game in which I was a 450+ point favorite.

Steincamp – Chen (2014)

1. c4 e5 2. Nc3 Nf6 3. g3 d6 4. Bg2

4…Be7 This move is extremely passive. There is no plan for this bishop, and frankly should have been fianchettoed.

5. e3 O-O 6. Nge2 c6 7. O-O d5 8. cxd5 cxd5 9. d4 exd4

10. exd4 So despite starting with a different opening, we have reached the same pawn structure as the previous game. Two things I should note in this position are that a) Black wasted tempi playing d7–d6–c6–d5, when he could have tried 3… d5 line. And b) Black’s bishop is misplaced since it cannot easily attack my isolated pawn, whereas my bishop is. Already I have a better position as white as my earlier opponent had against me.

10…Nc6

11. Nf4 Here I chose to veer away from the a–pawn push idea like in the other game. This mostly had to do with less than perfect position of the bishop on e7. Also I have a tactic if Black tries …Be6

11…Be6? 12. Re1 Qd7 13. Nxe6 fxe6

14. Bh3! The critical idea. By weakening his d5 pawn I was able to create an even bigger weakness for black.

14…Kf7?

15. Bg5? Too much finesse I should have just taken the pawn and gone ahead in material.

15…Rae8 16. Bxe6+ Qxe6 17. Rxe6 Kxe6 18. Bxf6 Bxf6

19. Qb3 While I have a substantial advantage, the general thematics in the position have not changed. The d5 pawn is still very weak.

19…Rd8 20. Re1+ Kd6 21. Nb5+ Kd7 22. Qxd5+ Kc8 23. Qe6+ Kb8 24. d5 Nd4 25. Nxd4 Bxd4 26. Re2 Rfe8 27. Qxe8 Rxe8 28. Rxe8+ Kc7 Following the simplification, I won a fairly easy ending. 1-0

In this game, I didn’t follow the exact plan that I had lost to earlier, but the core of my plan remained the same. Activate pieces, make forcing moves, and win the d5 pawn. By understanding how I lost to a higher rated player, I actually learned how to beat a passive player in that position. Don’t let the lower rated player scare you, and learn from your own games!

Feel like I missed something? Feel free to comment below!