Today’s video features an important game I played yesterday in the Pittsburgh Chess League. My opponent missed one opportunity to get play, but after that, all bets were off as I was left pressing in the final position.
This was a crucial fixture for the University of Pittsburgh, as the winner of the match would clinch the league title. In the end, our team won, pulling a 3-1 victory over the Carnegie Mellon alumni team.
I hadn’t planned to play a rated game until Saturday’s Pittsburgh Chess League finale, but when I got the email saying my Tuesday night class had been canceled, I quickly found myself playing an extra rated game against a local expert from Carnegie Mellon University at the Pittsburgh Chess Club.
Usually when I post a game to chess^summit, I make sure the selection has some sort of specific instructional purpose. That being said, I can’t say that this game can be marginalized into such a general category. Even though he fell behind early, my opponent did really well to hold and even missed a few chances to equalize!
So if today has a theme, let it be complicated positions. Honestly I can’t remember winning a game this difficult (and almost blowing it too!).
I think I’ve posted a few games with this set-up for White. Ideally, I’m going to place a knight on d5 and expand on the queenside. However, my opponent decided to change the pace of the game.
8…Bh3 9.e4 h5?!
Going in for the attack! Black’s intention is to open the h-file and use his h8-rook and queen to quickly checkmate my king. However, there are some downsides to this move out of principle.
1. This move doesn’t develop or get Black’s king safe.
Okay, this is obvious, but still a valid point. By postponing the fundamentals, Black risks falling behind positionally should the attack not pan out.
2. Black cannot push …f7-f5.
This is the main problem with this move. If the f-pawn is pushed, Black gives White an outpost on g5 for a knight or a bishop.
Knowing this, I opted for 10. f3, giving me the option of Rf1-f2 if needed. Furthermore, if Black tries …h5-h4, g3-g4 can now shut down the position.
10.f3 Bxg2 11.Kxg2 h4
Because of Black’s decision to attack, this must be played now. If 11… Nh6 12.h4, White stops all kingside play and has a simple lead in development.
12.g4
Not a move I was crazy about playing, but I was able to convince myself that this was right. First, Black traded off the light squared bishops, leaving the c1- and g7 bishops on the board. Black’s pawns on c7-d6-e5 are all on dark squares, making my bishop better than my opponent’s. This is important since this structure has dark-squared holes, so from e3, I can cover some of Black’s potential outposts. Furthermore, playing this move guarantees a closed h-file, limiting Black’s intentions, and leaving me with a developmental advantage.
12…h3+!?
My initial reaction to this move was to think that this was an error since it forces my king to safer waters and opens the g3 square for my knight. However, there are long-term benefits for Black! By controlling the g2 square, Black gets the counterplay he needs to stay alive in some lines – and according to the computer – enough to defend adequately.
13.Kh1 f5
I found myself perplexed by the relative speed to which my opponent was moving, but this move I felt out of principle was wrong.
As I mentioned before, the g5 square becomes weak, yet it’s not so easy to exploit. At this point, I began to look at 14. gxf5, but I didn’t like it on account of a few reasons:
1. The g-file opens
Even if this is tenable, I do feel like Black is getting the play he intended with his opening choice. With the g-file open, Black’s plan is to play … f5-f4 and queenside castle to bring his d8-rook over to g8. This is a lot of pressure, which brings me to my next point.
2. I’m not punishing Black!
Remember back when Black played 9… h5 when I said my opponent wasn’t following opening principles? 14. gxf5 not only fails to capitalize on this detail, it actually rewards Black for his play!
So this being said I played the anti-positional move
14.exf5?!
Taking away from the center! But it turns out here that matters aren’t so trivial, Black’s king is still in the center, so opening the e-file with a future f3-f4 or d3-d4 push may be lethal. It was here that I noticed that Black’s weakness wasn’t the square on g5, it was the f5 square! By taking in this manner, the structure has changed; so a pawn on g4 helps support a knight on f5 and close the g-file. As my knight reroutes to f5, my bishop will find the right moment to go into g5 and cramp Black’s position.
And the best part? 14. exf5 was one of the computer’s best moves!
14…gxf5 15.Ng3 Nd4
I thought this was Black’s best move, but there were several lines I had to consider before playing 14. exf5
The position is a little unclear here since Black can simplify, but b2-b4 is coming with a slight initiative for White.
Last Choice:
15. … fxg4 16.fxg4
As I’ve discussed in many of my posts, releasing the tension seldom leads to the best outcome. Here I have all the advantages I had a move ago, but the f-file is also open. It’s clear here that Black has simply run out of attacking resources.
So Black opted for the stingiest move, but it also once again neglects development and king saftey. Immediately I wanted to play 16. gxf5:
The concept of cousre is to break Black’s center, leaving his king out in the open. This all works if Black plays along: 16… Nxf5 17.Nxf5 Qxf5 18.f4
Because of the discovery threats on the queen, castling for Black comes at the cost of a pawn. However, not all captures are forcing! I soon realized that my dystopic outlook on the position was not only incorrect, but potentially losing after Black’s amazing resource, 16… Nh6!
This shifts the game from dynamic play to static play. With 16. gxf4? I’ve actually given up any chance of securing the f5 outpost and opened the g-file for Black’s rook. Trying to stop Black from castling with 17. Bg5 still looks grim after 17… Nhxf5 =+.
And here it’s clear that Black is simply better with no real counterchances for White.
So I had to be less direct, yet still keeping the position in a dynamic state. With my next move, I highlighted that the f5 pawn is still weak.
16.Nce2
My c3-knight was no longer planning on reaching d5 since Black can play …c7-c6 now, so trading it for Black’s best piece was appealing. Black took drastic measures with his next move, but he had several options to consider.
Scenario 1:
16… f4!
After some post-game analysis, I’ve come to the opinion that this was the best shot to equalize. While it creates light squared weaknesses, it neutralizes my grip on f5 and g5, while blocking in my bishop on c1. I had seen this during the game, and thought I had found a tactical resource in 17. Nxd4 fxg3 18. Re1 g2+ 19. Kg1 0-0-0 20. Nf5
But after some research with Stockfish, here it’s my play that’s burned out, and soon I will find that the g2 pawn is not protecting my king, it’s a protected passed pawn! All endgames favor Black here.
However, my opponent didn’t play this move when originally given the opportunity, so he must have thought the assessment was the same as before.
Scenario 2:
16… Nxe2 17.Qxe2 fxg4 18.fxg4
With evasive play, Black has avoided the loss of a pawn, but even after 18…0-0-0, my opponent will find his lack of development and counterplay concerning. My knight will find the f5 square, and my bishop, g5. White’s position plays itself.
Scenario 3:
16… Nh6?
This isn’t really a move for Black, but it does a nice job of illustrating his dilemmas after 17. Nxd4 exd4 18. Re1+
The win still needs work, but you get the idea. A trade on d4 eliminates Black’s ability to pressure the long dark squared diagonal, and opening the e-file will favor me.
So my opponent, uncomfortable with his options, played a move I hadn’t considered.
16. … Nxf3?!
The idea that opening the long diagonal will give Black strong play. However, this is the first innacuracy of the game! With this line my opponent forces me to seal in his bishop and open the e-file.
17.Rxf3 Qc6 18.Nd4!
The only way to refute Black’s play! In just a couple moves, Black will find himself much worse!
18…exd4 19.Nxf5 Be5 20.Bg5! +=
Not only is Black unable to castle, but his knight on g8 is extremely immobile. From this point on though, Black’s 12. h3+!? starts to pay off as his pressure along the light squares becomes my biggest issue.
20…Kd7
The only move from Black that doesn’t concede anything. While the f7 square becomes weak, my rook can’t get there due to the pin on the king. With the queen cut off from the kingside though, I decided that now would be the best time to drive the queen away by force.
21.b4 b5!
The best move if Black plays the continuation correctly. The idea is that regardless of what I do, Black’s queen can stay on the diagonal with the b7 (and potentially d5) square opening up. Without much to do, I made my next move, assuming my next move assuming my opponent was intending a pawn sacrifice.
22.cxb5 Qxb5?
A critical mistake! With this move, Black gives me an opportunity to move my queen away from the defence of the f3 rook, giving my a1-rook a chance to enter the fight. Black had much better in simply sacrificing the pawn and putting the queen in the center of the board.
Black really needed to try 22… Qd5 to force me to play slower.
White’s plan would be to play Qe2-e4, trade queens, and go into an endgame with small winning chances. But with my next move, my opponent realized how active I had become.
23.Qb3
Poking at the f7 square while giving my rook on a1 a chance to play.
23…Rf8
The best defense. Using the other rook doesn’t pin my knight. A sample line I looked at was 23…Rh7 24.a4 Qb7 25.Rf1, but 24. Nh4 also looked appealing, with the idea of going to g6, or bringing the rook down to f7. I hadn’t really decided since I figured the text move was far simpler for Black.
24.Rc1
Here I thought I was being smart, forcing the queen to go back to b7 instead of c6 to pin my rook, however, Black actually is in no rush to do this. In the game, I thought 24… Nf6 25. Ng7 was fine for White, putting pressure on e6, but 25… Nd5! was actually winning for Black. The computer says that after 24… Nf6, the position is about equal in other lines.
24…Qb7
So why is it so important that White convince Black to reach b7 instead of c6? Well now White has Qa4+!, and Black is forced to surrender his control of the long diagonal.
25.Qa4+ Kc8
Black is becoming passive, and if he had tried 25… c6, not only does he block in his queen, but I also have a turn-around tactic in 26. Nxd4! winning due to the attacked rook on f8.
26.Qc6=
It turns out that this simplification leads to equality since (as I soon discovered) the endgame is extremely difficult to convert.
The computer gave me an option here that holds on to my grasp on the position with 26. Rf1 Rh7 27. Kg1 getting out of the pin 27… Nf6 28. Ng3 += with a slight edge.
I do have to say, so far the game has been very complex, yet there have not been any missed tactics by either side. Coming from the position of strength, I have to say this is a testament to my opponent’s defensive resourcefulness to find holding moves each turn. However, with the queen trade on c6, I must win again – this time however with an advantage on the clock.
26. … Qxc6 27.Rxc6 Kd7 28.b5
Stopping any future a- or c- pawn advances from Black. My opponent is cramped, but with his next move, he gives up a pawn for activity, which proves to be vital for his ability to play.
28…Nh6
With pressure on g4, I decided I have nothing better than to win the pawn on d4. but to do this I must give up my bishop for a knight, and increase the Black bishop’s scope.
29.Bxh6 Rxh6 30.Nxd4
I had to make sure that this trade worked, and I think again my opponent found the best resource in 30… Rhf6. Let’s quickly look through some of Black’s choices:
30… Rxf3 31. Nxf3 Rf6 32. Nxe5+ does not win a piece! Black can prolong the fight with 32… Ke6!
…and White must stop the threat of mate on f1 with 33. Kg1, meaning that this is the position that must be understood. While Black may still be able to hold, I assessed that my advantage had increased since Black must give up the c7 and a7 pawns (the importance of a prophylactic measure like 28. b5!). Since I believed I had better winning chances, I was okay with this position.
So simplification does not come to Black’s aid. Black can’t afford to be passive either since the backward 30… Rhh8? has a tactical problem. Can you find it?
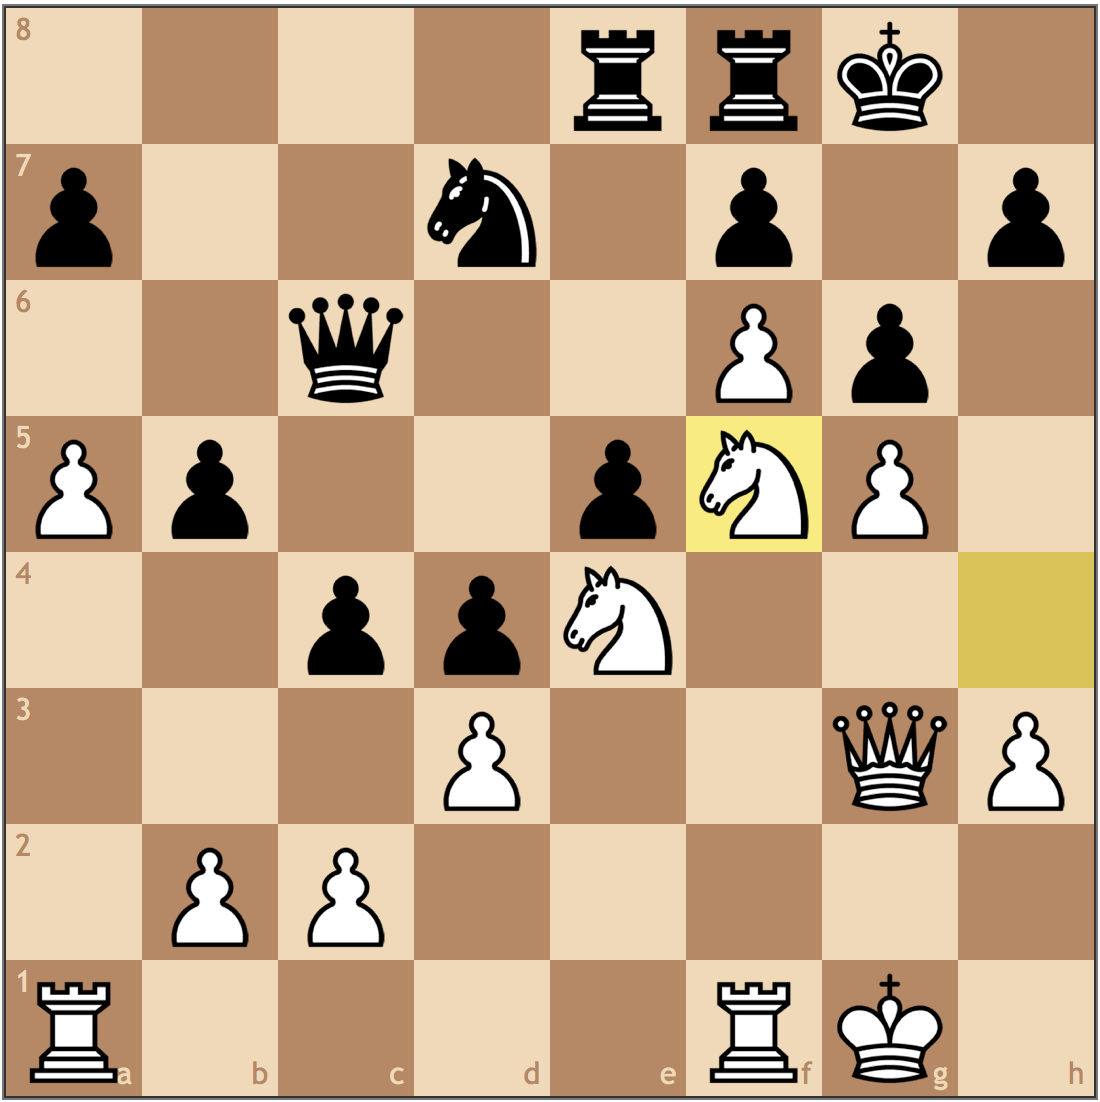
Here I had found 31. Rxf8 Rxf8 32. Rxc7+!! since now 32… Kxc7 is met with 33. Ne6+ with a winning minor piece endgame. Black can’t save himself with 32… Ke8, threatening mate on f1 and the knight on d4, because 33. Rc8+ forces a trade of rooks, and now I must find Nd4-f5, followed by d3-d4 to limit Black’s ability to attack my h2 pawn.
It’s clear that only White can be better, and of course I knew my opponent wouldn’t go for it. There was one last option I didn’t consider until after I had made my move in 30… Bxd4?! the concept being that my king is stuck on h1 and the constant threat of mate is a problem for me.
While this may be a potential drawing resource in other positions, my b5 pawn makes c7 a permanent backwards pawn and target. So in the line 31. Rxf8 Re6 32. Rc1, Black cannot both be active and defend c7 as 32… Re3 33. Rf7+ still gives White reasonable winning chances.
But as I said, I thought my opponent found the most aggressive try despite his time troubles.
30…Rhf6
My knight will return to f5 to block the f-file, after which Black can pressure the g4 pawn and emphasize my king’s awkward positioning.
31.Nf5 Rg6 32.Rc4 Rb8?
The second real mistake from my opponent (the first being 22… Qxb5). Time trouble played a large role in this decision, and now my not only will I eliminate Black’s annoying h3 pawn, I will get a rook on the 7th!
Black had much better in the more flexible 32… Rfg8 33.Ne3 d5 34.Ra4
And while Black remains a pawn down, he has reasonable drawing chances. Having a bishop in the center of the board alone should be enough compensation for the extra g-pawn, not to mention, my queenside stucture is also quite hideous.
33.Rxh3 Rxb5 34.Rh7+ Ke6 35.h3
Rather than immediately grab the c7 pawn, I thought it was important to nurture my two pawn advantage on the kingside. If Black tries 35… c5, I can play 36. a4, and only Black’s b5 rook is truly active.
35…Rb1+ 36.Kg2 Rb2+ 37.Kf3 Rxa2 38.Rcxc7
Two rooks on the 7th and my opponent in time pressure? Should be an easy win, right? Not so clear. It’s hard to secure control of the d5 square (If Kf3-e4, …d6-d5+ wins for Black), and Black does have an outside passer.
38…a5 39.Rhe7+
Believing I was winning since at the time I thought 39… Kd5 was unplayable (you’ll see shortly). I had calculated 39… Kf6, and now since the f6 square cannot be used by Black’s rook, my idea was Ng3-e4 creating a mating net while improving the overall position of my knight (I was fine with a bishop and knight trade since the resulting rook and pawn ending should be won).
39…Kd5 40.Rc4
My opponent played his move quickly, so when I dropped this and his head sunk, I thought I had won because of my mating mechanism of Nf5-e3#. Here I got up walked around to wait for the resignation but had completely had missed my opponent’s defense.
40…Rf6!
I give this move an exclamation for its psychological importance. With this oversight, I had now walked into a position I hadn’t analyzed and it felt like again, I had to start all over to win. However, with my opponent in time trouble, anything could happen so I made a waiting move.
41.h4 a4?
Black’s third mistake of the game. Advancing the a-pawn to a4 gives me a free tempo move with 42. Ra7, which is winning in all lines. Black should have also waited, but in time trouble this is hard to do, especially with my kingside pawns moving down the board.
42.Ra7 a3 43.Ra5+ Ke6
Finally, it’s starting to come together. Now with the king no longer on the fifth rank, I can play d3-d4, highlighting the awkward choice of squares Black’s bishop has.
44.d4 Bh2 45.d5+ Kd7 46.Ra7+ Kd8 47.Rb4
Missing the simplest win in 47. Ra8+ Kd7 48. Rac8, and Black must give up an exchange to stop the threat of Rc4-c7#. But at this point I was already playing my opponent’s clock – with 8 seconds left, he can never hold this, right?
47. … Rb2 48.Rxb2?? =
Here I thought that my opponent could make no progress with the b2 pawn, but with it on a dark square, his bishop can hold it until the rook comes to the rescue. So as I promised, one blunder… moral of the story? Don’t look at your opponent’s clock! If I had just spent 1 more minute, I would have realized that 48. Rxb2 allows too much play and that 48. Rba4 is a lot simpler.
48. … axb2 49.Rb7 Be5 50.Ke4 Kc8 51.Rb5
As my opponent correctly pointed out in our post-mortem, …Kc8-c7, followed by …Rf6-f8-b8, not only is the best mechanism but now I have to worry about losing the game entirely. White should be fine if I bring my king to c2, but my kingside pawns become weak and won’t be able to promote with the bishop on e5 guarding both g7 and h8. But I got lucky…
51…Rf7 52.Rxb2!
Thanks to the fork on d6, my rook is untouchable, so the endgame is now won. I can’t really blame my opponent for his mistake, but what I can say is that the mistakes will come if your opponent is in time trouble. Imagine how much less trouble I will be in if I hadn’t taken on b2!
Here my opponent resigned after realizing my rook is protected on b4, and my f-pawn is soon queening. Tough game and my opponent did well to hold, but he simply just made more mistakes than me.
As I said before this (really, really long) analysis, there really isn’t a particular theme I can sum up here. But there were some key points:
Early attacks mean neglecting development. Sometimes the best defense is to find ways to punish your opponent for not following the fundamentals.
Captures aren’t a truly forcing move. In this game, there were two points where a pawn takes pawn move could be ignored, and thus change the entire evaluation of the position.
This brings me to my next point, always evaluate who is statically better each position. This constantly changed throughout the game, so it changed the focus for each player’s goal as well.
Time trouble for your opponent is not time trouble for you! Say what you want, but I’m going to kick myself for this Rxb2 move more than I’ll pat myself on the back for winning. Next time I won’t be so lucky.
I thought this was a really interesting game, and I hope you did too. For me, winning (despite some errors) was a great way to rebound from the Pittsburgh Open and start thinking about my summer calendar – specifically the US Junior Open!
In today’s video, I review Vishy Anand’s win over Levon Aronian from the 2016 Candidates Tournament in Moscow. While everyone will be discussing Giri’s missed chance against Caruana, a lead change this late into the tournament cannot be overlooked!
I haven’t done a Free Game Analysis post in a while, so I was extremely pleased to get two game submissions this week from tournaments in both Pittsburgh and Washington, D.C. If you too would like to have your game analyzed for free by me, send your game PGNs to chess.summit@gmail.com!
Without further ado, let’s get started!
Our first game is from Joe P’s last round of last week’s Pittsburgh Open. Joe scored 3.5/5 in the U1800 section, and saw a rating boost of 71 points to break 1600! Congrats Joe!
Instinctively, I don’t like this move. Black moves the knight a second time and it’s not quite clear what the compensation is. Attacking the c4 pawn and provoking White to push it to c5 gives White a space advantage, with Black’s knight forced to move once again.
So what should Black do instead? The main lines in this position are 6…0-0 and 6… c6 with the intention of keeping a closed position, and standard QGD play. While there’s nothing objectively wrong with this, Black doesn’t score very well at the top level.
With this quick look in ChessBase’s free online Mega Database, Black only has two decisive games in the position after 6… 0-0 7. Rc1. If you look at some of the names, strong players like Sargissian, Naiditsch, and Kryvoruchko all lost to lower rated players in this line. Black’s relative passivity in this line makes life tough for Black, which is why I’m going to recommend the much more active set-up in the Ragozin. Putting the bishop on b4 instead of e7 gives Black alot more flexibility and space, and while there is plenty of theory, it’s clear that Black can play for a win in the opening.
This position gives Black a little more life. It’s important that this isn’t a true Ragozin, since Black usually keeps the option of playing …Nb8-c6 open, meeting Bg5 with …h7-h6.
7. c5 Nbd7 8. Bd3 c6 9. O-O b5?
A strategic error! With this push, we reach a padlock structure (check out the idea here). By reaching this kind of position, Black shuts down his own queenside counterplay, meaning that White is the only side that can press for the initiative. Think about it, if Black gets a pawn on b3, White can meet it with a2-a3, and if Black reaches a3, b2-b3 will shut down the queenside. Furthermore, if White does nothing, Black now has a very bad bishop on c8. Much better was 9… b6, putting pressure on the c5 pawn, while making the b7/a6 squares available for the c8 bishop to clear the way for a rook.
10. cxb6??
This move justifies Black’s play. Now when Black recaptures on b6 with the a-pawn, Black will have dynamic chances with a …c6-c5 push, as well as pressure on the a2 pawn.This brings us back to the importance of statics and dynamics. Just a move ago, White was statically better, and could simply improve his own position. However, by changing the structure and taking a dynamic measure, Black’s resulting position is vastly improved. To learn more about static play, make sure to check out my October Article!
10…axb6 11. a3 Ba6
A practical decision. Here Black trades off the light squared bishops, getting rid of his worst piece. Furthermore, this reduces White’s ability to defend squares like e4 and c4. Let’s see if this becomes an issue.
Well the typical recapture would be with the knight, right? Maybe, but I like this better. If Black can play …c6-c5, he can put even more pressure on d4 with a bishop on f6. From d7, Black’s knight not only controls e5 and c5, but safeguards the weak pawn on b6.
16. Ne2 c5 17. dxc5?
One thing I’ve discovered about lower rated play is that less experienced players HATE structural tension. In this case, Black’s bishop is opened (even with a quick cheap shot on b2!) and he trades off his last weak pawn, b6. Much better was 17. b3, preventing …c5-c4. I’m not quite sure what White intends with his knight on e2, since it doesn’t exactly have many great squares.
17…bxc5?!
Opting for structural solidarity over a tactical shot. In his analysis, Joe sent me the following computer line: 17… Bxb2 18. c6 Nc5 19. Qb5 Bxa1 20. c7+ Qd7 21. Qxb6 Na4 22. Qb7 Rc8 23. Rxa1 Nc5 24. Qb4 Qxc7 25. Ned4Black is clearly better here but had to make a lot of precise moves to hold on to the advantage. Sure, being able to see this line would have been nice, but not being able to clearly see the right continuation and taking on c5 instead is the much more practical choice.
18. Rab1 Qb6
This move isn’t exactly precise, as White’s idea is at some moment to push b4 and rid himself of this weak b2 pawn. Rather than checking an engine for the best line here, I encourage you to ask yourself how to limit White’s play. If you found 18… c4!, then you’ve found the best way to take control of the position. Black’s knight will move to c5 with nice options on b3 and d3, and it’s White who must find ways to break out of his shell.
19. Ng3
This knight does a lot of dancing over the next few moves, watch it jump on its quest to nowhere… White really needed to keep the knight on the queenside, since that’s where the battle is being fought.
19…Ne5
I’m not a fan of this move, as Black’s knight on d7 does a lot more than White’s. 19… 0-0 was the computer move, but 19… h5?! is an interesting alternative, with the idea of marching the h pawn down the board to attack.
I understood before, but why not take on b2? The pawn won’t get much weaker than it is presently and White has no way of exploiting the pin by tactical means, thanks to the bad knight on d2.
24. Qd1 Ra5 25. a4 c4?
I think Black’s future problems stem from this move. Unfortunatelty, its already unclear how to convert Blacks bishop v knight advantage. My best guess is a long term plan of …Qa7, provoking b2-b3, then play …Rb8-b7 and …Qa7-b8, targeting both b3 and h2. It’s a long term fight, and it’s becoming clear that Black lost his chance when he didn’t take on b2.
White was so close to equality, but here White willingly loses a pawn for close to no compensation. White could have tried Nd4 or h4, but this move is clearly inferior.
There have been some small inaccuracies leading up to this moment, but this move is practically a resignation. While you wouldn’t believe it from this position, a knight and queen is usually stronger than a queen and bishop due to the unusual combinations of squares they can control. Giving up that advantage means going into a position down a pawn where Black has a bishop over a knight. White really should have never brought the knight back to d2, but now cedes the trade without a fight.
Walking into a lost pawn endgame. A poor decision by White. Black played reasonably well to secure the win, trading off a couple pawns to create a passed pawn.
My thoughts on the game? Aside from the opening, Black was never really in trouble of losing the game, but at times played too passively. White should have secured the half point, but Black played the better game. Congrats Joe on the strong finish and the big rating gain!
On to our next game, from Jeffrey, a chess^summit fan and my former teammate from my MLWGS days. Jeffrey’s currently at the Virginia Open, and after a rocky start, managed to pick up a round 2 win to reach 1.5/2. Let’s see how it went!
Jeffrey playing GM Sergey Erenburg in a simul back in late 2014. Since then, Jeff has managed to break 1700, and is trying to fit into the tough world that is adult chess.
Even though the Bird’s Opening may not be the most conventional weapon, it’s different, and can still reach reasonable positions. Here White could transpose into a Closed Sicilian if Black were to choose …c7-c5 for his next move.
7…e5
As a King’s Indian player, I’m not thrilled with this choice for Black. Usually, Black plays …e7-e5 to undermine the d4 square to control critical outposts like c5, but here the position is different. I think the most sound move is 7… c5 going into a semi-Sicilian, but the knight on d7 does make it hard for Black to play moves like …Bg4 and …Nd4. One reason I switched out of the Nbd7 King’s Indian lines was that it wasn’t very flexible and could often lead to passive positions with innacurate play.
8.Nc3 c6 9.h3 Re8?
Whenever I play against the King’s Indian, I’m always thrilled to see this move. Here, with the pawn on e4 protected by the d3 pawn, this …Re8 move actually does nothing! Keeping the rook on f8 is a thematic resource, not only to play …f7-f5, but to protect the f-file in some positions. Black has bigger problems right now besides the placement of his rook such as development and space.
10.Nh4
Knight on the rim is grim! Or is it? This is a new move for me, but it does help push the f-pawn to f5. While it’s a neat idea, this move tactically fails to 10… exf4 11. gxf4 Nd5! and the h4 knight is hanging. Honestly, White doesn’t need the support of the knight to play f5, it might even be worth a pawn later if black were to cripple his structure by taking with g.
10…Nb6?
Just like the last game, another bad …Nb6! While it technically opens the bishop, where can it actually go? Again, like last game, Black has wasted two tempi with this knight to go nowhere. A much better plan would have been 10… a5 with the idea of …Nd7-c5! A much more active square. If you are going to play a modern style of chess, you must be prepared to be active. The King’s Indian is the least forgiving to passive players.
11.a4 d5 12.a5
I think both 12. fxe5 and 12. f5 are possible here, but upon further evaluation, White’s choice doesn’t really matter since Black’s plan should be …Nf6-h5 with the idea of putting pressure on f4. Black’s opening play has been kind of poor, but White’s play hasn’t exaclty been punishing. I analyzed the move order with an engine and came to a few conclusions.
First, Nf3-h4 was a waste of time in this position, not only because it should have failed tactically, but it loses the value of having played 1. f4. What do I mean? Well if you think about it, White can reach a similar position in a King’s Indian Attack set-up:
This has a structural resemblance to the game, but now White must move the knight on f3 to execute f2-f4. Since f5 is occupied, the knight usually goes to e1 and then returns to f3 to be able to enter the fray via g5 after f2-f4 has been played. White’s first move enabled him to not lose this tempo.If you think about it, with a Black pawn on g6, White doesn’t exactly have a landing square for this knight besides f3, so to go back to my original question, the knight is grim!
Next, 9. h3 is what gives Black the …Nh5 resource since g3 is weakened. Usually this move is played to allow for Bc1-e3, taking away the g4 square from the knight, but seeing as Jeffrey didn’t play this move, 9. a4! would have been much more prudent.
It’s not that we are expecting Black to play the poor 9…Nb6? its just that this move restricts Black’s ability to expand with …b7-b5 on the queenside. Now it’s up to Black to come up with ideas. 9… a5 is a natural move for Black to secure the c5 outpost, but a knight on c5 won’t help Black with the pawn on d3. White can just play Kh1 followed by f4-f5. Also reasonable is b2-b3 and Bc1-a3 putting pressure on d6 once the f4-e5 tension is resolved (I will admit this is less agressive).
Anyways, I thought it was interesting that Black still had a tenable position after violating several opening principles.
12…d4
So who gained the most out of this sequence? Black managed to expand in the center, but in doing so drives White’s knight to a more productive square, d2. Meanwhile, Black must retreat the knight back to d7, and still is way behind in development.
13.Ne2 Nbd7 14.f5 c5 +=
Black’s limited development makes it extremely difficult to mobilize his forces, but I think Black’s best plan is follow-up with a …c5-c4 push, with the idea of placing a knight on c5 pressuring d3.
15.Qe1 b5 16.g4 Qe7?
Simply too slow. Black has no time and must act with 19…c4. My guess is that Black was afraid of 20. Qb4, but 20… Ba6 21. dxc4?! Bf8 22. Qe1 bxc4 it becomes clear that this would only help Black mobilize his army.Following the sample line. Black is arguably better here with the strong a6 bishop, and the f8 bishop ready to come into c5. Obviously, White had much better in 20. Bf3.And my chief concern becomes the threat of g4-g5. My proposed move doesn’t really give Black an answer, but neither did the text’s move. With Black already this far behind, it’s fair to believe Black is strategically, in large part to the idea of Nb6.
17.Bf3 Qd6 18.g5 Nxe4
Black gives up material instead of …Nh5. This doesn’t bode well for Black.
19.Bxe4 Rb8 20.Ng3 Bb7 21.Bd2!
A very practical decision by Jeffrey. Instead of rushing manners on the kingside, he maximizes the overall optimization of his pieces before going in for the kill. Now the rook on a1 can join the fight. This is a great way to save time on the clock and maintain pressure over the board.
Trying to do too much. White is better because of material, but this move slows his ability to win. 26. Nf6+! was a lot more simple, the idea being that 26… Nxf6 27. gxf6 Qxf6 28. fxg6, and Black’s queen and king are both under fire.Black is lost. From f6, White’s knight is untouchable in the combination, and should Black not capture it, White will bring in his rooks to the kingside before busting open the g-file.
26…Rbe8 27.Nf5??
This is too much, not to mention the combination actually fails! The idea is that if 27… gxf5! 28. Rxf5 Kh8! Black’s king is extremely safe, and after …Rf8-g8, White’s king could be under fire.One of the reasons I didn’t like f5-f6 was that it makes it very difficult to attack Black’s king. White doesn’t have many points of entry to the kingside aside from g7, and with the pawn on g4, it’s not quite clear how White will make progress. This diagram here is the structure if Black had taken on f5. As you can see, it’s not so simple to breakthrough. Sure White was up a piece anyways, but the f-pawn push followed by …Nf5 was a failure of tactical foresight.
27…Re6 28.Ne7+ Rxe7
Out of frustration, Black gives up the rook, and in doing so, the game.
This game was a lot more tactical than the first, but also proved as another exemplar as to why these …Nb6 ideas don’t work. Sure, Black got away with it in the first game, but that was White’s choice, not Black’s genius. As a coach, I’ve noticed that this manuever, though incorrect, has been played alot by lower rated players. When I started working with one of my current students, he played a line of the King’s Indian like this:
Of the three cases we’ve discussed today, this is the worst …Nb6, and while my student knows much better now, I think it shows that even at the 1400 level, this move still shows up.
If we’ve learned anything today, it’s that this amateur-ish …Nb6 idea is not only a weak move, but its a bad plan! It’s passive, and it slows the natural expansion of the queenside for Black. In more active openings like the King’s Indian, this move is even more unforgiveable since Black falls behind too many tempo in the sharp position.
Well, I hope you’ve made it this far – this is my longest free game analysis post yet. Make sure to send your games into chess.summit@gmail.com to have your game analyzed by me in my next post!
Check out my video for today! In this video, I reset my tactics trainer rating to 1200 and tried to bring it up as much as possible in 10 minutes. With the exception of a small slip up in the end, I was nearly perfect! See if you can do better by pausing the video before I try and solve each puzzle.
My first game had me on board 1, taking on Grandmaster Alexander Fishbein. The game took five hours, and though I lost, it was a reasonably well-fought game on my behalf.
Well – I wish I could say that a week of intensive study and deep preparation paid off, but I simply had a rough outing at the Pittsburgh Open this past weekend. Only scoring 1/4 in the top section, the weekend’s performance showed me that the road to becoming a master and playing for the US Junior Open is a lot longer than I had anticipated.
While there were a lot of negatives for me in this event, I did want to share my second round match-up.
Steincamp–Opaska (Pittsburgh Open, 2016)
1.c4 c5 2.Nf3 Nc6 3.Nc3 g6 4.e3 Bg7 5.d4
Once again I opted for this c4-d4-e3 set-up, it’s really easy to play since it’s mostly intuitive. I knew my opponent can play the English, so going for this meant there was a greater chance he wasn’t familiar with the opening.
5…cxd4 6.exd4 d6 7.d5
Already, I have vast central control, and it’s up to Black to come up with solutions. The computer already loves my position, since Black must now decide on an awkward knight move.
Willing to give up the bishop pair if it means provoking …f7-f6.
12…f6 13.Bf4 Nf7 14.Bf1
I thought this was a good decision when compared to Bc2. I decided that Black having a light squared bishop is inconvenient since going to f5 would block in the dark squared bishop, so going to c2 where a trade was possible wasn’t as appealing.
14…e5??
I was super happy when I saw this, I thought after 14… a5 then …Ne5, Black had a respectable position. Now the pawn on d6 is a major liability.
15.dxe6 Nxe6 16.Bh2 f5 17.Nb5 Bxb2 18.Rb1
I will win the pawn on d6, so in this trade, I got an opportunity to claim the half-open b-file. Black’s lack of development makes his position quite uncomfortable.
18…Bg7 19.Nxd6 Nxd6
And the initiative is all mine. I had calculated 19… f4 (I suppose this was Black’s intention after f5), 20. Nxf7 Qxd1 21. Rbxd1 Rxf7 22. Rd6 and if 22… Re7 the f4 pawn is hanging and I have the option of 23. Ng5 and Black’s lack of development is a real problem.
20.Bxd6 Re8 21.Qd5 Kh8 22.Ne5 Qh4 23.g3 Qf6
He didn’t play this the first time around, so I had prepared a fun line 23.. Qh5 24. Be2 Qxh3 25. Nf7+ Kg8 26. Ng5 Qh6 27. Bf4 and black is losing thanks to the pin on the knight and discovery soon to happen on the queen on h6.
24.f4 h6 25.h4 Kh7 26.Nf3?
Pressed for time, I made this mistake, which relieved too much pressure. 26. c5 is so much cleaner, since …g6-g5 isn’t really a problem. Once the h-file opens, I can just play Re1-e2-h2 and have a comfortable grip on the position.
26…Rd8 27.Rbd1 Nd4?? 28.Rxd4 1-0
A mistake in mutual time trouble. As you may have noticed, while the computer evaluation is roughly equal before the knight blunder, it is difficult to find constructive moves for Black.
My only point of the weekend, but hopefully the short-term disappointment will lead to long-term success. I have a match for the Universtiy of Pittsburgh in two weeks, and I don’t intend to let that one go.
With less than 24 hours before my first round of the Pittsburgh Open kicks off, I thought I’d share another game of mine from the Pittsburgh Metropolitan Open. While I wasn’t happy with my finish in that event, it’s certainly propelled me to work harder this week in each phase of the game. I’m not sure what that means for this weekend in what should be a tough open section of Continental Chess’ Pittsburgh Open, but confidence is never a bad thing to have.
I like the game I’m about to share, because to an extent, it balances practicality with precise play, while at the same time showing what happens when your opponent jumps ship on opening principles. My opponent is a young, ambitious player who is closing in on 1700, let’s see how he holds up.
Steincamp – Cao (71st Annual Pittsburgh Metropolitan Open, 2016)
1.c4 c5 2.Nc3 Nc6 3.Nf3 Nf6 4.e3
I’m really starting to embrace this kind of play for White, not necessarily because it is theoretically dangerous, but a lot of the play is intuitive – meaning a lot less study time. My knowledge of this position has grown exponentially since I used it in the last round of the National Chess Congress back in November.
4…e6 5.d4 b6??
A concrete error on behalf of my opponent. Failing to realize the importance of the center, my opponent will now lose time retreating his pieces.
6.d5 exd5 7.cxd5 Ne7 +=
Black’s queenside expansion kind of resembles a Benoni, but his development is so slow that he won’t be able to find the counter play he needs in time. Meanwhile, I can push the center and restrict my opponent’s development.
8.e4
Moving the pawn a second time is justified since my opponent will have moved his e7 knight 3 times once it finds refuge on g6.
8…d6 9.h3!
An important decision! In the Benoni, Black usually likes to trade off his c8 bishop for the knight on f3. My opponent, only now opening up the light-squared bishop with his last move, prompts me to take away the g4 square.
9…Ng6 10.Bd3 Ne5? 11.Nxe5 dxe5
Trading on e5 was not in Black’s interest. Not only did he move this knight 4 times in the first 11 moves just to trade it, he also gives me a protected passed pawn, giving me another long-term advantage. In addition to space and development, this will also wreak havoc on Black’s position.
12.a4
In a position like this, where there’s no clear plan yet for White, it’s important to feel out Black’s position. This pawn thrust is a natural way of gaining space while also stopping Black from playing …b7-b5. If Black doesn’t play …a7-a6, I might be able to break through with a4-a5 ideas.
12…a6 13.O-O Bd6 14.f4
Taking advantage of Black’s lack of development. Should Black try to trade on f4, it will only help me develop while Black’s king is still in the center of the board.
14…O-O 15.f5
This f-pawn thrust alone is how I broke 1900 (see my 2014 post on the idea here). By cutting off the light-squared bishop from the game, I can opt to play on the kingside, or I can continue to build my advantage around the rest of the board. Since Black lacks activity here, I decided that it would be easiest to draw out the game, let him suffer, leaving me with easy decisions.
15…Qc7 16.Bc4!
A surprisingly critical moment. Black’s only hope was to play …c5-c4 and try to play along the dark squares. I think 16. b3 is also acceptable, but Black would still have the option to sacrifice on c4, so this move cuts out the nonsense.
16…Bd7 17.Bg5 Be7 18.Qd3
So this is where practicality sets in. I’m sure some of you may have noticed the move 18. d6! was possible – and I spent some extensive time looking at this before making my decision. Here’s what I saw: 18. d6 Qxd6?? loses to 19. Qxd6 Bxd6 20. Bxf6 gxf6 21. Rad1 and Black loses a bishop.So this is winning, Black must recapture on d6 with the bishop to avoid these tactics.18. d6 Bxd6 19. Bxf6 gxf6 20. Nd5 Qd8 +=So in exchange for a pawn, I have a great outpost, and I’ve managed to weaken Black’s structure. But even though I knew I was intuitively better, the game isn’t easier. Black might have some resources with …Kh8 and …Rg8, and if I mess up, I’m just down a pawn. My move 18. Qd3, keeps my options open. Let’s look at that position again:For starters, I’m attacking a6, which would put me up a pawn, not down one. Furthermore, now I’m actually threatening …d6 because if …Bxd6 I have Bxf6 and Ra1-d1, winning a piece. Even though I knew d6 probably worked, I figured I could reap more rewards if I just improved my position.
18…Rfd8 19.Bxa6 Rxa6 +-
I was surprised to see this move. It might be the best try though – for my opponent, he forces me to calculate accurately, to ensure the safety of my queen, and he gets some counterplay. Unfortunately for him, I saw the forced continuation before I took the pawn on a6.
20.Qxa6 c4 21.d6!
The move I was counting on! This zwischenzug will either allow me to have a strong pin on f6, or take the pawn on c4 with my queen.
21…Bxd6 22.Nd5
The other advantage to playing d5-d6 was that it cleared a square for my c3 knight. Now I have protected the critical e3 square to stop all counterplay from Black.
22…Qc5+ 23.Be3 Qc6 24.Nxf6+ gxf6 25.Qxb6
Cashing in my exchange for a winning endgame. My opponent puts up some resistance, but the two rooks offer too much play for White.
My opponent is punished for his passivity, and with a rook on the seventh, I have full control over the position.
33…Kf8 34.Rc7 Bd8 35.R7xc4!
Simplification! Eliminating Black’s hold on the light squares, while taking advantage of my soon-to-be doubled pawns. It turns out that the b2 pawn plays an important role in the conversion of this game.
And Black realizes his dilemma. With the rook on c6 protected, there’s simply no way the king can undermine it. The f6-pawn is also weak, so that makes the conversion rather simple.
40…Ra8 41.b7 Rb8 42.Rc7+ Kd6 43.b6
Continuing to use the same idea. Black allowed me to promote with his next move, but soon Black will be in zugzwang. If 43… h4 44. Ke3, and Black must move his rook since the king has no legal moves, giving me Rc7-c8 with a promotion.
43…Rd8 44.Rc8 Rxc8 45.bxc8=Q 1-0
My opponent made me play on till checkmate, but the win is simple.
My opponent really only made two mistakes this game:
1) He didn’t stop my d-pawn push, which allowed me to gain too much time and space.
2) Giving me the protected passed pawn on d5 not only lost a tempo but caused long-term problems throughout the game. Because of the time he lost, it allowed me to march my f-pawn and then squeeze for space.
But the two principle abandoning gaffes were enough to lose this one. My opponent is a relatively strong player for his age, but even this game shows the importance of two basic opening principles: controlling the center and not moving the same piece twice.
For today’s post, I wanted to recommend a book I’ve been working through. Techniques of Positional Chessby Valeri Bronznik and Anatoli Terekhin is by far one of the most instructive books I’ve read, and while it may be a reach for many chess^summit followers, it’s definitely one to put on your future reading list.
My coach, Grandmaster Eugene Perelshteyn, suggested that I read this book in conjunction with 100 Chess Master Trade Secrets by Andrew Soltis to help me prepare for the US Junior Open this summer. To say the least, I’m glad he did, and today I wanted to share a few examples from the book with some of own my analysis and insights to show you why this is the book to read.
The “Padlock”
So here I’ve constructed a position to help demonstrate the padlock idea. The goal with a padlock is to reach a position where the pressing side can’t make progress. Here, if Black tries to push one of his queenside pawns to open up the position, White can lock up the position by pushing the other. For example, should Black play …a4-a3, White can simply push b2-b3, and no more progress can be made. Understanding this concept is not only important in race positions, but also a key feature of endgames. This next composition is taken from Bronznik’s book and highlights the importance of the padlock idea. See if you can find it!
White to move and draw
So where’s the padlock? In these kinds of endgames, it’s critical that the Black rook has points of entry to infiltrate White’s set-up. Because of the padlock structure on the a- and b- files, Black can never hope to open the queenside as long as White does not move his a3 or b3 pawns. That being said, the only way to secure the kingside is the incredible 1. Kd1!! Rh2 2. Ke1!! Rxg2 3. Kf1! Rh2 4. Kg1 Rh5 5. f3 = and Black will never be able to make progress. As long as the White king prevents the Black rook from entering e2, e1, h2, or h1, the extra rook is meaningless for Black. Again, it’s the padlock idea on the queenside that makes this possible.
I have to admit, that one study alone made me want to write this post today… but we must go on!
Fighting with the Rook Pawn
Steincamp – Chen (G/60 Pennsylvania State Championships, 2015)
After being under fire for most of the game, my opponent offered a draw here, and without too much thinking here, I took the half point. Not too much in this major piece ending, right? Well not quite. In this position, I actually had one opportunity to press for more. The a-pawn. Here, I could have tried a3-a4-a5-a6 at no cost, securing the b7 square for my rook and with play along the 7th rank. It’s not clear if this is enough to win, but the lack of an active plan for Black here does make this promising. Let’s take a look at one of the book’s examples.
Botvinnik–Smyslov (1954 World Championship)
Black to Move
White is definitely cramped but Smyslov will need a point of entry to find a way to take advantage of his opponent’s passivity. 1… a4! 2. Bd2 Qb6 3. Be3 a3
And just like in my own game (rather what should have been), Black takes over the b2 square, thus securing the critical point of entry. For the sake of brevity, looks fast forward a few moves later.
White cannot simply take the rook on b2 without creating a strong passed pawn and weakening a2, so White must succumb to a worse position. To get out of Black’s grips, White gave up the bishop pair in the game by trading on c5, and eventually lost the rook and minor piece endgame.
The “Wavebreaker”
The last idea I will discuss today is a prophylactic structure called the “wavebreaker”. In my post, Catching Up – A Season in a Post, I discussed a game from the World Open where I actually used this concept to secure my kingside!
Steincamp – Zinski (World Open, 2015)
White to Move
So White could try a “padlock” set-up with 1. h3?!, but that would be structurally dubious after 1… h4 2. g4 because now the White king is at risk of being exposed. Much simpler is creating a harmonious set-up with 1.h4!
Stopping the h-pawn push in its tracks. I originally got the idea from watching Jan Gustafsson’s commentary during the 2015 Dortmund Sparkassen Meeting. Black ought not to get too carried away with his antics, as …f7-f5 would give me a great outpost on g5. You can check out my analysis of that game with the corresponding link above, as I got a slightly better position, misplayed the advantage, and then had a little luck to secure the half-point in the endgame.
Understanding the “wavebreaker” structure is not only important to understand defensive play, it’s also an important element of the 4 v 3 rook and pawn ending. Check out this position from the book:
Capablanca – Yates (1930)
Black to Move
As Bronznik explains, if it were White’s move, Capablanca would play g3-g4! stopping Black from creating the wavebreaker formation. This idea of having a pawn on g4 is the easiest way to convert the 4 v 3 ending, with the idea of pushing the h-pawn in the hopes of creating a passed pawn. If you are more interested in 4 v 3 structures, you should watch this lecture by Yasser Seirawan:
For this reason, the book explains that Black had to try 1… h5= to equalize but after the inferior 1… Rc4? 2. g4! was played. While White is far from winning, he is well on his way towards making Black’s life miserable.
It’s been a while since my last book review on the site, so I’m glad I chose this one to break the silence. I’m still working my way through it, and I feel like I learn something every time I sit down to read it.
This morning I managed to crack 2700 on chess.com’s Tactics Trainer, so I decided to do a revised post on that, with some key updates and coaching advice from my last post on the website’s tactical features.
I’ve used chess.com since my sophomore year of high school, with this coming November marking my fourth year of membership on the site. Aside from video viewership and Chess Mentor, one of the advantages of a diamond membership is unlimited tactics a day on chess.com. Since I started using the feature in 2012, I’ve attempted over 15,000 puzzles and climbed the ranks to reach 2700.
It may not last long, but for now, I’m ranked one spot ahead of chess.com’s CEO, IM Daniel Rensch.
So as a coach and an active player, how do I assess progress on Tactics Trainer?
For most of my students, I believe that your tactics trainer rating minus ~200 points roughly represents your level of play. While that’s true for most 1400-2000 rated players, I think what TT represents after it gives you a 2400+ rating is very different from the original intentions of its functionality.
For master level players, chess.com’s TT features are great for warming up or practicing calculation while on a bus, but it no longer serves as an exact gauge of your tactical ability. Since most of the puzzles are member-submitted, the target audience is usually 1500-1900, and sometimes even lower.
Even chess.com’s bell curve shows the target audience for TT, and the number of players above 2000 are minuscule.
Chess.com does two things two things make Tactics Trainer more challenging for stronger members: Limit the amount of time to gain rating points and more endgame puzzles. Once you break 2400 on TT, the emphasis becomes much more on speed in a position where perhaps you have many different pleasant options, and you have to find the best one. Endgame puzzles become more frequent at the higher levels too, but often times, simply knowing opposition and achieving it on the board is enough to reach 50% of the solution, merely finding forcing moves and the right move order should be enough to earn the other half.
Does this mean that Tactics Trainer is bad for top players? Of course not – you just have to realize that it won’t push you to be as creative as perhaps a position in Secrets of Chess Tactics because chess.com’s interface is programmed so that only one move can be correct. Which leads me to my next point.
No puzzle is a bad puzzle. It’s so easy to get a puzzle wrong, look through the answer, and think “this puzzle is bad” before moving on to the next problem. Already in doing this, you deprive yourself of the greatest learning opportunity you have: your own mistakes. Whenever we play a tournament game, our natural habit is to review the game (perhaps with the opponent) and spend lots of time calculating the lines of the most critical position. Chess.com’s TT lets you cheat in the sense that it takes away the rest of the game and only gives you a critical position. You getting the puzzle wrong means you failed to find the best resource in said position. From my experience, I’ve kind of learned the different tiers of wrong:
1) You weren’t wrong, you just weren’t right. Often I find that when I make an error in a puzzle my line works perfectly fine, it’s just that it is simply not as good as the best solution. This may be frustrating but it’s important to understand why your answer wasn’t as right.
2) Move Order! Move Order! Move Order! This is the next rung down the ladder, as now we make the descent into actual mistakes and game-losing blunders. A move order error could simply fail to win as much material/checkmate, or even draw/lose to a discovered attack. This is one of the main tests TT offers, and what separates the complainers in the comments from the users that give answers.
3) Calculation Error… Now things turn sour. Maybe you left a piece hanging, or the endgame you were analyzing is actually a draw because you missed the critical in between move. Full board awareness is a skill, and you have to develop it by asking yourself one question….
4) What can my opponent do? On some puzzles, the computer introduces the position by offering a move for the opposing side. Asking yourself why the opponent made that move and understanding his plan is the first step towards getting the answer right. Then you need to look for critical weaknesses and themes in the position. Is a piece overloaded? Is there a mating net? This can get you back on the right track.
As a coach, there isn’t a student I haven’t recommended Tactics Trainer to. It teaches discipline while simultaneously offering a lesson in full board awareness. That being said, as a player trying to become a master, I have come to terms that while TT is a great resource to warm up, ease into a practice, and get in the mindset of calculating, it simply isn’t enough to bear the weight of all my tactical studies.
Well. It’s been another long week here at school, but in just a few hours I will finally be on my spring break and focus on my chess. Though I’m thrilled that the day-to-day stress of going to class and getting my homework done will be put on pause, there’s still the one big elephant in the room: my chess.
The weather here in Pittsburgh has been very inconsistent, somehow reaching a balance of snow and 60-degree weather.
If I’m totally honest about it, I am not exactly pleased with my results and level of play over the last few weeks, especially considering the amount of time I’ve dedicated to my preparation. After an extremely disappointing third round last Saturday, I decided to do something I haven’t tried since the summer: stop.
With two exams this week, in addition to several other deadlines, I limited my chess to just fun excursions on chess.com and checking the results of the Aeroflot Open and Women’s World Championships. That’s right, no openings, tactics, endgames – nothing.
Staying away from the chess board wasn’t easy, but I doing so meant I had time to draw for the first time in a very long time. Recognize some of these characters?
I’ve only tried this chess-free week once before, but it actually proved very helpful. Last summer, I had been putting in a lot of work into my play, but not really seeing any return in my results. After a 1.5/5 finish in the Open section of the Potomac Open, I decided to not study chess before my next tournament (aside from reviewing my games), the Washington International, which was scheduled for the following week. A risky decision, but the time gave me an opportunity to focus on reducing my overall stress and relax for my return to Rockville. In that tournament, I produced some of the best games I had played all summer, ending the season on a high note and a 40 point spurt.
That being said I don’t have a tournament tomorrow, so how will this work? What’s my goal? Well, next week is the Pittsburgh Open, and choosing to stay here on campus means I will have a lot of time to myself to improve on last Saturday’s performance at the Metropolitan Open. Given the level of competition, I’m going to need to review my main opening lines, work on my calculation, but most importantly, get more sleep! Getting back to top form won’t be easy, and it will take dedication, but this is the kind of work that will get me closer to winning the US Junior Open in June.