The best chess player in the world right now is Hikaru Nakamura. Forget the household names – Carlsen, Anand, Caruana, and Kramnik, chess is changing, and so are the best players.
Hikaru has been dubbed “player of the year” for 2015. Can he make a push for the crown?
But why isn’t the American capturing any real attention when it comes to discussions of the next World Champion? Nakamura has been called the “Player of the Year” by many, claiming either 1st or 2nd in each event he’s played in this year (excluding the World Cup). While top performances in the FIDE Grand Prix, Gibraltar, Millionaire Chess, and the Grand Chess Tour have propelled Nakamura to the top, his success has yet to lend itself to the one result he wants most: a win over Magnus Carlsen.
In classical games, Magnus dominates Hikaru 11-0 with 18 draws. However, with Carlsen’s recent form, it might just be a matter of time before the American captures his first win.
While this one fact separates players like Fabiano Caruana and Vaseline Topalov from Nakamura, it doesn’t detract from his quality and consistency. Let’s look at some games.
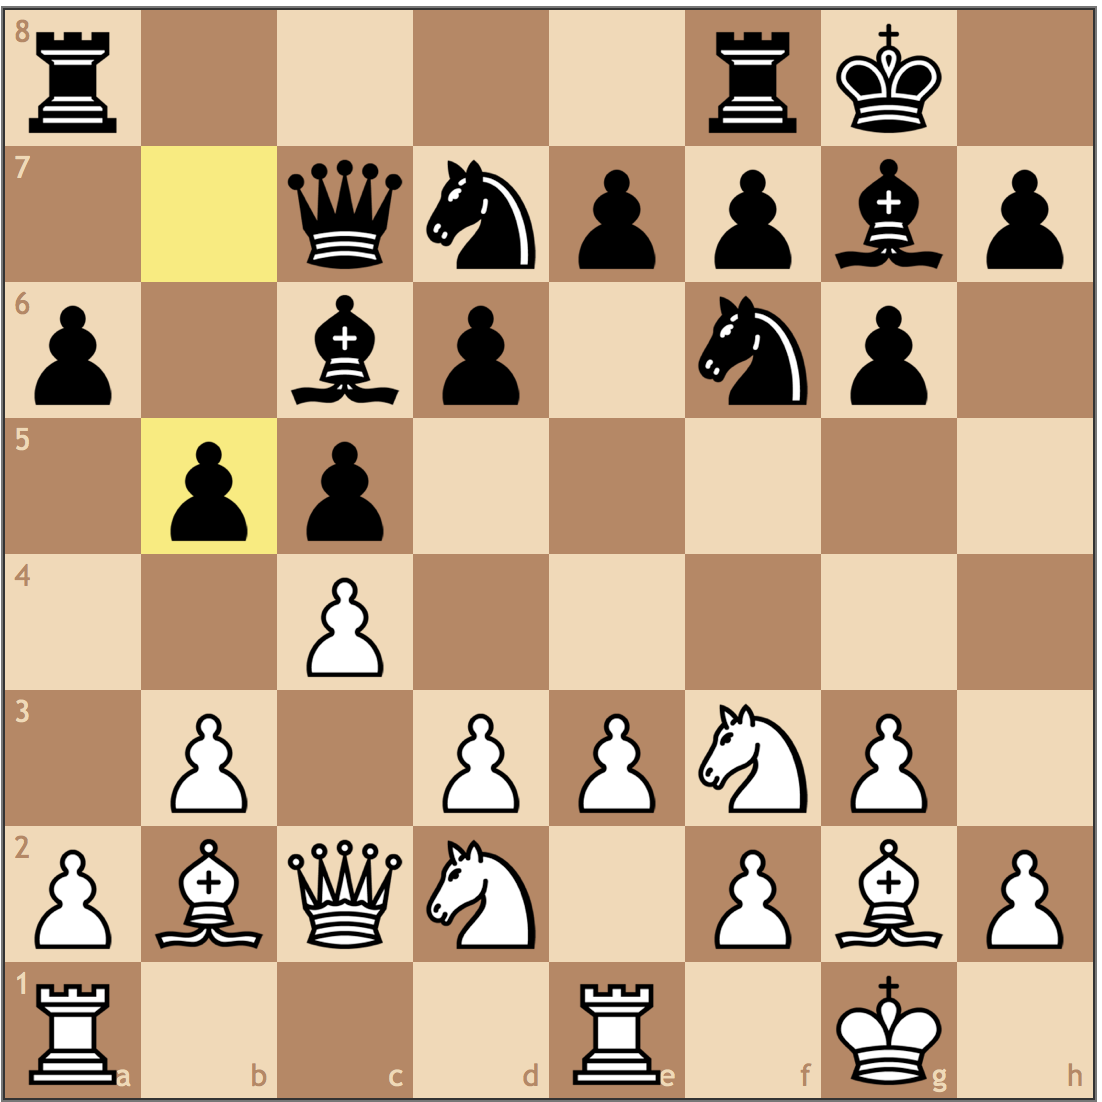
Here Nakamura decides against playing the common Grandmaster move 8. a3 preparing to launch the b-pawn to b4, gaining space. With this move, Nakamura plans to play b4 directly, the idea being to push to b4-b5 and attack the c6 knight. If Sevian takes this pawn, he must concede his central e5 pawn, as the c6 knight is the sole protector. Furthermore, should Sevian stop this move with …a7-a5 the b5 square becomes weak, and White can play d2-d3, Bc1-e3, followed by trading on b6 to weaken the outpost for his c3 knight.
8…O-O 9.b4 e4
Black decided that he might as well jettison this pawn to gain tempi for development. This is a temporary pawn sacrifice as the b4 pawn is weak. After 10. Nxe4 Bf5, the position looks strong for Black, but Sevian had to concede his central pawns for this position, which gives Nakamura a slight structural advantage should the game liquidate to an endgame.
10.Nxe4 Bf5 11.Qc2 Bxb4 12.a3 Bd6 13.e3
An awkward looking move by Nakamura, but the right decision. It was important to not play 13. d3? as 13… Bxe4 14. dxe4 Re8 is better for Black as White’s own central pawns blocks his queen from entering the game. 13. e3 serves helps White play d2-d4 controlling the center, but I think Nakamura played this move knowing he wanted to play f2-f4, so this move does a nice job of defending the a7-g1 diagonal as a prophylactic measure.
13…h6 14.Nh4 Bh7 15.f4
Black’s development advantage from playing 9… e4 has dissipated, and now once Nakamura resolves the pin on the knight with f4-f5 and plays Bb2, White’s pieces will be much more active than Black’s.
15…Be7 16.f5!
A fantastic move! Sevian’s last move 15… Be7 was made to attack the h4 knight, so I wonder if he saw Hikaru’s thrust to f5 as a legitimate possibility. 16… Bxh4 is not advisable, because 17. gxh4 Qxh4 18. Rf4 gains tempo on the queen while threatening f5-f6, creating weaknesses in Black’s kingside, which justifies the pawn sacrifice. Even if Black doesn’t take on h4, the threat of f5-f6 will force Black to make a concession on the kingside.
16…Ne5 17.Bb2!
No rush to infiltrate since White’s development is not completed. The d3 square offers not counterplay for Black, as after 17… Nd3 18 Bd4 wins a piece and 17… Qd3 18. Qxc7 Nc6 19. Qf4 should give Black headaches.
17…f6
A sad concession. Black locks down the a1-h8 diagonal at the price of blocking in his e7 bishop and making any g7-g6 break impossible. Black now has a lot of light square weaknesses on the kingside, and will struggle to stay in the game.
18.a4
These next few moves are telling as to how white picks up the win. a3-a4 does two things. First, it allows the b2 bishop to move without hanging the a3 pawn. But perhaps more importantly, this is a minority attack – if White can play a4-a5 and open up the b-file, his rook on b1 is perfectly placed to dominate the queenside. This is really instructive, as Nakamura wisely decides to shut down both sides of the board for Black before trying to force his way to victory.
18…Nec4 19.Bd4 a5
I’m no grandmaster, but this move can’t help Black. When White decides that he wants to use the g2-bishop to target b7, Black would really like to be able to play c7-c6, and thats not possible now considering how loose the knight will be, making it significant a liability for Black. Looking around the board, it’s hard to find other concessions for Black. Sevian cannot play to reroute his h7 bishop to g8 because of the weak g6 square, and his knight on c4 is stuck, stopping the move a4-a5.
20.Nc5 Bxc5 21.Bxc5 Rf7 22.Bxb6
Nakamura cashes in his bishop pair advantage for a pawn and a structural advantage. While some might prefer to keep the bishop pair, its important to note that here after this trade on b6, White’s pieces that are left on the board are simply better than Black’s.
22…Nxb6 23.Bxb7 Rb8 24.Bc6 Qd6 25.Rf4 +-
Hikaru was destined to play this move when he pushed f4-f5 nine moves ago, since then, Black’s position has completely fallen apart, and White’s timing for an attack couldn’t be better.
25…Kh8 26.Rd4 Qa3 27.Qc3
White decided that the queen trade was acceptable given that he could dominate the d-file. The b6 knight and h7 bishop can’t move so this trade helps White simplify the victory.
27…Qxc3 28.dxc3 Re7 29.Rbd1!
If I were White, I would have waited a move and played 29. e4, keeping a grip on the center – but that’s because I’m not Nakamura! Here Hikaru left a trap for Sevian because if 29… Rxe3 30. Kf2! Black is busted, no matter where the rook goes. If 30… Rxc3, 31. Ng6+ wins as 31… Bxg6 32. fxg6, as Black’s pieces aren’t coordinated to stop White’s back rank threats. If Black retreats with 30… Re5/e7 31. Rd8+ Rxd8 32. Rxd8+ Bg8 33. Ng6+, and Black is reminded once again that the bishop is grounded on h7.
29…Rf7 30.c4 Rff8 31.c5 Nc8
White disconnects Black’s rooks before going in for the kill. Masterful chess from the current US Chess Champion.
32.Rd7 Na7 33.Bg2 Rbc8 34.Ng6+ Bxg6 35.fxg6 1-0
Just a pawn down, Black resigns as White’s pieces are just too suffocating. The a7 knight is immobile, and Black’s rooks are stuck on the back rank defending the king. White’s plan is to bring his d1 rook to the 7th rank and meet the defensive …Rg8 with Bg2-d5, winning the g7 pawn.
A truly inspiring performance from Nakamura, as he took a slight advantage over the world’s youngest grandmaster and made the conversion seem effortless. Hikaru’s energetic play covers all openings, 1. e4, 1. d4, and the English, making him impossible to prepare for. For the second game today, I was tempted to put in Nakamura’s win over Anand from the recent Sinquefield Cup, as he left a powerful impression on me during his interview about older players, specifically Vishy:
Vishy is of course a quite bit older than most other players so unfortunately for him he made a mistake at the critical moment…
–Hikaru Nakamura after Round 1 of the 2015 Sinquefield Cup
This is something which I think Kramnik is struggling through too – its just harder to compete on the highest levels as an older player. If this alone is a reason for why they make mistakes, then younger players do have some sort of stamina advantage. While that game was interesting, it was mostly equal until Anand played f7-f5 too early and fell apart in the endgame, so it wasn’t the most exciting.
With his second place finish in the 2015 FIDE Grand Prix, Nakamura has secured his spot in the Candidates Tournament in March among players like Vishy Anand, Fabiano Caruana, Sergey Karjakin, and Peter Svidler.
With Wesley So’s recent switch to the United States, its not too hard to imagine seeing So v. Nakamura becoming a regular rivalry to determine the best American player. That being said, the most exciting game between them may have already happened at this summer’s Sinqufield Cup. Where Nakamura beat So in a dynamic King’s Indian. With So’s incredible victory against Ding Liren at the Bilbao Chess Masters earlier this week in the same line of the King’s Indian, I thought that gave this game the nod.
This is all theory, but in his more recent game against Ding Liren, So chose 13. Rc1 with the idea of placing the rook on the c-file before pushing with c4-c5.
The c6 square becomes weak, but it’s important to remember, this is not a positional game! In this race position, both sides will be pressing for the advantage so this move makes it difficult for the a3 knight to get back in the game. Furthermore, the f7-rook offers enough protection as it covers the entire 7th rank.
20.Rc6 g4 21.Qc2 Qf8
Still mostly thematic play here, but it’s important to notice that Nakamura is not too worried about So’s control over the c-file. Because the rook on c6 has no concrete threats, Black has time to continue optimizing his army for a kingside plunge.
22.Rc1 Bd7 23.Rc7 Bh6
Still improving his pieces, Nakamura puts his dark squared bishop on the best square. Now, should the f4 pawn be traded, the h6 bishop is mobile and black would stand better. While Black hasn’t taken any attacking approach yet, its starting to become apparent that White has achieved little with his c-file infiltration.
24.Be1 h4
Now the idea of …Bh6 seems much more clear! If White does nothing, Hikaru will push …h4-h3 breaking the kingside and planning g4-g3, busting open the c1-h6 diagonal. White’s only chance is to take the bait on g4.
25.fxg4 f3!!
In this line, Black still gets the diagonal, but its not the rook that he wants. With Wesley’s bishop on e1, his king is not adequately protected as his two bishops act as a wall, stopping white’s rook and queen from defending. This move seizes the most opportune moment to attack and breaks the center with Black’s next move.
26.gxf3 Nxe4
Its important to note that Black did not take the rook on c1, as the chronic dark square weaknesses make the h6 bishop vastly superior. The knight on e4 is toxic since 27. fxe4?? loses immediately to 27… Rf1+ 28. Bxf1 Qxf1#
27.Rd1
White decides that he wants to keep the rook to help defend the king, but this move really shows that So has absolutely no counterplay to Black’s attack. Up a pawn, Wesley is paralyzed by the passivity of his own army.
27…Rxf3!
Offering White a choice between being up the exchange on f3, or winning a piece on d7. Wesley better choose one of them, but 28. Bxf3 is playing with fire, as 28… Qxf3+ 29. Qg2 Bxg4 leaves the king open and Black with few chances.
28.Rxd7 Rf1+ 29.Kg2 Be3
Hikaru is rewarded for not being materialistic earlier in the game. From e3, the dark squared bishop sets up the threat of …Rg1+ followed by …Ng5#
30.Bg3 hxg3
Offering Wesley more material, but the game is already over. Perhaps Nakamura was jealous of Wei Yi’s “Immortal Game” from earlier this year.
31.Rxf1 Nh4+ 32.Kh3 Qh6
Despite being down a full rook, Hikaru continues to ask Wesley how he plans to protect his king. Just as it seemed when Black played 25… f3, the e2 bishop blocks out the queen, and the rook on c7 and knight on a3 seem too distant to really be part of the fight.
33.g5
A last gasp for the king on h3. Unfortunately this isn’t Navara–Wojtaszek (Biel, 2015), and a king march is not the winning idea.
33…Nxg5+ 34.Kg4 Nhf3 35.Nf2
White offers his knight so his queen can finally have access to squares (g6 and h7). However, its too little, too late.
In a sporting manner, So lets Nakamura complete the tactic, reaching checkmate down two whole rooks. What a game!
I’ve been really inspired by Hikaru’s play as of late, and even though he’s had some disappointing games, he has been the most consistent players this calendar year. Only one hurdle remains for the American – the Word Championship. He’ll have to beat Magnus, not just in one sitting, but an entire match. With the way he’s been playing as of late, I would put my bet on him to get the job done.
It’s Tuesday, which means more game analysis from fans of the blog! If you want to have your games analyzed by me on the blog, email your game PGNs to chess.summit@gmail.com, and check back the following Tuesday to see if I chose your game for my post!
For today’s post, we have two more games from chess^summit fan Maciek Kowalski, who sent in games from this past World Open.
Lackner – Kowalski (World Open, 2015)
1.Nf3 c5 2.c4 g6 3.d4 Bg7
In this position, I would like to suggest the move 4. Nc3. Because Black has neglected to develop the g8 knight, White has a much greater stake in the center, which is why it might be best to go for a bind kind of position. If 4… cxd4 5. Nxd4, and White just needs to play e2-e4 and Be3 to set-up a Maroczy Bind. If Black had a knight on f6, he could meet 4. Nc3 cxd4 5. Nxd4 with 5…d5!, busting open the bind structure. Based on how White played the opening, this positional approach may suit him more than a Benoni set-up.
4.d5 d6 5.Nc3 Nf6 6.Bg5 e6 7.e4 exd5 8.exd5
A theoretical mistake. Because of the tactical nature of the Benoni, White needs to be able to create chances in the center to prove that his hyper extension in the center is not a weakness. A thematic idea for White in these positions is to capture cxd5 with the goal of pushing e4-e5, breaking Black’s center. This ties in with White’s bishop on g5, so this threat of pushing the pawn also puts a lot of pressure on the f6 knight. By taking with the e-pawn, White not only rids himself of this resource, but gives Black the e-file.
8…O-O 9.Be2 Bg4 10.h3?
While Black’s development thus far has been standard, White falls behind with this move. The bishop on g4 isn’t really putting pressure on f3 because White’s e2 bishop does a nice job of defending, so a move like h2-h3 forces Black to do what he wants to do: trade the light squared bishop. In the Benoni, Black generally wants to put his knight on d7, so the light squares in the position are extremely limited. After black trades his e-pawn on d5, he typically plays …Bc8-g4 to trade it off for the f3 knight (which supports a e4-e5 thrust when there is a pawn on e4). Better would have been to play 10. 0-0 and complete development before kicking the g4 bishop.
Up till now, Black has played really well, but with this move Black loses the initiative. The Benoni is a dynamic opening, where Black aims to expand on the queenside as White pushes a central advantage. Seeing as Black has already secured the center, the much more practical plan would be go for a7-a6, Ra8-b8, and b7-b5. I think here Black was worried about the threat of Nc3-e4, trading off minor pieces, but then he shouldn’t have played …Nd7-e5 last move.
15.Qd2 Re7 16.f4 Ned7 17.f5??
A strategic blunder which I actually covered in my post, “Identifying Weak Squares and Creating Static Advantages”. By playing f4-f5, White hopes to open the kingside, with the added benefit of being able to play Bh6. However, by opting for this plan, White takes drastic measures by giving up the e5 square. If Black can use this outpost correctly, it will be hard for White to create any weaknesses.
To see the article Identifying Weak Squares and Creating Static Advantages, click here.
17…Rae8 18.fxg6 hxg6
19. Qf4? doesn’t work because 19…Rxe2 20. Nxe2 Rxe2 and Black has two pieces for the rook.
19.Bg4 Nxg4?
An interesting idea, but with both rooks, White can just double up on the e-file and is by no means worse. Because of this pin on the f6-knight, this idea of putting the rook on e7 for Black might be the most sound.
20.Bxe7 Rxe7 21.hxg4 Ne5
Taking over the original weakness of White’s strategic mistake. It is important to note that the “patzer see a check” approach is artificial because after 21… Bd4+ 22. Kh1 Ne5 23. Qe2 Black will always have to worry about White forcing a knight for bishop trade with Nb5, where Black loses control over the dark squares.
22.Qe2 Qd8 23.Ne4 Re8
With this passive move, Black begins to lose objectivity as White begins to clamp down on the position. 23… Nd7 would have given Black some opportunity to play. While a hard move to find over the board, the idea is that Black activated the g7 bishop, thus using all of his pieces while pinning the d4 knight. Black can try for …Bd4+ and then Kg8-g7, opening the h8 square for the queen. Because White can never control the e5 square, Black can move the knight knowing it can always return.
24.g5!
An instructive moment! White cuts off Black’s queen from the kingside. Furthermore, this weakens the f6 square, which could lend itself to future tactics.
24…Nd7 25.Rxf7??
This move not only doesn’t work, its also not practical for White to take this shot. Before taking on f7, White was statically better, as he didn’t have many weaknesses while Black’s pieces were suffocating each other. White can play 25. b3, eliminating Black’s only target, while putting the ball in Black’s court. In the future, White can play for a rook lift with Rf1-f3-h3, followed by bringing the inactive c-rook to h1. While White has a long ways to go until victory, Black has problems, and a single inaccuracy would be devastating.
After a sacrifice gone wrong, White offered a draw hoping to salvage a point and Black agreed. While this was a back-and-forth game, I think Black accepting the draw offer was the biggest mistake of the game. Sometimes, when we spend a lot of time defending, we don’t really spend much time thinking about our winning chances. Here, if Black had just played 29… Be5, he would have realized how much potential the position had. Black’s queen is going to the h-file, and the g5-pawn has gone from a strength to liability. Even though this endgame is difficult, with a material advantage Black is better.
Not a bad game by either side, as each player played at their respective rating levels. White, unfamiliar with the Benoni set-up, gave Black the initiative, after which, Black fell behind with moves like …Qb6 and …Re7. While White for the attack, he had to take drastic measures and create weaknesses which were just enough for Black to hang on before going for a bad sacrifice on f7. Fun game!
Not a mistake, but definitely the weakest way to handle the Symmetrical English positions. Generally when White plays d2-d3, he also plays e2-e4, where his knight it best served on e2 instead of f3 so the f-pawn has the potential to go to f4. Seeing as White’s knight is already on f3, the more standard option is to play an immediate d2-d4, or Nc3 followed by d4 or going for a Reti set-up (b2-b3, e2-e3). With this move, White’s pieces aren’t exactly placed to make a stake in the center.
6…Nc6 7.Nbd2 d5 8.b3
8. b3 seems to ask for trouble, and even though the sac exchange (see next move) isn’t too bad for White, it can be avoided with 8. cxd5. Black will get a bind position, but if White can get in a2-a4 and Nc4, he does have a game.
8…Ne4!?
This move wins material, but it is too optimistic. Black has to use a lot of tempi to capture the rook (Ne4, Ba1, Bg7) while White has time to secure the center. The engines like black, but only by a half pawn, which suggests that the material imbalance is not too significant. Though it is not desirable to leave the first ten moves down material, this particular position is still playable.
9.dxe4 Bxa1 Black should have inserted the intermezzo 9…dxe4 to limit White’s play in the center. 10.exd5 Nd4?
With this move Black goes from equal to worse, as after Ba3, the c5 pawn is lost. While Black will remain up an exchange, there won’t be a file to effectively use them. Better was 10…Nb4, but already you can see that Black’s opening set-up was flawed as too many tempi are being wasted.
11.Ba3 Nxf3+ 12.Nxf3 Bg7 13.Bxc5 Re8?
Despite having a material advantage, Black is not actively developing to make it worth while. Unfortunately, by giving up the c5 pawn, Black is no longer better, but can still play for activity with 13… Bg4, developing the last of his minor pieces and preparing …Ra8-c8.
A smart move by Maciek. After simplifying to this endgame, White rids himself of his last weakness and plans to play Bd5 to blockade the only open file on the board. Because of the limited mobility of the rooks, it can be argued that the bishop is at least as valuable, if not more.
Black has to sit and wait as White improves the position. Now that Maciek has full control of the center, he will bring in his king, creating a more active position.
Too ambitious as Black can now get counterplay on the b-file. In these endgames its easy to become impatient, but White needs to create a second weakness before considering to open up the position. 33. b5 is a much more solid idea, as the bishop can go to c6 (a rook trade on d4 will give White a passed pawn after exd4), and his king can march to f5.
33…bxa5 34.Kb3 Kc7 35.Ka4 Kb6?
This move is too passive and makes White’s road to victory easier. Black’s best course of action was 35… Rb8 36. Kxa5 Rb2 37. a4 =. The idea here is that by sacrificing a pawn for activity, White’s weakness on f2 is exposed while the king is uncomfortable on a5.
With a second passed pawn, Black cannot hope to stop both the d- and e-pawns from promoting, and correctly chose to resign.
I liked this game for White because after falling behind early, Maciek quickly made up for lost ground by using his queenside pawn majority and bishop to closed off the position. With the exception of the bxa5 slip up, White played a very respectable game.
Well, that sums up Free Game Analysis! Stay tuned for more articles, and send in your games!
For today’s video, I played a G/15 ICC game which reached an instructive conclusion. After completing my opening development with relative equality, I just solidified my position while I allowed my opponent to create weaknesses of his own. Unlike my last Live Chess video where I was able to push the a-pawn to expose Black’s queenside weaknesses, this game was unique because I never really needed to establish a plan. I think the main takeaway from this game is when your opponent makes a move, you should not only ask why they make each move, but if their intentions put your position at risk. Once my opponent played Bc1-d2, Qd1-e2, White’s position became passive while I continued to expand on the queenside. Enjoy!
Who said chess wasn’t a sport? Since 1999, chess has been identified as a sport by the International Olympics Committee – but what about our game is athletic? Let’s take a look at a recent example from Norway Chess 2015:
Hammer – Topalov (Norway Chess, 2015)
After 6 hours of play, Jon Ludvig Hammer looked ready to draw his round 5 game against tournament leader Veselin Topalov. In a position where 74. f5 would be enough to liquidate the game, Hammer thought he could win the game with 74. Kc6?? aiming to push the bishop and promote the a-pawn. Unfortunately, after 74… Ke6 Topalov saw an immediate resignation from the Norwegian as the black king was ready to move to f5 and win White’s kingside pawns. 0-1
A disgusted Hammer looks on post-mortem, as a draw is no longer within reach against the Bulgarian Grandmaster. Hammer’s lone win of Norway Chess was against reigning World Champion Magnus Carlsen.
This game gave Topalov a crucial half-point, that eventually helped put him in first place. I remember watching the live broadcast for the event, and the reaction was obviously that of shock for a 2600 rated player to make such a mistake in a high level game. While as a spectator, its easy to see such errors and take them for granted, as a player I can also relate to the issue of endurance. When I first broke 2000, I started competing against a much harder level of competition, which really pushed my mental stamina. After winning the last round of the 2014 Virginia Closed Chess Championships, I went from October 2014 to April 2015 without winning the final round of a chess tournament. Its not fair to compare my level of play to that of a Grandmaster, but I feel like at some point, every player struggles with endurance – and even at the highest level we are constantly reminded by the intensity of the game. Here are a couple gaffes of my own:
Steincamp – Wu (National Chess Congress, 2015)
45. Nxd3 Draw offer and my opponent quickly agreed. I had gotten an overwhelming advantage in the opening, but lost it trying to evade time trouble. Now five hours into the match with only 15 minute left on my clock, I offered a draw, trusting that the rook endgame was equal. However, here it’s not too difficult to see that after 45… Rxd3 46. Ke1 Escaping the checkmate threat of …Rd3-d1# 46…bxc6 47. bxc6 that I have a passed pawn and a much more active king. While I am not winning, this position could easily be reached, and White would have a risk-free (and better) position. Unfortunately with draw offers, they can be seen as a “way out” – and that’s the disappointing decision I made here.
Rajasekaran – Steincamp (Potomac Open, 2015)
In this position, I am strategically better. Playing the reigning 2-year Virginia Scholastic State Chess Champion, I’d managed to surprise my opponent in the opening, gaining a massive advantage and subduing him into passive play. However, things hadn’t been going my either. I had drawn three of my four games, and I just finished my morning game an hour earlier, where I had managed to blow a significant advantage with the white pieces. Needless to say, I really wanted to win and chose the un-calculated thrust 21… f4? which lead to unclear play and me losing material. If I had just relaxed and played the natural 21…b6 (or a move like it), White would be out of options, and there would be no queenside counterplay. A basic rule of thumb before attacking is to develop all of your pieces, and here I uncharacteristically jumped on an unrealistic attack before developing my bishop on c8 and my rook on a8.
If you read my article, Catching Up – A Season in a Post, I also mentioned my three round collapse at the World Open, where I started 4/6, but then finished 4/9 and actually lost a rating point in the event. So what can we do to avoid these moments?
Well, I have to believe that practicing for longer time periods with a consistent intensity never hurts. When I was a scholastic player, my dad always told me to “practice the way you play”, and while he was never was a great chess player or anything, there is a little bit of truth to that. Another aspect of my game that I have been working on is my athletic training and regular exercise. While I’m not exactly sure how much this has contributed to my game, running regularly and eating healthy certainly cannot hurt.
How do you improve your chess endurance? Feel free to comment below!
Hi everyone! This is my first Free Game Analysis post on chesssummit.com, and I’m really excited to get this section of my blog underway. For those of you who don’t know, if you would like to have your games analyzed by me for free, send your PGNs to chess.summit@gmail.com, and if you are lucky, I will post them on my blog!
For today’s post, I was sent two games from an up-and-coming amateur from the Northern Virginia area, Maciek Kowalski, who recently competed in the Washington Chess Congress. In just the last year, his rating has increased by roughly 275 points, getting him to his current best, 1472! That being said, let’s take a look at two of his games.
Kowalski – Offertaler (U1700 Washington Chess Congress, 2015)
1.Nf3
I consider 1 Nf3 one of the most flexible starting moves for White, and probably the best option for a positional player who is looking to cut down on learning theory.
1…Nf6 2.c4 g6 3.g3 Bg7 4.Bg2 O-O 5.O-O d6 6.Qc2
This move 6 Qc2 is seemingly out of place. Though a thematic idea in the Catalan, here Black hasn’t committed to a Queen’s Gambit Declined structure. Usually, the goal of Qc2 is to push e2-e4 to break a static pawn structure in the center, but here Black’s pawn is on d6 and not d5. I have a couple suggestions for White here that may prove a little more testing for Black. 6 Nc3 is the most natural, and I’ve had this position a few times myself, the idea behind this move is to move the d-pawn to d3 and should Black choose 6… e5, the game starts to feel like a reversed closed Sicilian. If White is hoping for something a little more assertive, 6 d4 is the easiest way to play, reaching a King’s Indian Fianchetto variation. While there is a lot of theory behind this line, the more tame variations are mostly intuitive and promise White a good game. With either structure, its not immediately clear where to put the queen, so by not playing Qc2, White saves a tempo.
6…c5 7.b3 Bd7 8.Bb2 Bc6 9.d3
I hope this position illustrates my concern with 6. Qc2. While White has achieved solidarity, it was at the cost of a tempo, as the queen no longer has an active role in the fight. While this double fianchetto structure seems passive, it could have been attained with 6. d4 followed by b3, where the d-pawn blocks the long diagonal from any tactics. This would also justify a later Qc2 and White has a game. In the mean time, Black has constructed a rather crafty set-up with a bishop on c6. While not orthodox, I think its justified given White’s wasted tempo.
9…Nbd7 10.Nbd2 a6 11.Rfe1 Qc7 12.e3 b5
I thought that Black had put up reasonable resistance up to here, but now White begins to play for a sharp edge. This b7-b5 move allows for White to play d3-d4, the thrust that justifies Maciek’s set-up. Here Black really needed to ask himself what White’s plan was, and with moves like Re1 and e2-e3, the goal d3-d4, is not transparent. If Black allows this move, the e-file could open, thus allowing White active play and central control. If Black had opted for 12…d5, The game becomes challenging for White to make progress. If White takes on d5, the position quickly liquidates, for example, 12… d5 13. cxd5?! Nxd5 14. Bxg7 Kxg7 15. d4 N5f6 16. dxc5 Bxf3 17. Nxf3 Qxc5 = the pawns are symmetric and the only advantage White has is a bishop and knight combination instead of the knight pair.
13.d4 cxd4
I feel like b7-b5 was only justified if Black had seen that 13… e6 keeps the position together. White is making progress, but now with this exchange, Black releases the tension in the center, giving White the e-file. One common theme that differentiates weaker players from experts is the fact that more experienced players prefer to keep the tension in pawn structures as trading pawns (like in this position) tends to weaken their position. Here Black was reacting to d4-d5, shutting down the bishop, and therefore thought the trade on d4 was justified. 13… e6 would have sufficiently covered the d5 square, while not playing into White’s hand. In that line, the rook on e1 seems misplaced and Black is still in the balance.
14.exd4 e6 15.d5!!
A true pawn sacrifice! Now its the queen on c7 that is misplaced!
Excellent choice! White threatens both the queen on c7 and a discovered check along the long diagonal. Black thought was out of the woods after …Ba8, but that is simply not the case!
20…Nc3 21.Bxa8 Qa7 22.Nc6
An interference idea! If White had just played Rxc3, …Qxd4 is annoying as the rook on c3 is attacked and pinned. This move ensures that White will win material as the knight on c3 cannot be protected. Nice tactical vision!
An unorthodox move justified tactically. Should white take on h6, b2 is hanging, and with it the a1 rook. From h6, the knight will want to go to f5, where it can reach its fullest potential attacking d4.
8.O-O Be7 9.b3??
A move, which to me shows that White is out of his opening preparation, this move does not help White improve his position. If White played this move to take on h6, I think Black would be more than happy to accept as the trade would result in the opening of the g-file. Black hasn’t committed where he wants his king yet, so having doubled h-pawns gives Black the edge. White could have tried better with 9. dxc5, followed by the space grabbing b2-b4 push. With an imbalanced pawn structure, the game should yield promising play for both sides.
9…cxd4 10.cxd4 f6
A thematic break in such positions. Black hopes to weaken white’s central hold, and now the knight can choose f5 or f7, depending on what White chooses. Even without a castled king, Black has enough development to compensate.
Some times, a threat is stronger than its execution. Here White’s pieces are passively defending the weak e5 pawn, but by capturing, White can trade off his weakest pieces at the cost of only a pawn. What Black needs to realize is that the e5 pawn will be weak forever since its blockaded by the e6 pawn, and right now blocks the e1 rook from doing any damage to the king. If Black really wanted to make the most out of his position, …b7-b5 would have been a nice way to grab space while also maintaining pressure on e5.
16.Bxh7 Reacting to the discovered attack on the c-file. 16…Rxh7 17.Nxe5 Bd6
If White finds Rc1, he will have a much stronger position as Black is resigned to giving up the c-file. This move 17… Bd6 didn’t change things for Black by securing his only advantage. The computer likes 17… Qc2, going for trades, but such moves are to find over the board. Black gets lucky that White fails to find the right reputation.
18.Qd4 Rh4 19.Ng6 Rxf4
If Black was going to sacrifice a rook, why not also win it back with an extra pawn? Here 19… Bxf4 20. Nxh4 Bxh2+ gives Black a healthy advantage as 21. Kh1 Be5 is enough to put the game away.
Giving up a pawn for free? I think Black was better before this moment as the pair of bishops is superior to the knight. I think a trade on c1 followed by ..Bc6 would have been adequate.
In games that feel like a pendulum swinging, the guy to blunder last always loses. Here White must have missed that Bb5 at the end of the line is simply winning. Black should be able to easily convert the point.
And White throws in the towel down a piece in a losing endgame.
Interesting games to pull out two wins, but I think the second game provided the most concerning point with the early Ncxe5?. Generally, when you are better, you want to hold your advantage. If you have the initiative, but continue to make the game even more complicated, you can risk losing your advantage entirely. Once you are better, don’t be afraid to play simple chess and just improve your overall grip on the position.
Since I played in the Pennsylvania State Chess Championships this weekend, I wasn’t able to upload my video on Sunday. That being said, I hope you enjoy this one.
As some of you may know, the World Blitz Chess Championships in Berlin were last week, in which Magnus Carlsen failed to defend his title, making way for Russian Grandmaster Alexander Grischuk to take the throne. In what was a rough day for the World Chess Champion, he further proved that he is mortal:
Courtesy:NRK Sport
While Magnus is considered to be one of chess history’s best players, he definitely has been sliding this year. The FIDE Grand Chess Tour proved to be the beginning of his unwinding, first in his home country, Norway Chess, and then again in St. Louis at the Sinquefield Cup. Even with his 14/21 score at the World Blitz Championships, Carlsen was a full 1.5 points behind Alexander Grischuk, finishing 6th and falling from 1st to 2nd in the world blitz standings. With only a few months to go before the Candidates Tournament in March, Magnus’ time to get out his slump is limited, and the London Chess Classic, the last leg of the Grand Prix, will be a big indicator as to his progression.
For today’s article, I decided to put a different concept of chess under the microscope – weak squares. In my recent posts and videos, I’ve focused a lot on poor pawn structures and lack of space, and while instructive, doesn’t really encapsulate all of the natural elements of positional chess.
Weak squares, as defined by Grandmaster Iossif Dorfman in his book, The Method in Chess, are squares that can no longer be defended by a pawn, and can be attacked by the opponent’s pieces. Generally, these squares become great outposts, and can dictate the result of the game. For my first few examples, I would like to demonstrate how careless pawn moves can result in completely worse positions.
My opponent has played an early f4-f5 out of the Four Pawns Attack, but already you can probably identify all of the dark squared weaknesses this move creates. My knight now springs to life on e5, and White’s attack comes to a halt.
13…Ne5 14. Be2? White doesn’t really sense the trouble in this position. I do not want the pair of bishops, as my knight from e5 is far superior to the scope of the f3 bishop. 14…b5 15. Qc2 Qb6 Now that I’ve acquired the e5 outpost, I need to create more play on White’s weak dark squares 16. Kh1 Rae8
My knight from e5 not only controls a lot of squares, but also acts as a blockade to White’s backwards e4 pawn. By playing …Ra8-e8, I can move the knight away from e5 at any moment and put great pressure on White’s pawn.
17. Bg5 h6 18. Bxf6 Bxf6 19. Nd1 White is lost for ideas and the position is completely lost. 19…c4
When you have a significant static advantage, you are in no rush to cover the point. Here this move gives me control of more dark squares, which are even more weak without White’s dark squared bishop.
20. Nf2? Qe3-+ I identified the second weak square here, and was easily able to convert the game. I don’t like the Four Pawns Attack for White, but my opponent had a tenable position before giving me the outpost on e5, after which he was lost for ideas and fell apart.
In this next game, I was on the losing side, and the one mistake I made in the opening cost me from start to finish – let’s check it out:
Grenias–Steincamp (Baltimore Open, 2015)
12…b6??
A seemingly harmless move as I gain space on the queenside. My opponent here realizes that with this move, I have seriously committed an error by weakening the c6 square. White needs to limit my ability to gain space while simultaneously controlling the c-file.
13.Rc1! Immediately asking me to defend against discovered tactics along the c-file. Nc5 14.Bd4 Qc8 Still not realizing my disadvantage, I simplify into a much worse ending. 15.Re1 Bh3 16.e4!
Dvoretsky would be proud! Realizing that the light bishops were coming off the board, White takes the time to gain central dominance and put his pawns on light squares. Now if I take on g2, I trade off White’s bad bishop, losing tempi as my opponent gains space. Even though my side of the board becomes less cramped, I lose a critical defender of the c6 square.
16…Bxg2 17.Kxg2 Qb7 I have lost a lot of tempi with this …Bh3 maneuver and have no play to show for it. 18.f3 Nxb3 19.Qxb3 Nd7 20.Bxg7 Kxg7 21.Nb5
White’s master plan begins, as from b5, the knight will move to d4, controlling the c6 square. With my inferior position, all I can do is sit and watch.
21…Rfc8 22.Nd4 Rxc1 23.Rxc1 Rc8 24.Rc6 +-
After taking all of the necessary precautions, White punishes 12… b6 12 moves later. White went on to convert this endgame on move 71, as the control of the c-file and flexibility of the knight proved too much for my defenses.
2) Identifying Weak Squares
At the higher levels, players are generally more conscientious of creating such weaknesses, but that doesn’t mean that weak squares don’t exist. In the first game I’d like to show, I was paired against a young opponent and had played a fairly respectable game, but my opponent sealed my fate when he identified the weak squares in my position.
After having outplayed me for the last 5-7 moves, my opponent needs one last shot to push for a result. The endgame is complicated, but how can White limit my play?
33.Bb5! The idea is to reroute the bishop to c6, keeping my rooks from becoming active. 33…Rb8 34.Bc6 Rb6? The real mistake. The best option was for me to play 34… b6 and open the position. While I have an isolated e-pawn, the endgame is closer to a draw than a win. Either way, by moving the bishop to c6, White obtains something to play for, thus increasing his wining chances. 35.b5! No second chances! Now …e7-e6 doesn’t work because White can capture with the d5 pawn and bring the rook. By letting my opponent secure this outpost, I quickly found that I had nothing to play for, and resigned a little over 10 moves later. 35…Kf8 36.Rb4 a6 37.a4 a5 38.Rh4 Kg7 39.Rf4 Ng8 40.h4 Rb8 41.g4 Nh6 42.Rfe4 Kf8 43.Kg3 Rb6 44.R4e2 Ng8 45.Kf4 Nf6 46.Kf3 Rb8 47.h5 1-0
A nice win from my opponent, where he managed to demonstrate superior endgame knowledge over the board. This next weak square earned the winner $38,000 at the recent Millionaire Chess Open:
Yang – Mandizha (U2400 Millionaire Chess 2, 2015)
In this position, International Master Kaiqi Yang has White in the U2400 Millionaire Chess Final. He and his opponent, IM Farai Mandizha have drawn their past three games, leading to this blitz match. How did White make the most of this objectively (+0.17 according Stockfish) equal position?
26. Nf1! Superb idea! Regardless of the computer’s assessment of the position, the game just became a lot more complicated for Black. From f1, the knight will reroute to e3 then d5, taking advantage of Black’s inability to control any light squares, while blockading the d6 pawn. Mandizha is limited in his possibilities, as the Sicilian Najdorf line he prepared did not go as planned. He has a bad bishop on e7, which is blocked by the central pawns. in just a few moves, Yang proves that his knight is much better than Black’s bishop. 26… Bd8 27. Ne3 Bb6 28. Nd5 Bc5
29. f6!! And now White has all of the winning chances. Black erred immediately in the game but if black plays 29… gxf6, White can play 30. Rf3!+-, with the idea of taking on f6 with the rook. This idea is the “Principle of Two Weaknesses” as White will seek ways to put pressure on both f7 and d6 while improving his position. The knight is still untouchable and its not clear how Black escapes the bind. 29…g6? Tired, Mandizha makes the game losing move. 30. Ne7 And White only needed a few more moves to win the $38,000 prize.
3) Creating and Securing Weak Squares
Some openings just don’t create enough weak squares. This is where positional play becomes dynamic; finding forcing moves to create weak squares is another way to generate an advantage. Here’s a game I played online:
leika (me)-jondrich (Internet Chess Club, G/15) 24…b5
This position looks balanced and destined for equality. Black hopes that by trading down on the queenside, he can liquidate the position into a drawn minor piece ending.
25. e5!
This dynamic thrust serves three purposes: 1) trade off Black’s best piece (the b7 bishop) 2) Limit Black’s dark squared bishop’s scope, and most importantly 3) force the f6 knight away so I can place my knight on e4 at the right moment.
25…Ne8 26. Kf2 Ba5 27. Ba3 b4?
White now holds an advantage. Black has blocked in his bishop while taking away an entry square for the c6 knight. In this position, I just have to secure the d4 square and mount a knight on e4, and I can play for a win.
28. Bc1 Bb6 29. Be3 My bishop can’t do too much, but this move puts pressure on c5 while covering the d4 square. 29…a5 30. a4 Locking down the queenside. If Black makes the mistake of taking en passant on a3, I will recapture and the c3 square become accessible for my e2 knight. 30…Nc7 31. g4
Black has no ability to generate counterplay, so now my plan comes to life. Ne2-g3-e4 is coming up.
The massive trades have significantly increased my winning chances. The passed d-pawn is more of a liability than a strength, and my knights are headed to d3 and e4. Just like the last game, Black really suffers from not having the right colored bishop.
35…f6 36. Nd3 Na6 37. Ne4 Kf7 38. Kf3
Now that I have completed my plan, it’s time to convert my position to the win. Still using the weak light squares, my goal is to move my knight away from e4 for my king. The king is a crucial attacker in the endgame, don’t be afraid to use him!
38…Kg6 39. Nd6 Bc7 40. c5
With this move, Black’s minor pieces are extremely limited, and now by creating a second weak square on d6, the win is easy for White. Who would have seen this position from the beginning of the endgame?
While its important to identify weak squares and put your pieces on them, its also important to keep that outpost, or trade them for better ones. I had a cute maneuver in my round 3 win at the World Open this past year:
Steincamp-Williams (World Open, 2015)
25.Na5 Bb5
Believe it or not, the critical outpost here is the knight on a5! Attacking the b7 pawn, White hopes that Black plays b7-b6, creating the weak c6 square that we’ve already demonstrated twice. It is also not in Black’s best interest to trade away the d8 bishop since it will weaken the c7 square while the a5 pawn will act as a clamp, keeping the b7 pawn at bay. …Bd7-b5 is annoying since if I take, b7 is protected by the queen and the pawn on b5 actually immobilizes my knight, covering the c4 square.
26.Bh3! Black cannot surrender control of the e6 square, so he must return his bishop to d7. 26…Bd7 27.Bg2!
With this move, Black cannot repeat the idea of …Bd7-b5 without facing a3-a4. Before Black could trade off bishops on f1, giving him some more coordination, but now my opponent must make the concession of taking on a5. I quickly get a strong position.
27…Bxa5 28.bxa5Qd8 29.Rc7 Bc8
Black is completely immobilized and out of ideas, as my grip on the position is extremely powerful.
30.a4 Opening the a3 square for my bishop to attack d6. 30…Ne7 31.Ba3 Bf5 32.e4 Bc8+-
I’ve achieved a significant advantage, and went on to win later in the endgame (admittedly after misplaying the position a little).
In all of these games, the position went from seemingly equal to dead lost because of one weak square. Use these squares to make pieces active and blockade weak pawns, and you will see significant returns in your gameplay!
If you enjoyed this article, make sure to check out my gofundme page to learn about my journey to New Orleans for the 2016 US Junior Open.
Well, I’ve finally done it. This past Sunday I played against an expert in the Pittsburgh Chess League and pulled out a nail biter to get the win. The win puts me at 2/2 (both games with black) in the league, but more importantly will help me get the 8 points I need to cross 2100 for the first time in my career. Even though the game was far from perfect, I thought it would still be worth sharing, as the endgame is far from simple. Here we go.
Atwell – Steincamp (Pittsburgh Chess League, 2015)
A passive move on my part. I believe a better suggestion here is 7… f6, putting pressure on the center. I saw this during the game, but I hesitated because of 8. Qa4. This is more or less a theoretical novelty for White, and I think 8… Qd7 should do enough, as White still has to solve his central problems.
8.Nf3 Ne7 9.Bg5 Bd7 10.Qd2
A great move by my opponent! I was planning h6 and g5, gaining space on the kingside (I had already decided I wasn’t castling), but this idea might not be as strong now because of White’s potential to sacrifice on g5.
10…h6 11.Bh4 Qb6=
After what felt like a passive opening choice, I think I have found equality here. I’m not exactly sure if White went wrong, but now my threat of Nf5 is also extremely strong. I remember during the game finding the award move 12. g4?! with the idea of cramping Black. If I try to counter with …h7-h5, White can open up the g-file and control g5. This is a cool concept positionally, but I have the saving grace 12… Nxe5 winning a pawn.
12.Bxe7 Kxe7 13.O-O
I honestly was not too disappointed with my position. Despite being cramped, I have the pair of bishops, and my king is safe on e7. Here I had to consider the possibility of 13… Nxe5! winning a pawn. Objectively, this is the best move, but White isn’t without play. I played the text move because I didn’t like that I give white the opportunity to put his rook on a half-open file that has my king on it. Post mortem, I think the best line for White goes something like 14. Nxe5 Bxb5 15. Bxb5 Qxb5 16. Re1 Rac8 -+ and I am completely fine. I had also seen lines with Nxd5+ possibilities, but this just ends down a piece – in other words, I had a win here. While not as good as taking on e5, I have to say my move is pretty strong as well. I take control of the open file with the correct rook, and now when I reroute my queen to d8, both of my rooks are where the action will be. By not winning the pawn this turn I’m not better, but I definitely can’t be worse.
13…Rhc8 14.Bxc6? Bxc6
My opponent didn’t make many mistakes this game, but if I had to find three moves I didn’t like for White, this would be the first one. Even though my light squared bishop is poor, it stops the c3 knight from getting to c5 via a4. Furthermore, having the pair of bishops alone guarantees some sort of advantage – if not here, then later should the position open up. I have two plans: 1) push my a pawn to gain space and attack the queenside and 2) maneuver my king to g8 to allow my bishop access to the f8 square.
15.a4 a5 16.Qd3 Kf8 17.Nd2 Kg8 18.Ra3 Bf8
Mission Accomplished! My opponent had the right idea of a4 to lock up the queenside, but the position was slow enough that I had time to complete my second plan, here with the added benefit of a tempo. I don’t like White’s idea of getting the rook to a3, because in some lines the a4 pawn becomes a liability. This is mistake number 2 for my opponent.
19.Rb3 Bb4 20.Nb5??
If you’ve ever read The Magic Tactics of Mikhail Tal, the author, Karsten Muller, emphasizes that mistakes come in “bunches”. While not losing immediately, White lets me trade off my worst piece while doubling his pawns and taking full control over the c-file. This is mistake number 3, and from this moment onward, Black has the initiative.
20…Bxb5 21.axb5 Kg7 22.h4 Qd8
Queens are terrible blockaders. Having served its duty on b6, I made a tempo move on the h4 pawn while planning …Qe7, threatening a4, trapping the rook. I think this is the best way for me to use my positional advantage to get more active.
23.h5 Qe7 24.Qe3 Rc2 25.Nf3 a4-+
Iossif Dorfman preaches that if a static advantage is played correctly, it will always become a material advantage. Here, White must sacrifice the rook on b4, as letting me take on b2 would give me a strong passer with no compensation. I like this decision for White, not because it gives him winning chances, but because the position quickly becomes extremely complicated.
26.Rxb4 Qxb4 27.hxg6 fxg6 28.Nh4 Qb3
The difficult decision of the game. Here I think I could have done better with 28… Qxb5, and when White attacks g6 with 29. Qg3, meet it with 29… Qe8. 28… Qd2 is aggressive, but after 29. Qa3! Black has to be very accurate when covering the seventh rank. I chose this move because my queen was active, and ultimately had the goal of reaching e4.
29.Qf4 Rf8 30.Qg4 Qd3 31.Qxe6 Qe4 32.Nf3 Rxb2
Winning a pawn, but more importantly coordinating my pieces! I can’t afford to let white gain access to the c-file, so this move gives me the resource …Rb2-b1, pinning the rook to the king.
33.Rc1 Rb1 34.Qe7+ Rf7 35.Qc5 b6-+
Winning a pawn! White can’t afford to take on b6 or play Qc5-c6 because the a-pawn starts rolling and I will queen the pawn. White must give up the b5 pawn to stay in the game.
36.Qc3 Rxb5 37.Qc6 Rb1 38.Rxb1 Qxb1+ 39.Kh2 Qf5
The hardest move to find throughout the game. If I were to have played 39… Qb3, I think I’m in trouble. 40. e6 Re7 41. Qd6 and the e5 outpost is really strong. By playing this move, I remove this threat at the cost of a pawn, but I really don’t think its so bad. For example, if 40. Qxa4, the queen is out of play, and the plan I had during the game would be much more effective (Qf4+, Rc7-c1+ – and White’s queen can’t generate counterplay with the passed pawn).
40.Qxd5 Qf4+
My opponent told me after the game that he thought 40… Qh5+ was much more effective, but I beg to differ. 41. Kg1 Rc7 42. Kf1 (forced) Rc1+ 43. Ke2 and its already not clear how I make progress. 43… Rc2+ Black has to keep checking because the lack of coordination is not prepared to face the massive central advantage of White 44. Ke3 (not 44. Kd3?? Qf5+ and checkmate is around the corner) 44…Rc7 The king is exposed, but its not clear if white actually benefits from having an active king. Meanwhile, Black now has uncoordinated pieces against White’s queen and center passers.
41.Kg1 Rc7 42.g3 Qc1+ 43.Kg2 Qc6
Still a difficult position, but I am making progress. Any queen trade is decisive and in my favor, and moving the queen allows me to attack f3.
I think White makes the right choice here, taking on b6 loses a tempi to push pawns for white. After 48. Qxb6 a3 should be enough for the point as …Ra7 will provide more than enough support for the pawn.
48…Qg7 49.Qh4 a3
And now the end is in sight. Every tempi White uses to stop my pawn is a tempi not used to push his own. White’s queen on h4 is blocked laterally by his own pawn on d4, and the knight really offers one meaningless check on g5. The result is 0-1.
I’ve never beaten an opponent who has two queens on the board before, but White resigned as Kg4 loses to …Qf5#, and Kh2 falls prey to …Qc2+ and mate on the next move.
A crazy game, and a lot for me to work on before the Pennsylvania State Chess Championships next week. Either way, breaking 2100 is really exciting for me – and hopefully, reaching master is around the corner.
Did you enjoy this article? Make sure to check out my gofundme campaign to help me keep improving and push my way to the 2016 US Junior Open!
I played an interesting game earlier this week on the Internet Chess Club (ICC). After reaching a position similar in nature to my game against Jennifer Yu, my opponent deviated from the line, missing my one crucial resource – my space-grabbing a-pawn. Watch my video of the week as I manage to use this pawn to dominate the half-open c-file!
Enjoy this video? Check out my gofundme page to learn about my journey to the 2016 US Junior Open Chess Championships!