Good morning everyone! Today we look at some practical endgames that occurred in some of my own games. No one ever said “equalish” meant equal!
Good morning everyone! Today we look at some practical endgames that occurred in some of my own games. No one ever said “equalish” meant equal!
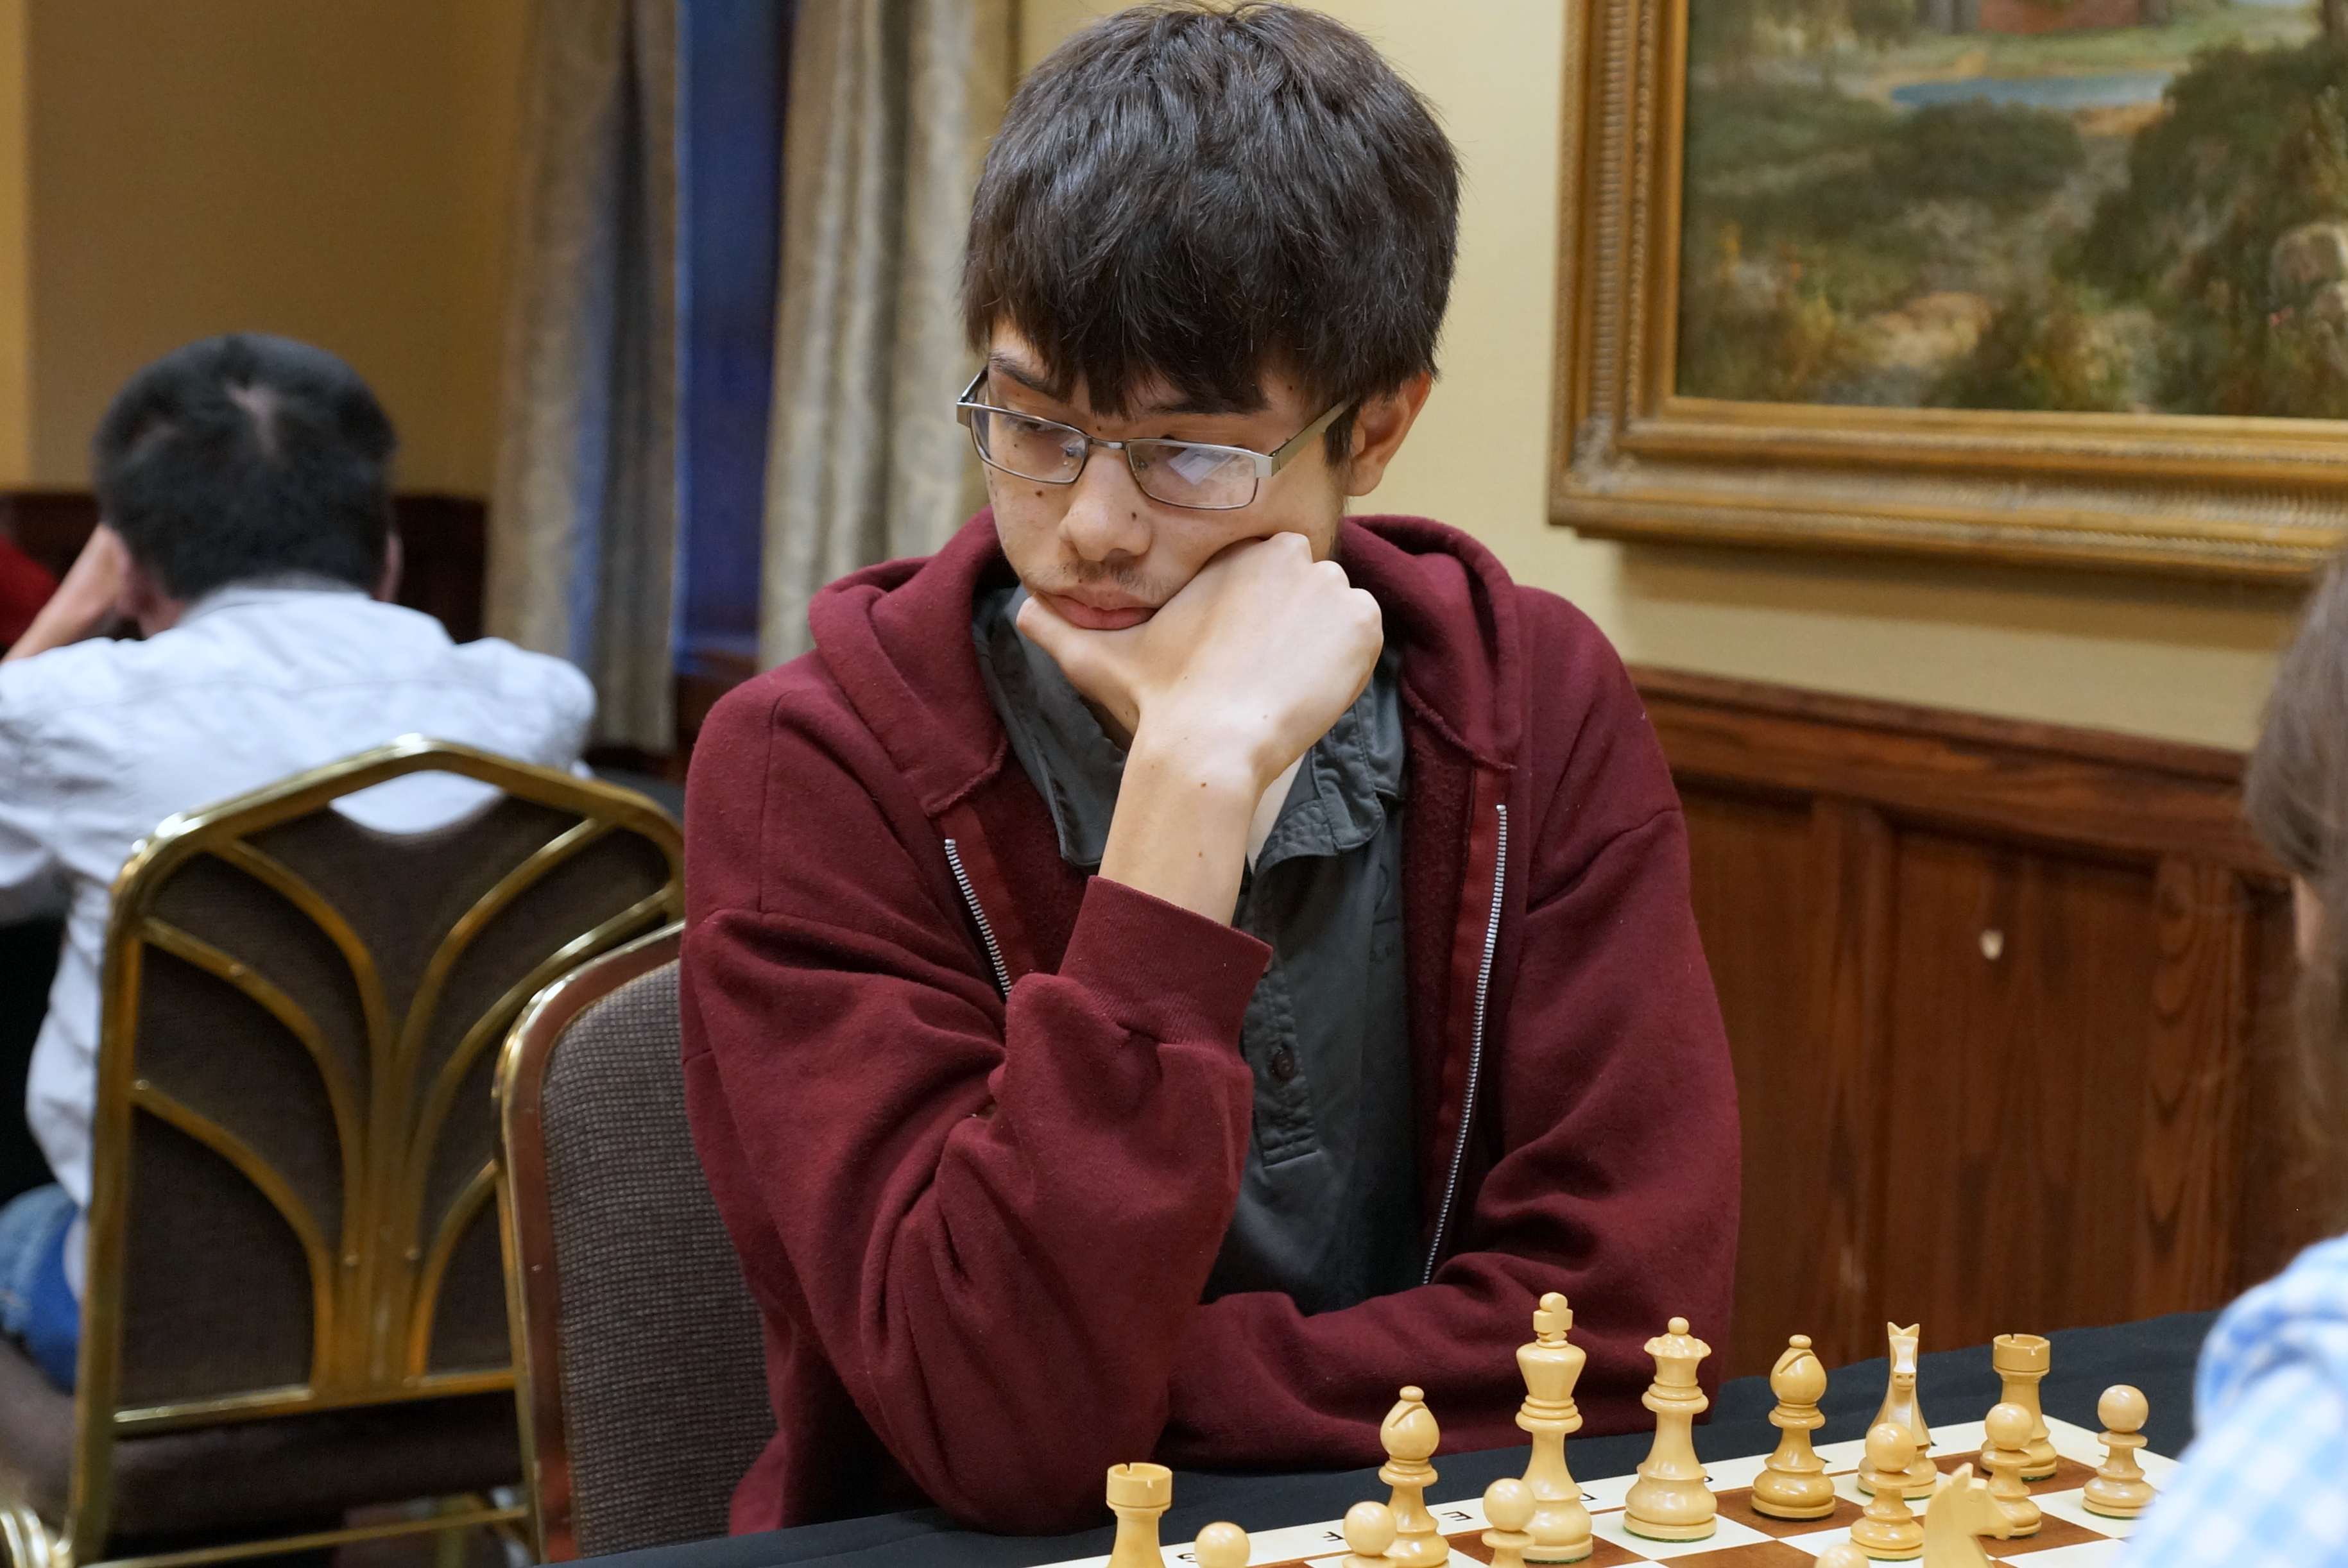
For today’s Free Game Analysis post, I will be sharing two games from one of the strongest scholastic players in Richmond, Matthew Normansell. Just last month, the high school junior tied for 9th in the U1900 National High School Chess Championships, bringing his rating to an all-time high at 1738. In just the three short years I’ve worked with him, he’s gained 1000 (!) rating points, and is trying to break expert before his graduation next June.

So in today’s post, not only will we be discussing improvements in each individual game, we will be pinpointing the strengths of Matthew’s play – specifically resourcefulness. While I haven’t worked with Matthew as much this past year, I noticed that his ability to fight in completely lost positions was one of his critical distinguishing traits from the rest of the MLWGS team.
In his freshman year, Matthew earned the nickname “Beast Mode” for his ability to put together a winning attack despite his propensity to hang pieces. I’d say that from my own observation, a majority of the games he won before breaking 1200 were in fact completely lost at some phase of the game. Obviously, to be 1700, you cannot routinely hang pieces, so at some point, the tactical entertainment evolved to positional resuscitation.
I specifically remember a quad last year where he was extremely worse positionally in each game, yet as a 1400, upset an 1800 and drew a 1950. The value of this resourcefulness in chess cannot be understated, and has proven itself to be a vital characteristic of Matthew’s style.

This past week, I got to analyze Matthew’s games for the first time in months, and I’m rather impressed with how “Beast Mode” has continued to evolve. Rather than waiting to be punished by his opponent, the monster now feeds off his own energy, playing more complete games, much more resembling that of an expert than that of an amateur.
So without further ado, let’s look at the last three rounds of Matthew’s National High School Chess Championship performance in Atlanta.
Yu – Normansell (U1900 National High School Championship, 2016)
1.d4 Nf6 2.c4 e6 3.Nc3 Bb4

Here on chess^summit, we haven’t had many opportunities to discuss the Nimzo-Indian, however, it is considered one of the most solid openings for Black against 1. d4 and enjoys a vast following. Black gives himself time to decide between a …c7-c5 or a …d7-d5 thrust by opting to castle first.
4.Bg5 h6 5.Bd2?!

Already White deviates from the main line of the Leningrad System by retreating his bishop here rather than h4 to maintain pressure on the f6 knight. If White was really concerned about structural problems, he should have opted for the 4. Qc2 lines rather than the Leningrad. Now Black enjoys an extra tempo in a flexible position.
5…O-O

A practical decision. Black could have considered an immediate …c7-c5 push to point out White’s awkward development and loss of time with 5… c5 6. d5 d6 7. Nf3 e5.

This position emulates the main line of the Leningrad System as proposed by Chess Openings for Black, Explained but also highlights the issue that without a bishop on h4, both of White’s bishops are bad while Black maintains a strong center. While this is promising, Matthew’s choice to castle instead offers a no-nonsense approach to the game. Having lost two consecutive games earlier that day, it was critical for Matthew to find some momentum going into the last day of the competition, so focusing on fundamentals was the right approach.
6.Nf3 d6

Again, remaining flexible. With White’s slow play, Black is in no rush to take the center. This move offers two plans: …c7-c5, or …Qd8-e7, followed by …e7-e5. Needing to castle, White is presented with an unpleasant decision this move, 7. e3 or 7. Qc2 to prepare e2-e4. White probably chose correctly with 7.e3, but either way, a positional concession had to be made. If White had chosen 7. Qc2, Black could consider a “waiting” move with 7… Qe7 because 8. e4 reaches an unfavorable position with Black’s response 8… e5.

Objectively, perhaps Black has better moves, but the point is that structurally White has ceded control over the d4 square, and again, the passivity of White’s bishops is a key highlight.
7.e3 =+

It’s amazing what a loss of tempo can do to a position. But you have to ask, did White play 4. Bg5 just to bring it back and block it in with 7. e3? I didn’t think so…
7…Bxc3

I’m not a fan of this move. Of course at some point, Black will inevitably trade this bishop for the knight, but it was critical to wait for White to use a tempo and play a2-a3 first. I think Black had a lot of options here, but I like challenging the e4 square the most with 7… b6. After 8. Be2 Bb7 9. 0-0 Nbd7, Black has a lot of options, the most attractive option being putting a knight on e4.

Now if White uses a tempo to play a2-a3, he loses his last defender of the e4 square, and still has to worry about …e7-e5 and …c7-c5 breaks. If White had tried to stop Black’s pressure on e4 with 8. Bd3, he’ll find how misplaced the bishop on d2 is when Black slaps down 8… Ba6! with the idea of …Nb8-c6-a5. With the real pressure on c4 coming, White also has to worry about his lack of coordination as the bishop on d3 is unprotected.

Black isn’t winning, but it’s clear that waiting to exchange on c3 gives Black more strategic chances.
8.Bxc3 Ne4 9.Qc2 Nxc3=

By trading off the dark-squared bishops, White has gotten rid of his bad bishop and has a lead in development. However, with a solid position, Black still holds relative equality. Even though White has space, he doesn’t have a space advantage because of the lack of pieces to apply further pressure. Black will find a thrust and the center and will have reasonable chances to find counterplay.
10.Qxc3 Qe7 11.Bd3

Based on his next two moves, White’s bishop is misplaced here and belongs on e2. While seemingly unusual, this is also the case in many London System positions to put the bishop on e2 instead of d3. With Black’s recent trades the pace of the game has slowed down, but many of White’s troubles start with this seemingly innocuous decision.
11…Nc6 12.h3 e5 13.Bc2 a5!

Just like my post on the Maroczy Bind last week, …a7-a5 comes to the rescue again, stopping any queenside expansion ideas.
14.a3 f5 15.d5 Nb8 16.e4? =+

White seals in his own bishop with this move. With the e4-d5-c4 pawn structure fixed on light squares, White has accepted a bad bishop. To make progress, Black will attempt to exchange his own bishop for the f3 knight, reaching a good knight v bad bishop endgame. Then, by using the dark square strategy, will play to take advantage of White’s passivity.
16…f4 17.O-O-O?

Simply failing to grasp the troubles of his own position. White needs to undermine Black’s pawns structure to have any chance to equalize and had to at least consider 17. c5.

It’s not really a pawn sacrifice since if taken, the e5 pawn falls so Black has to consider White’s threat to open the c-file.

Again, the misplaced bishop presents problems for White, but at least it’s still a game. By queenside castling, White’s king on c1 means that White really cannot afford to open up that side of the board. Let’s see how Matthew takes advantage.
17…Nd7 18.Rdg1 Nc5!

I really like this move! Black recognized that White really wasn’t threatening anything with this last move, so took the liberty of improving his position while waiting for White to cause more self-harm.
19.g3 Bd7 20.gxf4

White tries to break the static nature of the position with dynamic play, but in doing so, creates a target for Black. It’s never too early to start thinking about the principle of two weaknesses. Here Black gets his first on the f-file by simply recapturing with the rook, freeing the f8 square for the other. White will now spend more time protecting f2 than actually attacking g7. Furthermore, e4 is hit, and now White must also worry about his general lack of stability.
20…Rxf4 21.Qe3 Qf6 22.Rg3 Rf8

While the attack Matthew has essayed seems quite simple, getting here required precise positional play and a deep understanding of Nimzo-Indian pawn structures. Having played like an expert thus far, it’s unsurprising that Matthew but away this endgame with relative ease.
23.Nh2 Rxf2 24.Rhg1 Rf7 25.Rg6 Qf4 26.Qxf4 R2xf4

Even with the queen’s off the board, Black still is able to apply even more pressure on the position, in this case, the weakness on e4. White’s next move, 27. Ng4 is forced, but the simplifications further damage White’s position.
27.Ng4 Bxg4

This move was more or less forced but Black reaches the desired good knight v bad bishop endgame.
28.R1xg4 Rxg4 29.Rxg4 Rf3!

Very nice technique as now White must again make another concession in protecting the h-pawn. Aside from a few potential opening improvements, Matthew has looked like an expert this game. Even though he was never under any serious pressure this game, Matthew was able to demonstrate his resilience by bouncing back so nicely from a tough morning. Being able to relax in such tournament situations isn’t easy, and to pull it together in a National Championship environment is certainly admirable.
30.h4 Rf4 31.Rxf4 exf4

Now with a 3 v 1 set-up on the kingside, Black just needs to push his advantage to get the win.
32.h5

White has misplayed more than his fair share of the positions this round, but this move is the best way to put up resistance, giving the White king time to march to the kingside.
32…Kf7 33.Kd2 Kf6 34.b4 axb4 35.axb4 Nd7 36.Kd3 Ke5

Even in the better position, Black still slows down to make the right decision, the king belongs on e5 and not the knight. Not only can White’s king not help push c4-c5, but it must also stay in the center of the board as to prevent Black’s king from infiltrating on the dark squares.
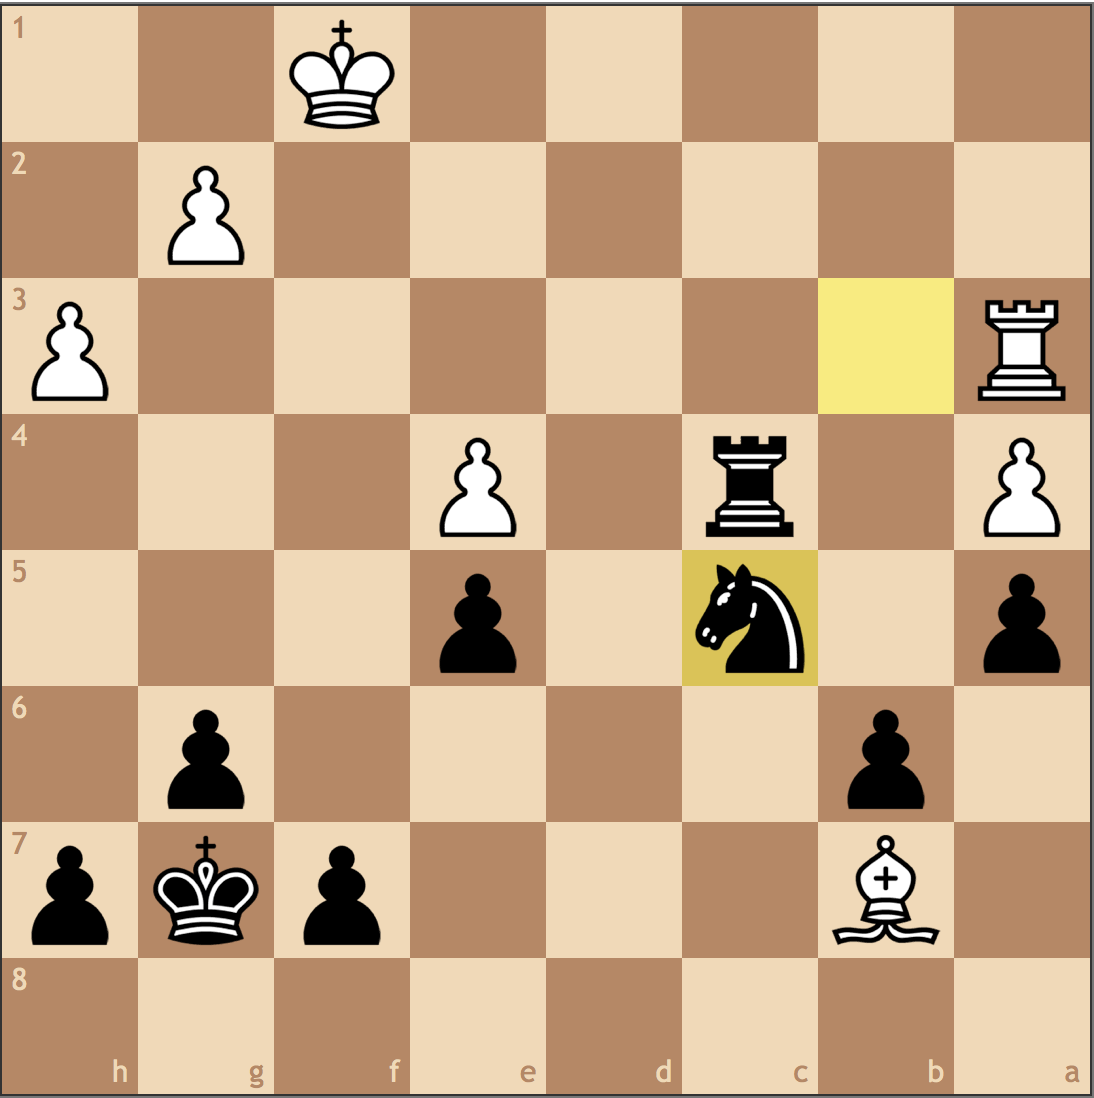
37.Bd1 Nf6 38.Bf3 b6 39.b5

The last straw. Already in zugzwang, Black forces White to make one last concession. Can you figure out how Black wins this position?
39…Nd7 40.Kd2 Nc5 0-1

White resigned, as every legal move loses material and the game. A really strong game from Matthew. One can only wonder how much higher rated he would be if he played more often!

Let’s check out Matthew’s round 6 match-up from the following morning and see if he kept the momentum going!
Normansell–Best (National High School Championships, 2016)
1.c4

Since switching away from 1 e4, Matthew’s results have become a lot more consistent with the English. As I’ve said many times with close friends, 1. c4 is the best way to start a game of chess…
1…Nf6 2.Nf3 g6 3.g3 Bg7 4.Bg2 O-O 5.O-O d6 6.d4 d5

And again, we reach another opening where Matthew gets to punish his opponent for wasting time in the opening. For amateur players, I find that understanding timing, development, and pawn structures is critical for improvement.
7.b3

Again, another no-nonsense approach from the Beast. Opting not to take on d5 to avoid Grünfeld-like positions, this move eases White towards a Catalan where Black is a tempo behind. This is a reasonable approach since the g7 bishop might be better placed on e7 in some positions.
7…c6 8.Nc3 e6 9.Qc2 Nbd7 10.Bb2

This move is objectively fine, but I think 10. Ba3 is also worthy of consideration, given that Black’s dark square bishop is not in a position to test the diagonal. I think after 10. Ba3 Re8 11. Rad1 White has an edge to work with.

White can still plan for e2-e4 ideas, but this time has full control over the dark squares. Even if Black were to try …Bg7-f8, the loss of time is apparent as Black’s remaining development is appalling.

10…Qc7 11.Rac1

Preparing for an opening of the c-file, White chooses this move . 10. e4 is interesting, but for White, it doesn’t come without cost. For example, 10. e4 dxe4 11. Nxe4 Nxe4 12. Qxe4 b6 with the future idea of c6-c5 justifies the placement of the g7 bishop.

11…Bh6 12.e3

At first, it seems kind of silly that White would have prepared e2-e4 only to make this lesser push. However, it’s completely justified! With Black’s bishop no longer on the long diagonal, White’s bishop on b2 stands uncontested. Black can’t exactly stop a future e3-e4 push, so White is in no rush to carry out this advantage.
12…Ng4?

Tricks are for kids! In threatening …Bh6xe3, …Ng4xe3 with a fork, Black violates nearly every opening principle. First, I’m not convinced that Black is better if he pulls off the tactic. He loses his good bishop and has to move a knight three times (three tempi is roughly one pawn) to get a rook and two pawns for objectively his best-developed pieces. Secondly, if White defends e3, which he does, what has Black actually gain from this bizarre movement? Tactics and strategy should work together, not operate independently of one another!
13.Rfe1 Qd8 14.h3 Ngf6 15.Rcd1 Bg7 +-

Not only has Black lost time, he has failed to improve his position! Check this out – this was Black’s position after 10. Bb2 (Black to move):

Anything familiar? It’s almost like Matthew’s opponent left the board after 10. Bb2 only to find that Ra1-d1, Rf1-e1, e2-e3, and h2-h3 had all been played and it was White to move! I wondered if this realization during the game registered for Black. I think if this were to happen to me, I’d be ready to resign.
16.e4 dxe4 17.Nxe4 Nxe4 18.Qxe4 Nf6 19.Qc2

Seeing Matthew’s next few moves, I’m going to recommend Qd4-b1! with the idea of creating a Reti battery with Qb1-a1, losing less time shuffling pieces. Ultimately, playing on the long diagonal was the right idea, but Black is so far behind that the extra tempi almost don’t matter.
19…Qc7 20.Bc3 Bd7 21.Qb2 Qd8

This game is 33 moves long, and I’m going to say that eight total moves this queen takes (roughly 25% of the game’s moves!) added no constructional value to Black’s position. The queen would be poorly placed on any unoccupied square on Black’s side of the board, but of course, this is the price to pay for having wasted so much time in the opening.
22.Ne5 Qc7

…Five. At this point, Black’s position is beyond finding one or two good moves. From here on out we’re just going to watch Matthew’s technique.
23.d5!

And the long diagonal is forcefully opened. Black cannot capture the d5 pawn since Ne5xd7 wins material on either f6 or g7.
23…Be8 24.Ng4 Nh5 25.Bxg7 Nxg7 26.Nf6+ Kh8 27.d6 Qd8 28.d7

Black can resign here, I’ve added the end of the game for the sake of completion.
28…Qe7 29.Nxe8 f6 30.Nxg7 Kxg7 31.Qd4 e5 32.Qd6 Qxd6 33.Rxd6 1-0

Hard to say White went wrong anywhere in this game. I thought it was important to notice how Matthew was never in a rush to open up the position and find a win by force. Instead, he optimized his pieces and waited for the best timing to breakthrough. Well done Matthew!

He has one more year left in high school, but if you play competitively in the Mid Atlantic, you’ve been warned. Matthew “Beast Mode” Normansell is probably the most dangerous 1700 rated player in the state of Virginia.
The weather here in Pittsburgh has been really nice these past few weeks, and I’ve been taking full advantage by studying chess outside. Yesterday, I picked up an old issue of Chess Evolution (May 2014) and started to work through the analysis before I reached this position.

White to move, and with Black’s king in the box, the win should be easy, right? Well not so fast. After about 30 minutes of calculation, I finally figured out the answer. Finding the solution without any prompting from a friend or engine made the composition a lot more difficult, but by asking the questions 1) What’s my opponent’s threat? and 2) Am I making progress?, all the sudden the answer doesn’t seem so contrived.
Rather than analyzing this study in post format, I decided to make a video of all the lines – winning and losing – so everyone could visualize the answer. Make sure to try and solve this one on your own first!
For today’s post, I wanted to discuss the nature of a critical position of the Maroczy Bind. While I typically don’t share opening ideas, the line I will share today is usually only brandished by amateur-level players, and understanding its nuances will help you combat similar bind positions. Personally, comprehending the nature of such positions was a large part of why I broke 2000, and I hope that you too can reap the benefits of being able to break down such a position.
Before we get too deep analyzing the specific lines of the Maroczy Bind, let’s take a look at the basic pawn structure the opening presents.

White very visibly enjoys a nice space advantage while Black is rather cramped behind his own structure. With an outpost on d5 for a knight and a potential kingside expansion, White stands well in most middlegame positions. However, Black has trumps of his own too. First, simply by trading pieces, space becomes a non-issue – and with two central pawns – Black can hope to be better in most endgames. Furthermore, if Black can find play on the dark square complex e5-d4-c5, the initiative can quickly shift in his favor.
The decision White has below will be the discussion of today’s article. White can push for an initiative with the standard Bd4-e3, or simplify with Bxg7. For many club players, the latter option is quite attractive as it eliminates Black’s dark squared bishop. In doing so, White hopes to eliminate Black’s dark squared counterplay on the long diagonal.

However, with every trade, you must not only consider what comes off the board, but what stays on. In this case, White is left with a bad bishop on e2 – boxed in by his own expansion. The first game we’ll look at I covered in a post back in 2014, but I glossed over some important theoretical notes that I think are quite important
Chrisney – Steincamp (Virginia Closed Chess Championships, 2014)
1.e4 c5 2.Nf3 g6 3.c4 Nc6 4.d4 cxd4 5.Nxd4 Bg7 6.Be3 Nf6 7.Nc3
d6 8.Be2 O-O 9.O-O Bd7?! 10.Rc1

A standard move in the Bind but White missed an opportunity to exploit my move order mistake with 10. Nc2!. Black’s plan is to take on d4 and then place the bishop on c6 to pressure e4, so such a move would not only stop my plan but highlight the fact that my bishop is misplaced on d7 in this version of the Nc2 Maroczy.

Now my bishop really belongs on e6, so at some point, I will need to spend an extra tempo playing …Be6. This theoretical point was battled a week after this game in the US Chess League between Grandmasters Mackenzie Molner and Eugene Perelshteyn. White stands better because Black can’t use the standard plan of …Nf6-d7-c5, so he has time to expand with f2-f4 while Black untangles.
Much better for Black was 10… a5!. This move slows White’s queenside expansion, and if 11. Nc2 Nd7 and we reach a main line position where Black looks to bring his knight to c5 and his bishop to e6.

That being said, White missed this novelty and we transposed back into a mainline position.
10…Nxd4 11.Bxd4 Bc6

A thematic idea against the Maroczy Bind as the e4 pawn is hit. While 12. f3 might make this bishop seem bad, it slows a lot of kingside expansion ideas since moving the g-, f-, or e- pawns comes at the cost of weakening White’s own king. With White’s next move, he cements his structure, making his bishop on e2 bad.
12.f3 a5!

A strong move, though in an ideal world, it would have already been played. This move secures the c5 square for the f6 knight while limiting White’s queenside expansion. It’s critical that Black insert this move, or he can quickly enter a bad position.
Roughly a year later from this game, I got thrown off in a similar structure, and allowed the push 12. b4! giving White a good game. Though I managed a draw, I got a bad Hedgehog and was lucky to find a well timed …b5 break to secure the result.

13.b3 Nd7 14.Kh1

I like this move from White as it gets the king off the weak dark squares, avoiding …Qd8-b6+ ideas. At the time, this was out of my theoretical preparation, but in all honesty, the structural integrity of the position stays the same, so Black’s plan of controlling the dark squares is still the right idea.
14…Nc5

And we’ve reached the critical position for today. In my experience, players rated above 2000 stick with the mainline move 15. Be3, and anyone below that is more likely to consider trading on g7. Since White signaled that he was worried about his king on the dark squares with 14. Kh1, the fact he went for the trade should not come as a surprise.
15.Bxg7 Kxg7 16.Qd4+ Kg8

So what’s Black’s plan now? In a perfect world, I’m looking for this endgame:

While White has a bishop, he doesn’t have a minor piece that can control the dark squares. By trading the light squared bishop for White’s knight, I’ve managed to eliminate White’s ability to create counterplay. This is actually a big issue for White, since his counterplay usually stems from Nc3-d5 and c4/e4xd5 to put more pressure on Black.
17.Rfd1 Ne6

While I was later rewarded for this move, I don’t think it’s nearly as strong as the more thematic 17… Qb6.

Though self-pinning, Black has two plans with this move. First, I can play Rfc8 before retreating the queen to d8, thus exectuing “Smyslov’s Formation” in getting both of the rooks on the same side as the king.
The more active plan, as diagrammed below is to bring the queen to b4 and march the a-pawn to undermine White’s structure.

18.Qe3 Qb8

I recall finding this move, and I think it’s one of the more difficult choices I had to make. With the queen on d8, White threatens e4-e5, breaking Black’s solidarity in the center. The idea of moving to b8 not only evades White’s plan, but prepares …Qb8-a7 with the aim of trading queens or controlling the dark squares. While conecptually this move isn’t too difficult to find, precise calculation is required for the next position.
19.Nd5 Bxd5

White has three ways to capture, and I had to be sure I was at least equal in all of these lines. White opted for the least challenging option, 20. Rxd5, so we’ll discuss that last.
If 20. cxd5 Nc5 and 21. e5 can be ignored with 21… b5 with an interesting position.

With the d6-pawn secured, 22. exd6 exd6 will only favor Black, as I’ll be faster in claiming the file. White still has a bad bishop despite the more open position, so Black cannot be dissatisfied.
White will find that the e-pawn is posioned if he tries 20. exd5 thanks to his bishop on e2, as 20… Nc5 21. Qxe7?? Re8 -+ is simply winning a piece.

So I maintained that I was at least equal with some chances with 18… Qb8.
20.Rxd5

I was least afraid of this response since it didn’t push me to come up with a positional answer. Now I can execute my idea of …Qb8-a7.
20…Qa7 21.Qd2 =+

With this move, White cedes the initiative to Black. Now White must always be weary of the queen entering on f2 or e3, as well as potential knight jumps to f4. White could reach equality with 21. Qxa7 Rxa7 22. g3 stopping the …Ne6-f4 fork, and Black’s awkward rook on a7 gives White time to expand with f3-f4.

Black of course is in no risk of losing, but is very clearly playing for a draw. This is why I believe I would have been better served with the strategic choice 17… Qb6.
21…Rfc8 22.f4 Rc5

Still a little cramped, I offered to trade pieces before White has time to activate the light squared bishop. With each trade, White will find it more difficult to secure the dark squares.
23.Rf1 Rxd5 24.Qxd5?

This move is strategically losing, as it gives up control of the e3 to the Black queen, which will force a lost endgame for White. Neither pawn capture is really great either, as I have an intermediate …Qa7-d4, and the dark squares will prove too difficult to defend.
24…Qe3 25.Qd3 Qxd3 26.Bxd3 Nd4

Finally! With the d4 outpost secured, I will play …e7-e5, locking up the position, giving Black the only winning chances. The following moves, while not directly related to the opening strategies are illustrative of the woes of a bad Maroczy endgame. Here the light squared bishop simply neve finds play.
27.Kg1 e5 28.fxe5 dxe5 29.Rf6 Ne6

A simple move to play, but simply demonstrative of Black’s resources and potential in this position.
30.Kf2 Kg7 31.Rf3 Rd8 32.Re3 Nf4

With a fair amount of time on my clock, I calculated a forced win for Black from this position. Can you do the same?
33.Be2 Rd2 34.a4 Rb2

Black has tied down all of the White pieces. The king is stuck protecting g2, the rook is covering the backwards b3 pawn, and the e2 bishop is pinned. As White tries to untangle, he is powerless to stop …Ne6-d4, picking up a pawn at the very least.
35.h3 Ne6 36.Kf1 Nd4 37.Bg4 Rxb3

Now a pawn down with three isolated weaknesses, White is hopeless to defend the position.
38.Re1 Rb4 39.Bc8 b6 40.Ra1 Rxc4 41.Bb7 Nb3 42.Ra3 Nc5
Once again, the theme of this game – weak dark squares! Black captured on a4 and got the point a few moves later.
43.Bd5 Rxa4 44.Rf3 f6 0-1
In that game, we saw that slow play doesn’t always favor White, even if Black doesn’t find the most accurate moves. The following game I played a few weeks later, though this time my opponent tried to be more aggressive.
Ling – Steincamp (Kingstowne Chess Festival, 2014)
1.e4 c5 2.Nf3 g6 3.d4 cxd4 4.Nxd4 Nc6 5.c4 Bg7 6.Be3 Nf6 7.Nc3
d6 8.Be2 O-O 9.O-O Bd7?!

Remember the refutation? Black should have played 9… a5 because of what resource? Scroll back up to the first game if you need a refresh.
10.Rc1 Nxd4 11.Bxd4 Bc6 12.f3 a5 13.Qd2 Nd7 14.Nd5

The first break from our earlier game. White executes this thematic idea before resolving the tension between the bishops. In this position I chose to wait with the standard …Nd7-c5 manuever.
14…Nc5 15.Bxg7 Kxg7 16.Qd4+

White tries to put together a central attack here, but Black has a nice defensive resource. How to punish White?
16…e5!!

This move is not only forcing, but already wins over the d4 outpost. Without a dark-square bishop, White must make positional concessions if he wishes to stop …Nc5-e6-d4.
17.Qe3 Ne6 18.f4?

Realizing that he was already statically worse, my opponent panicked with this dynamic push, but tactically it fails.
18…Bxd5 19.cxd5 Nxf4 =+

Black already has a winning game. For the sake of completion, I’ve included the attack that proved enough to convert.
20.Bd1 Qg5

Thanks to the threat of …Nh3+ and …Qxg2# White must give up the exchange, and in turn, any chance of saving the game. The resulting position proved rather easy to convert, and I won rather quickly.
In today’s post, we discussed Black’s dark squared strategy if White opts for the inferior Bxg7 lines. With solid manuevering, Black should be able to at least get an equal position, and quickly it’s White that’s left asking questions about how to find play.
Sorry for the late post, with exams these next two weeks, it’ll likely be sporadic until the end of the semester. Anyways, here’s another episode of Chess Chat!
In today’s games, I was able to demonstrate how to use space to convert a small advantage into a winning one. Check it out!
For today’s post, I wanted to share some of my studies from this past week. While I generally don’t release any of my US Junior Open preparation on chess^summit, I feel like the refutation I’m going to present in today’s post is somewhat intuitive and extremely instructive for many Hyper-Accelerated Sicilian Dragon players. Before I discuss this particular club player line, I wanted to share an endgame I stumbled upon in some of my own analysis.

White to Move
After playing a casual rapid game last night with a 2200 rated player, we reached this line in our post-mortem analysis. Faced with the threat of …Rg3-Rd3, I opted for 1. Rxd2+ Kxd2 2. a5 reaching this complicated position:

Black to Move
So here’s the question – what’s the assessment? Is White winning, drawn, or lost? The original play-out ended favorably for White: 2… Rh3+ 3. Kg4 Ra3 4. g7 Ra4+?? 5. Kf3 and Black is completely lost.

So it’s evident that for Black to hold the pawns with his rook, he must be a little more active, thus 4… Ra1 was necessary.

Now the position is equal, as White must give up the a-pawn to keep his g7 pawn, after which the ending is drawn. A sample line would go 5. Kf5 Rxa5+ 6. Kf6 Ra8 =

So here we can say that Black can safely draw the position with this line.
However, Black can try to utilize one small detail to press for more and win.
2… Ke3!! -+

Here Black takes advantage of White’s passive king and it’s awkward coordination with the g6-pawn. For example, 3. a6 Kf4 threatens mate on h3, giving the Black king time to get into the battle.
 With 4. Kh6 practically forced, Black can just play 4… Kf5 and White cannot save the g6 pawn because 5. g7 Rh3#. Once Black wins the g-pawn, the a-pawn is simply too far from promotion to be a viable threat, and the resulting position is simply winning.
It’s important to note that this mechanism works if White tries the stronger defense, 4. Kh6.

Black is seemingly a move behind, but if he can force the White king in front of his own pawn, he should have enough time to win the game. 4… Kf4 5. Kh7 Kf5 6. g7 Rh3+ 7. Kg8 Kg6

And here with Black’s threat of …Rh3-d3-d8#, White must surrender the g-pawn. 8. Kf8 Rf3+ and White can resign. It’s a cute side note to add that White is saved if his pawn were on a6 and not a5:

To stop Black’s back rank threats, White could throw in 7. a7 Ra3 8. Kh8 Rh3+ 9. Kg8 Ra2 10. Kh8 and the repetition is inevitable.
So this endgame was basically a study. We get to have even more fun if White takes back 2. a5?

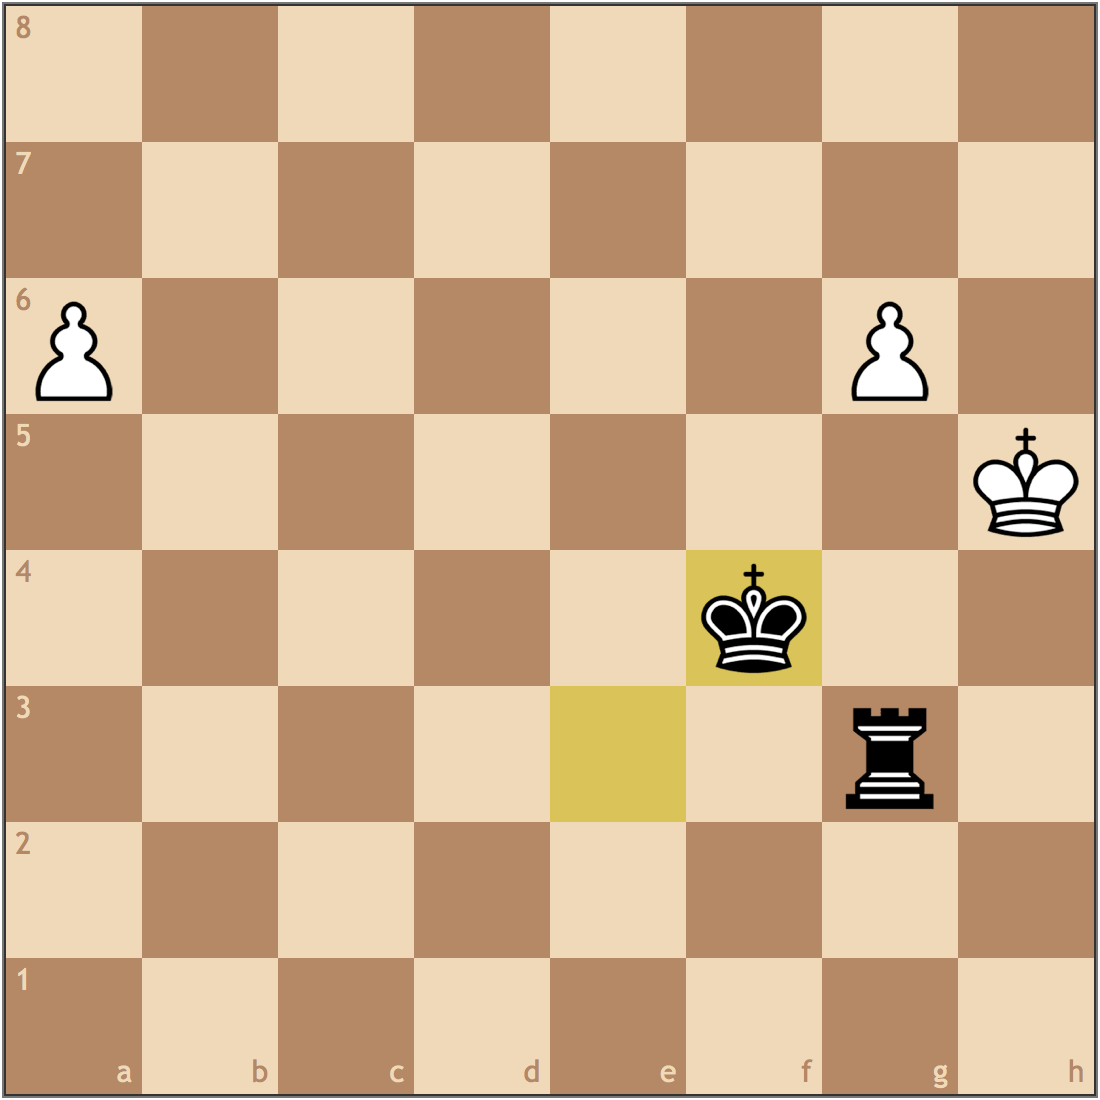
White to Move
Now that we know that extending the rook’s coverage is losing, what should White play? Knowing that White’s king placement is an issue, it makes the most sense to start with 2. Kh6 posing the question to Black, “how are you going to stop both pawns?”. As it turns out, the winning idea from before is the easiest way to hold equality.
2… Ke3!=

Now since 3. a5? transposes to the decisive line, White must waste a move, allowing Black to get his king in the a-pawn’s square. When the g-pawn promotes, Black will sacrifice his rook leaving insufficient material on the board.
Using the g-file proved instrumental in this endgame, so remember, you need to use both the king and the rook to win the endgame!
For the second half of the post, I want to share a refutation I found in a line of the Hyper-Accelerated Dragon.
Before we get too far into the theory, it’s important that Black understands this concept:
1.e4 c5 2.Nf3 g6 3.d4 cxd4 4.Nxd4 Nc6 5.Nc3 Bg7 6.Be3 Nf6 7.f3?! O-O 8.Qd2 d5!

The advantage of the Hyper-Accelerated Dragon is that it avoids the Yugoslav Attack by delaying the movement of the d-pawn. If White allows this …d7-d5 break, he quickly gets a worse structure with no kingside attack.
So in the following line, White discourages a d-pawn break.
1.e4 c5 2.Nf3 g6 3.d4 cxd4 4.Nxd4 Nc6 5.Nc3 Bg7 6.Be3 Nf6 7.Nb3 O-O 8.Qd2 d6 9.O-O-O Be6 10.f3

White usually doesn’t queenside castle in the Nb3 lines, but in keeping with his Yugoslav set-up, chooses 10. f3 here to begin shooting his kingside pawns at Black’s king. It’s important to note that should White want this set-up, he must opt for this move order to stop …d6-d5.

10…Rc8 11.g4 Nd7 12.h4 Bxc3!

With the help of the computer, I found that this counterintuitive trade reaps more than enough benefits for Black. Already, White is forced to play 13. bxc3 since 13. Qxc3 loses a pawn after 13… Nce5! and the queen and the f3 pawn are both hit.

Already visibly worse, Black can assert dominance over the position with 13…Nce5 =+ 14. Be2 Qc7 15. Bd4 Bc4 and Black not only has a promising game but has developed an attack of his own.
Again, I suspect White players that opt for this line would probably be around 1400-1700, knowing only just enough opening theory to get them in trouble. White’s set-up has some venom in it by stopping …d6-d5, but with proper play, Black can never seriously be concerned with losing.
Well, it’s finally here! The US Chess Championships start under way this week, and with Fabiano Caruana, Hikaru Nakamura, and Wesley So competing among the best players in the country, I’m looking forward to this tournament more than Norway Chess.

Here’s the field:
Fabiano Caruana, Hikaru Nakamura, Wesley So, Sam Shankland, Ray Robson, Gata Kamsky, Varuzhan Akobian, Alexander Onischuk, Aleksander Lenderman, Jeffrey Xiong, Alexander Shabalov, and Akshat Chandra.
So where to begin? Let’s start with the former World Championship Candidates Fabiano Caruana and Hikaru Nakamura.

Nakamura, the defending US Champion, may feel like he has the most to prove given a mediocre finish at the Candidates Tournament last month. While his even score drew criticism, I think given his -2 start, his performance was more of a sign of strength than a weakness.
I’m a little more concerned about Caruana. While he fell just short of getting the right to challenge Magnus Carlsen for the World Championship, he missed a lot of winning opportunities – in particular against Topalov – which ultimately cost him the event. This is a field that won’t forgive Caruana, and without much time to prepare for his opponents I’m curious to see how he’ll finish. Remember last year’s Millionaire Open? Caruana fans, you have your warning.

Without an appearance at the Candidates Tournament, Wesley So might be the most prepared player for this event. Still a top ten caliber player, So will want to avenge his disappointing showing last year by walking away from St. Louis a US Champion. There’s still a considerable gap between him and the likes of Nakamura and Caruana, but I fully expect him to bounce back.
If there’s one dark horse contender, it’s Ray Robson. In last year’s event, the Webster student placed second, only a half point behind Nakamura. Recently coming off a Final Four win, Robson should surprise again if he can keep the momentum going.
Predicting my Top Five:
Today I share some micro-moments of my past tournaments. Today’s episode is about defense, creating attacking chances, and just for fun – a game I played back in 2006.
In today’s free game analysis post, I wanted to discuss a game sent to me by an aspiring chess player from the Virginia Beach area. The game we will review today was played on chess.com, but nonetheless has great instructional value for some of chess^summit’s less-experienced followers. Let’s have a look!
Bchninja4–OhhhJordan (chess.com, 2016)
1.e4 e5 2.Nf3 Nc6 3.Bb5 a6 4.Bxc6 dxc6 5.O-O Bg4 6.h3


6…Bh5 7.Nc3 Bd6 8.d3 h6


9.Kh1

9…Nf6 10.a3

This being said, the position doesn’t promise either side an advantage and relies on one side agitating the balance. The problem for White is that the pin on f3 is hard to break. Should the queen move, the f-pawns become doubled after Black takes on f3. Without a light squared bishop, White’s ability to flexible is extremely limited. Using the prompting from the engine and the main lines following 6… h5, I think the ergonomically correct way to hanldle the position was to play 7. d3, with the idea of getting the knight to d2.

This particular structure gives White a lot more long term play. Without a knight on c3, White can consider a future central break of c2-c3 and d3-d4, while simultaneously not having to worry about the pin on f3 as much. While Black is solid, I think the second player still has to prove equality to some degree here.
And with that theoretical side note, we return to the game.
10…O-O 11.b4?

11…a5

12.bxa5 Rxa5 13.Bb2 =+

13…Qe7


14.a4 b5??

15.axb5 Rxb5

16.Nxb5 cxb5 17.c4?

17…bxc4 18.dxc4 Nxe4 19.Qe2 Bxf3 20.gxf3 Qh4?

The players simplified, but 21 moves later White lost on time in a completely winning position. That being said, I think the main points for this game have already been made.
Black wasn’t just slightly better, he was strategically winning! However by rushing into things with b5, and getting impatient by sacrificing material for no clear compensation, he quickly fell on the wrong side of the evaluation. As for White, his initial poor position derived from a lack of opening understanding and thus an inability to find a clear plan.
So the key word for today’s game? Relax. Both sides at points had opportunities to improve the quality of the game with clear-cut calculation.
If you liked today’s free game analysis, make sure to send your games to chess.summit@gmail.com so I can review them in my next post!
With last weekend’s tournament over, I head into what will likely be my longest tournament drought in years. With the New York State Open on May 20th looking to be my next tournament, I’ve got about a month and a half before I get back to the chess board again. For today’s post, I thought I’d share my plans for this summer, both before and beyond the US Junior Open.
New York State Open – Lake George, NY
With my first tournament of the summer, I get to add another state to my list of places I’ve played throughout my career. By the end of the summer, I’ll have played in 12 different states (and Japan!) after adding Louisiana and North Carolina to the list.
MLWGS Chess Championships – Richmond, VA
A return to my high school means getting to direct my alma mater’s chess championships for a few days. Last year’s event had a lot of drama in what proved to be an evenly matched field. It’ll be curious to see how far my team’s grown over the last year in the 2nd edition of the tournament.

Cherry Blossom Classic – Dulles, VA
Last year, this proved to be a “comeback” event for me, when I managed to beat then U12 Girls World Chess Champion Jennifer Yu. Just a week after the NY State Open, I’ll have another opportunity to play against high-level competition not far from home! If you missed out on my video from last year’s event, you can watch it here!
Carolinas Classic – Charlotte, NC
My last event before I depart for New Orleans. This is the first edition of the tournament, so I honestly don’t know what to expect. While I don’t know much about chess in North Carolina, I am a fan of the event’s strict section rules regarding playing up, as it likely will mean I will be playing superior competition for most of the event.
US Junior Open – New Orleans, LA
This is the big one! Since I’ve made my goal to win this tournament back in August 2015, my chess knowledge has definitely increased, and my playing style has matured – taking more positional criterion into account. History says I’ll need to play like a 2200+ rated player to have a chance, and believe I can get there thanks to all of your support!
For those of you that are new to chess^summit, feel free to check out my GoFundMe campaign here!
World Open – Philadelphia, PA
Well – this one has always been an interesting event for me, but perhaps I can hope that with the change in venue, there will be a change in results! In 2014, I somehow managed to finish 5.5/9 in the U2000 section, but ended the tournament with 7 draws in a row! In last year’s event, I got off to a strong start in the U2200 section posting 4/6, which made the 0/3 finish particularly difficult. Energy will be a key factor, as I’m not just playing in Philly for the World Open…

Philadelphia International – Philadelphia, PA
So this will be part II of my mini-vacation in Philadelphia. That’s right! If things work out, I’ll be playing in tournaments non-stop from June 30th-July 10th. I suspect I’ll take a few half point byes to get some rest, but I’m curious to see how my stamina will hold up.
Dragon Chess Camp – Richmond, VA
I guess I’m making it official? I’m returning to the BEST scholastic chess camp in Richmond. As a former director of the program, I’m extremely happy to return as an instructor at this year’s event. I suspect I’ll be gassed from all the chess in Philly, but helping out my colleagues is the least I can do to help them reach the 2017 SuperNationals in Nashville.

Southern Open – Orlando, FL
The last time I was in Florida was the 2004 Junior Orange Bowl International Scholastic in Miami (nearly 12 years ago!). With this being a CCA event, I expect the strength of my opponents to be roughly the same as they were in the Boston Chess Congress. I’m just curious to see how I’ll stack up by then…
Washington International – Rockville, MD
Last year this proved to be one of my favorite events of my career. The accommodations, organization, competition – easily the best playing conditions I had had my whole career. However, I may be a little biased, thanks to my 3rd place finish in the U2200 section last year. This time around, I’ll likely be swimming with the big fish … We’ll see how fond of a memory I’ll have then before I start my sophomore year of college.

