The powerful e5 Pawn break against the Benoni: using it as White, neutralizing it as Black

Introducing myself

Hi, I’m Franklin Chen, and this is my first post for Chess Summit, and I’m pleased to have the opportunity to begin sharing insights into chess understanding and improvement here. I recently (December 2015) finally became a US National Master, at age 45, and still consider myself an improver. (If you are curious about my history, my personal Web site has an interview of me for the Pittsburgh Chess Club.)

Theory, examples, and practice

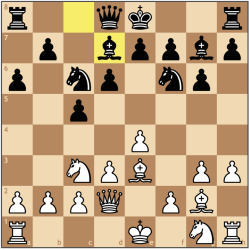
Today I’d like to give an example of how to improve understanding and use of a single important concept, the e5 Pawn break by White against the Benoni Pawn structure, in particular, the Modern Benoni structure:

1

As you go through my post here, I’d like you to consciously think about how to be effective at chess study. I like to conceptually effective study as being broken into three components:

  • Theory: knowing about a concept, in its abstract generality
  • Examples: seeing analyzing how the concept works or doesn’t, in specific contexts
  • Practice: actually using the concept in your play, and then analyzing whether it worked or didn’t, making note of improvements to make in your play the next time

Theory

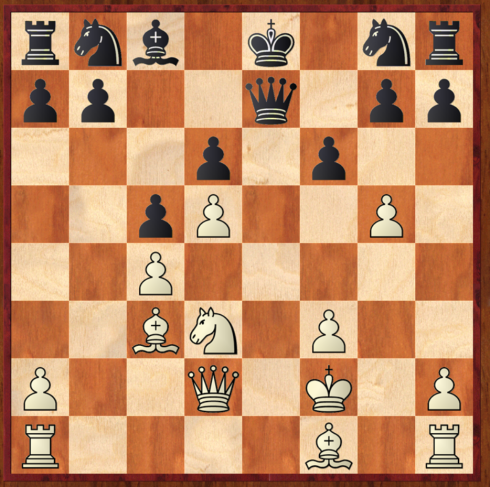
The basic theory of middlegames with this Pawn structure is the following:

White has an extra King side Pawn, on e4, and it would like to advance to e5 to attack Black’s d6 Pawn, which is very vulnerable because it is the base of a Pawn chain that has no possible Pawn to protect it. If White’s Pawn can get to e5, then it shuts down Black’s Bishop developed on g6, and also might advance to e6, or might support a Pawn or piece getting to f6. White might also advance g4, g5, h4, h5 for a full-blown King side attack on Black’s King.

Black has an extra Queen side Pawn, on c5, and therefore has chances to play against White’s Queen side by advancing with, …a6, …b5, then maybe …c4, …b4. Black’s Bishop on g7 will aid in the attack on the Queen side and also sometimes go to d4 or e5 to attack White’s King. Black has a half-open e-file and can put pressure on White’s e4 Pawn and try to prevent e5.

All very abstract, but it’s useful to know what the possibilities are up front, before diving into concrete examples. Note that when looking at examples, it is critical to examine good and bad play by both sides, not just one side; this way, we avoid the trap of overoptimistic, wishful thinking believing that the side we play has it easy. The beauty and challenge of chess is that most reasonable positions are not winning or lost but contain resources for both sides in case one side plays inaccurately (and in human chess, that always happens eventually).

Example from Isaac on how not to play against him as White

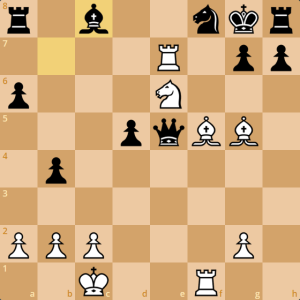
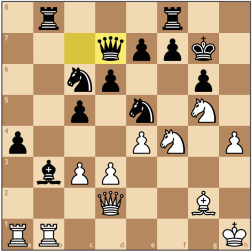
Last month, Isaac analyzed one of his games in which he was Black in this Pawn structure and his opponent as White misplayed the middlegame and allowed Black easy play on the Queen side, resulting in this won position:

3

White is completely lost here, because Black’s Queen, Rook, and Bishop have broken through: White had not even made any progress in the center or King side, but instead mistakenly not only helped Black open the b-file, but also went after winning Black’s a6 Pawn rather than protecting the critical b2 Pawn from capture.

Remember this position! At the end of this article, you’ll understand why.

Examples of Mikhail Tal losing horribly as Black!

Now that we’ve seen White punished for imprecise play, let’s see examples of Black being punished. I really like the following examples, in which the great attacking legend Mikhail Tal, who played the Modern Benoni as Black a lot and won many brilliant games as Black, actually got completely crushed by not being careful about White’s own attacking resources involving the e5 Pawn break!

Penrose-Tal, 1960

Penrose-Tal, 1960 reached this position, which White to move:

4.png

White looks in trouble

Let’s face it, the position is looking really bad for White here. It’s looking like Black will be playing …b4 next move, pushing White back. Meanwhile, White doesn’t look like he can get in e5 any time soon, given that White’s only guarding the e5 square with the f4 Pawn, while Black has the d6 Pawn, Knight, Queen, Rook, and Bishop all majorly overprotecting the e5 square.

Let’s say White tries to blunt Black’s Bishop and get more control over the e5 square with 19 Bd4. But then 19…Bxd4 20 Qxd4 b4 21 Nd1 Ba6, and White clearly stands worse, with no hope of pushing through with e5 or anything else on the King side, while Black is swarming in on the Queen side:

5

White had something ready

So you might think, there goes another dominating game by Tal as Black. But he was in for a big shock: White played 19 e5 here!

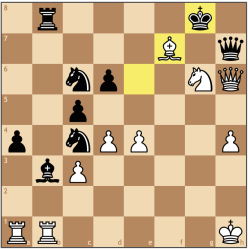
Yes, it loses a Pawn, as we already observed, but the critical insight here is that e5 can, in the right circumstances, be powerful even if it is a Pawn sacrifice. Let’s see why: after 19…dxe5, 20 f5! is the key idea, reaching this position, which is in fact winning for White:

6.png

Black to move faces many difficulties. Make note of the following transformations in the game after just two moves:

  • Black’s Knight on c5 is no longer overprotected, since the d6 Pawn has been deflected to e5.
  • Black’s Bishop on g7, which had so many threats against White’s Queen side, is now blocked up.
  • White’s Pawn on f5 threatens to take on g6 and open up the f-file for White’s Queen and Rook.
  • White’s Bishop on d3 is now unblocked against Black’s King side.
  • White’s Knight on c3 now can hop to the cleared e4 square to attack Black’s King side.

You can study the full game (linked above) for details, but let’s just say that after reaching this position, White played 26 Nc5 winning Black’s Knight on d7 and the rest was just a matter of technique:

7

Korchnoi-Tal, 1962

You’d think the great Tal would have “learned” to watch out for the e5 sacrifice idea and wouldn’t fall for it again, but oops, he did it again! We’re all human.

8

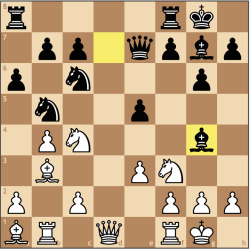
In this position, Tal as Black has just played 18…b5, frantically trying to get in Queen side counterplay. But 19 e5! followed. Let’s look at the positional transformation in this example after 19…dxe5 20 Nde4.

Now that you’ve seen the previous example, you might want to think for yourself and write down a list of what has changed, before reading further to check your answers. I’ve found that it’s really important to try to work out your thoughts, and even actually write down, as though making a commitment to your beliefs as though you were really playing, before checking answers, rather than just passively reading:

9.png

OK, here’s a list of transformations:

  • As in the previous game, White has forced Black to self-block the e5 square, which is no longer available for Black’s Knight, Bishop, or Queen.
  • As in the previous game, Black is now suddenly weak rather then overprotected at c5.
  • White has an immediate threat of d6. Note that in the previous game, this motif was not present.
  • Even Black’s b5 Pawn is now vulnerable, because it was never overprotected in the first place, and now if Black’s Knight on c7 gets chased away, it will fall.
  • Interestingly, unlike the previous game, where White basically dominated the King side, here, White is suddenly operating on the center and Queen side.

Note how each concrete situation will have its own list of possible transformations. That’s why it’s important to study many examples of the theme of the e5 sacrifice, and when encountering the possibility in your own games, to check whether it actually works. Note that the list here is smaller than the previous list, for example; correspondingly, White’s advantage is not as decisive as in the previous game. But still, after 20…Qd8 21 Nxf6+ Nxf6 22 d6 Ne6 23 fxe5 b4 24 Nd5 Nxd5 25 Qxd5 Bb7, White had regained the Pawn with a large advantage:

10.png

The final position before Tal resigned is very entertaining:

11.png

Revisiting Isaac’s game

Armed with the knowledge and examples we have seen, let’s go back to Isaac’s game. The whole impetus for my writing this article was noticing something in this position in his game, with White to move: 

2

White played the planless 15 Qg3 here. But when seeing this position, I immediately thought, is now the time to play the thematic 15 e5 sacrifice? First of all, does Black even have to take? And if Black takes, then what are the possible transformations of features of the position? You may want to stop and work out some possible lines.

A note on chess engines

Warning: this position is actually much more complex than the examples from earlier. In fact, after doing this exercise, you may want to check whether your favorite chess engine wants to play 15 e5. Mine did not. My engine did not believe that 15 e5 was as strong as I believed it to be. So this is a reminder that engines are not a replacement for human concepts and intuition: Kramnik famously lost a game against Leko in the 2004 World Championship because he relied on engine analysis that was not deep enough at the time. When studying chess with an engine, use your own knowledge of ideas to generate and check candidate moves and plans with the engine.

What if Black doesn’t take?

Note that Black can simply choose not to take the Pawn on e5, in order to prevent White from advancing with f5. After all, Black could protect the d6 Pawn with …Ne8 or …Qe7, or even not protect the Pawn at all, since if White ever takes, Black could retreat with …Ne8 and try to regain the Pawn, with a blockade of White’s d6 Pawn, and might be able to defend.

The thing to realize here is that White’s e5 advance is not intended for a quick knockout win. It is a positional move that just happens to possibly be a sacrifice. What the e5 Pawn does, if untouched, is restrict Black’s counterplay, so that White can continue to improve his position before making a committal capture of some kind to break through. Note that White’s Rooks are not yet developed. Imagine if they were on d1 and e1 behind the d5 and e5 Pawns. A sample line where Black just ignores the e5 Pawn might be 15…Qe7 16 Rad1 Ne8 17 Ne4 Rb8 18 Qf2 b5 19 axb5 axb5 20 g4 c4 21 Bb1 Ra8 22 g5 and White has made progress on the King side while Black has only been able to advance the Queen side Pawns and move the Rook around:

12.png

After Black accepts the sacrifice

Black to move:

13

This is a fascinating position because White has no direct threats at all and it’s even Black’s turn. Try running an engine on this position. It has to think longer and longer before believing White will eventually achieve a substantial advantage. Here are some features of the position:

  • Black’s activity is very restricted.
  • White will put a Knight on e4 and advance the Pawn to d6 eventually, supported by a Rook on d1.
  • White g4 and g5 stuff might happen, and/or something on f6.
  • Black has to watch the c5 Pawn, which is no longer overprotected because the d6 Pawn was deflected away.
  • White’s Queen on f3 could be a threat against Black’s Pawn on b7. White is playing on all sides of the board here.

A sample continuation: 16…Ne8 17 Ne4 Rc8 18 d6 c4 19 Bc2 Nef6 20 Rad1 b5 21 axb5 axb5 22 Nxf6 Bxf6 23 Qd5. White still has a bind and is going to finally regain the sacrificed Pawn:

14.png

I have not analyzed every possible continuation with the engine, but I have complete faith that White’s advantage must be considerable in every line after the e5 sacrifice. I would welcome any attempt to prove me wrong! In any case, from a practical point of view, without perfect Black play, at least we should be able to agree that White has more than enough compensation for the Pawn.

A game of mine where I faltered

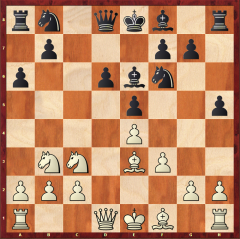
In 2006 (when I was less knowledgeable and strong than I am now), I played a game as Black in which I got crushed by a National Master. I like to think I learned something from that game. Here is an important position, with Black to move:

15.png

I should have stopped to think about the features of the position, which is completely fine for Black, but I got complacent. There were too many choices: …b5 looked good, and so did …f5.

I could even play …Bxc3, removing the defender of the e4 Pawn, then go after it. I ruled that out because 17…Bxc6 18 bxc3 Nf6 19 Bf3 and it looks like Black is in bad shape. I didn’t see the tactic 19…Nxe4 which equalizes because of 20 Bxe4 Re8:

16.png

Instead I played …Re8 and then White played the “obvious” 18 e5.

17

I was devastated when I saw this, because what was I thinking when playing …Re8? I had forgotten to check whether e5 was good, since it wasn’t anything special in the other variations I had considered. It’s always important to check for important ideas on every single candidate move even if they didn’t work on the candidate moves you already looked at. I felt so bad that I gave up and panicked, took the Pawn, and after the thematic f5, slowly fell apart. I could not see a good continuation if I declined the Pawn. It turns out there was: because White’s e5 Pawn is still pinned, Black has time to play 18…f5! 19 e6 b5! with counterplay. It looks like Black can try to maintain a blockade and defend.

A final example

To reinforce understanding of a concept, it is important to keep reviewing examples, and nowadays, that is easy because of the publishing of played high-level games online. For example, just by following chessbase.com, I saw a nice game by young 21-year-old GM Benjamin Bok posted in an article there in which he showed how to play the Black side of the Modern Benoni.

In the following position, White has just played 18 e4.

18.png

Unfortunately, the threat of e5 is transparent and easily parried, with 18…Ng4. White has misplayed the opening, because now e5 is completely controlled by Black, who has the d6 Pawn, two Knights, Bishop, Queen, and Rook all controlling e5! You know that White is never going to get e5 in. Sure enough, some moves later, we have White to move:

19.png

White has done nothing but defend, while Black is already creating serious pressure on the Queen side. Look familiar? This should remind you of Isaac’s game. If the b2 Pawn falls, it’s game over. Guess what?

20.png

In this position, Black played 31…Nxb2 and the game was effectively over. I recommend looking at the entire game to see how Black finished White off after winning a Pawn and then switched attention to attacking White’s exposed King. GM Bok made it all look easy, against a FIDE 2470 opponent! The Modern Benoni in the hands of an aggressive player still lives!

Conclusion

In this article, I explored examples of thematic White and Black play in Modern Benoni Pawn structure middlegames. I particularly enjoyed spotting the opportunity for an e5 Pawn break in Isaac’s game. I hope we will all watch out for this idea in our games, whether to play it or to defend against it.

SPFGI Take Two

After playing chess for maybe a year in the outskirts of Columbus, Ohio, I stared in amazement as I arrived at the Susan Polgar Girls National Open tournament in Corpus Christi, Texas. There were ballrooms upon ballrooms of just rows of tables with chess sets on top. There, I played and won my first ever all-girls tournament – well, I tied for first, but that’s close enough for a nine year-old who was the only one able to defeat the first seed. For the first time ever, I just knew that chess was what I wanted to do, not dance or gymnastics or any other ‘girly’ activity.

SPFGI rd 4 022.JPG

That was 2007. Five years later, I found myself invited to be the New Jersey representative for the Susan Polgar Foundation Girls Invitational. In those five years, I never played in an all-girls tournament outside of the local New Jersey Girls Junior – where the open section was maybe ten people on a good year. When I arrived at the St. Louis airport for the first time ever, I felt that heart-wrenching pressure to win as the top seed. But something was different when I stepped on campus and the pre-tournament events began. For the first time ever, I was there not to win, not to just eat, sleep, chess. I went into the tournament with no friends, and just one acquaintance who I had met while in Greece for the World Youth Chess Championships two years prior. I came out of the tournament with at least a dozen new friends, most of which I still keep in touch with even today.

Five days ago, I again found myself here, in St. Louis. When I first accepted the invitation, all my friends asked me why I would even consider returning – it’s my last summer before college and I’ve already won the title, so why take that week out of my life to come back and risk losing that 2100 rating I’d finally achieved after four years? Shouldn’t I be relaxing on a beach somewhere, enjoying my last taste of freedom before I become shackled to college life? To be honest, I asked myself these questions even while I was on the flight here, but as I settled into my dorm room, I remembered the excitement of the tournament, the friendliness of the organizers and the fellow players and I knew I made the right decision to come back.

SPFGI Blitz 063.JPG
Round 4 of the Blitz Side-Event

In a way, it feels only right that I end my scholastic career here at the 13th annual Susan Polgar Foundation Girls Invitational after launching it at the foundation’s National Open nine years earlier. It’s taught me that tournaments are not just a battleground – it’s a place to experience immersing oneself in chess completely for the first time ever, or a place to realize you’re not the only girl who loves this game, even if you are the only one in your school or even state. The SPFGI is an event that inspires, not only pushing me to keep playing chess, but also pushing me to promote chess with the NJ All-Girls Chess Camp.

The Southern Open: A Comedy of Errors

13680511_840246946110976_1979527866533666978_n
The 2016 edition of Dragon Chess Camp brought in a record 51 campers for the week long program.

What a long couple of weeks it has been! Since my return from Philidelphia, improving from one of my most nightmarish tournaments of my career has been at the forefront of my agenda. With new openings to learn and grandmaster games to review, I had exactly two weeks to prepare for this past weekend’s Southern Open in Orlando. While such a short period of time to prepare is by no means ideal when preparing a new repertoire, I was ready to play some new lines as Black. In fact, in each of my games as Black I got to play new openings and reached much more solid positions! So progress has been steady, but there’s still a long ways to go.

On top of my own personal opening preparations, my first week back from the World Open was also spent volunteering at a program I had started back in 2013, Dragon Chess Camp. Back in my sophomore year of high school, I wanted to push our team to become much more competitive and provide my teammates with competitive opportunities across the country. The first edition of the summer camp had twenty participants and raised enough for our team to travel to the National High School Chess Championships in San Diego the following year where we won clear first in the U1200 section. Since, the team’s outreach has really taken off – running free chess clinics, more summer programs, and hosting a plethora of scholastic tournaments – and the Maggie L. Walker Governor’s School has become the pinnacle of chess in Richmond.

13700967_838676432934694_5114516315835122652_o
Watching the kids practice the Lucena and Philidor positions – better now than later! And that screen in the background? We were watching Nakamura’s big win over Carlsen too.

This summer, fifty-one scholastic players registered, which will help next year’s team compete in their first SuperNationals in Nashville, Tennessee! With such high attendance, I was tasked with the largest group I had taught in all four editions of the program. For that week, our class focused on theoretical rook endgames – the Lucena, Philidor, Vancura, known draws – whatever you could think of! Despite the relatively young age of my group, by having the players practice both converting and defending, they proved to be extremely fast learners and one of the players even used the ‘building a bridge’ technique to convert a win at the weekend’s tournament.

The second half of the course focused on principled opening play, which I had put together after my performance at the World Open. Halfway through the week, I had realized that many of the players in the camp only knew “unprincipled” openings – for example, various Pirc and Modern structures as Black – and were constantly having problems because they didn’t know theory. Thinking back to the thousands of pages of chess literature I’ve read, Greg Serper’s chess.com article on Inexperienced Player Mistakes comes to mind, where he calls a 1500 rated player’s choice of 1. c4 a mistake (of course this means I sinned in this same way six years ago) because a player of that caliber needs to learn chess by fighting for the center first with 1. e4 or 1. d4.

I think part of the openings-craze among scholastic players is driven by coaches who themselves don’t know classical openings, or perhaps think that changing openings will solve all of the problems their pupils may be having. Of course, this may temporarily improve the student’s performance, but long term – as I too have recently found – could be more of a hindrance than a strength. As a gift to all the 1. e4 players in my class, I showed them a simple plan Amonatov used in similar structures to demonstrate how Black’s failure to fight for the center was the root of his problems.

IMG_4729
The tournament venue – good thing the US Junior Open in New Orleans taught me how to cope with the heat!

So that’s enough banter, how did my first tournament back from the World Open go? Admittedly, not what I had hoped for. Without any opportunities to really practice my new openings or demonstrate improvement in an over-the-board game, I lacked a lot of confidence in my own abilities. This definitely had an impact on my overall play, but the bigger problem was that in spending all of my preparation on openings for this event, I was not as sharp tactically, and that proved to be the most apparent reason why I underperformed.

In my first round, I had a Deja vú experience, getting once again surprised in the opening and completely dismantled by International Master Daniel Fernandez – not exactly what you want when you’re confidence is already at a low! For my next two rounds, I focused on staying solid and earned two easy draws, though I figured they would not be the most entertaining games to share today. I nearly repeated the task in the fourth round, but a simple blunder saw me lose a pawn and enter a hopeless endgame. So once again, I had to look to my last round game to avoid disaster. After some impractical opening decisions, I reached the following position:

Screen Shot 2016-07-25 at 16.40.34
Steincamp – Teodori, White to Move

While White might be able to hold a fortress, it’s clear that only Black can really play for a win. Beyond the fact that I have the thematically bad Maroczy bishop, Black also has the advantage that he can play for several weaknesses. First against the e4 pawn, in either tying down my pieces or making me play f2-f3 weakening my dark squares. But perhaps the idea that will really prove to be the most annoying is that Black can simply play …a7-a5-a4, and then put pressure along the half-open b-file, using the principle of two weaknesses to create pressure. If needed Black also has the …f7-f5 break as an added resource he can use to try to put an end to my existence. So strategically Black is winning. Over the board, I figured my best chance in this position was to find a way to generate kingside counterplay and reroute my light-squared bishop to a more active position. 21.g3

Screen Shot 2016-07-25 at 17.10.13

Here I decided my only way to improve the position was to expand at the right moment with f2-f3 or f2-f4, but playing this move first leaves my options open. More importantly, this is the beginning of a long road trip for my bishop on d3, starting on f1, and re-entering the fray on g2. With the next few moves, my opponent made it clear that he didn’t know how to proceed. 21…Bc6 22.Bf1 Qd4 23.Bg2 Kg8 24.Rd1 Qg7 25.Rde1 Qd4 26.Rd1 Qg7 27.Rde1 Ba8 28.h3

Screen Shot 2016-07-25 at 17.21.08

As you can see, my opponent has done very little to improve the nature of his position, simply waiting for me to make a mistake. Of course, there’s nothing I can really do at the moment to punish him, but the more I continue to evolve my position the better suited it will be to fend off any attack from Black. With this move, I create a little room from my king on h2. I was considering 28. f4?! but after 28… Qd4 starts to get annoying and tactical complications ensue after …f7-f5. Though h1 seems like a suitable square for the monarch, it’s on the same diagonal as Black’s bishop, and I would rather avoid that if possible. With Black not doing much, I have time to place my pieces as I would like. Realizing I was planning f2-f4, my opponent lashed out with 28…g5? and then the party really started!

Screen Shot 2016-07-25 at 17.35.27

Even in my poor form, I immediately recognized this as a positional blunder. While temporarily stopping f2-f4, Black has just weakened his light squares around the king. Already I can think about mounting my g2 bishop on f5 where it would actually be a decent piece and at the very least give me very good drawing chances. Furthermore, thanks to 28. h3, I can put my king on h2 and consider opening the g-file at my own convenience. With this one move the entire dynamic of the game starts to change, and luckily for me, my opponent has yet to realize the gravity of the situation. 29.Kh2 Kh8 30.Qe2 Qg6 31.Qb2+ Qg7 32.Qe2 Kg8

Screen Shot 2016-07-25 at 17.57.12

If you compare this position to the previous diagram, you’ll see that Black’s position is identical to the one before it, while I’ve had the luxury of making two moves and am on turn to take a third. Here I decided to take control of the game with 33.f4 since now seemed the most logical time to change the structure in the game. Black’s ability to use his long-term trumps are starting to wear off, and it almost seems like the a8 bishop is every bit out of the game as mine on g2. 33…f6 34.Bf3 Kh8 35.Bh5?

Screen Shot 2016-07-25 at 18.12.42

Trying to execute a bishop pendulum before locking in on g4. Positionally not bad, but tactically problematic if Black finds 35…gxf4! the critical zwischenzug that turns the game upside down. Luckily for me, as the game has shown thus far, Black was beyond trying to proactively solve his problems and reacted to my threat as I had anticipated. 35…Rg8 36.Bg4 gxf4 37.gxf4 h5 38.Bf5

Screen Shot 2016-07-25 at 18.18.17

Not taking the pawn! Positionally it is much more important to have a bishop on f5 and control the critical light squares in the position. This enables my queen to enter the game on h5 if Black isn’t careful, which wasn’t an option if I had taken with the bishop. Tactically, Black probably retains an edge if after 38. Bxh5 f5! attempting to open the long light square diagonal. I awkwardly managed to set-up a defense until making this critical mistake some moves later. 38…Qh6 39.Rf1 Reg7 40.Rff3 h4 41.Qf2 Bb7 42.Be6?

Screen Shot 2016-07-25 at 18.24.42

Black to move and win. I’ll attach the answer further down in the article if you want to try and solve it first. Positionally though, my goal was to lock down the e-file by playing f4-f5 and use the f4 square for my rook to attack h4. This is precisely what happened in the game, but even from a positionally better side of the board, tactics are still everywhere! 42…Re8 43.f5 Bc8 44.Rf4 Rh7 45.Bf7!

Screen Shot 2016-07-25 at 18.28.43

I had seen this when I played 42. Be6, and perhaps I was too quick in missing its initial refutation. The game is now lost because Black cannot take on f7 without losing the queen via Rf4xh4 with a pin, and now my bishop will go to g6 and win the exchange. Sadly for Black, there are no practical winning chances once the position simplifies. 45…Re7 46.Bg6 Bb7 47.Bxh7 Rxh7 48.Rg4 1-0

Screen Shot 2016-07-25 at 18.31.45And the game meets its rightful end. Black cannot save the h4 pawn, and my pressure on the kingside will be too much to handle. Black’s light-squared bishop, once the proudest piece in the position, now is utterly useless to aid Black in his struggles.

Not a particularly well-played game, but I thought it illustrated how at the 2100 level, how tactics and poor endgame technique still plague our games. And to some extent, the once abysmal d3 bishop’s road trip was quite amusing – it moved eleven times from d3 to reach h7 to win the game!

I’ve already thoroughly discussed endgames here on Chess^Summit, but if you missed my series on Carlsen, you can check them (in order) here, and here, and here, and here, and here, and here – I swear they are all different links! It was a lot of fun putting together those articles, and it certainly helped my endgame play, and  hopefully it can help you too! As for tactics, it’s a never ending improving process – speaking of which:

Screen Shot 2016-07-25 at 18.24.4242. Be6?? Rg2+ 43. Qxg2 Rxg2+ 44. Kxg2 Bxe4!! 45. Rxe4 Qg6+ -+

Screen Shot 2016-07-25 at 18.43.41

How easy it was to miss 44… Bxe4!!? Well, luck was certainly on my side this game.

11887740_1139521726063770_1467573306272308072_o
Last summer I took third in the U2200 section, which set me well on my way towards breaking 2100.

I’m closing out this summer with my next tournament, the Washington International, before heading back to Pittsburgh for my fall semester. While I was flirting with the idea of trying the open section early in the summer, I’ve decided to compete in the U2200 section to iron out some of the weaknesses in my game. The Washington International is certainly the most accommodating tournament I’ve ever played in, and I’ve had this event marked on my calendar since I left Rockville last year. I’m hoping to make the most out of this tournament, and hopefully, it can be as good to me as it was last year! Until next time!

Psychological Resiliency: The Art of the Bounceback

motivational-quotes-confucius

If you’re anything like the prototypical chess player, you probably hate losing more than anything in the world. Or even drawing games that you think you should have won. It sucks, but I’m not going to give the usual “study your losses and learn from your mistakes” spiel. Instead I’ll focus on the short term instead of long term response, because immediate reaction to disappointment is critical to consistency and improvement.

I am no stranger to periods of frustrating stagnation. After starting tournament chess in 2007 and ending with a rating around 2050 by the end of 2009, I struggled to improve noticeably for quite a while. My results were woefully inconsistent: good results alternated with bad results. Basically everything I’m going to tell you I didn’t know. It took me the next 15 months just to break 2100, during which I considered quitting chess completely after every tournament.

When we hit plateaus, often good tournament results are alternated with horrible tournament results. Rarely do players plateau because they continuously have average tournaments. If you can increase your floor performance level, then you give yourself a great chance to have a breakout result eventually that isn’t offset by other major losses.

I’m a big stats and data guy (it’s actually my job for the summer), so take a look at the below table and see what you can notice:

results

Not coincidentally, I made master towards the end of 2012.

Basically, try to avoid ever losing twice in a row or being upset twice in a row. Whenever you get hit, get right back up and hit back harder in the next game. I know it’s a whole lot easier said than done, but if you put yourself into this mindset all the time you will develop a psychological resiliency that can carry over not just from game to game but also from move to move, or tournament to tournament. Even many strong players seemingly can’t do this. How many times have you seen one of the top seeds get nicked for a draw or loss in round one and immediately withdraw? There’s a certain word I would use to describe these people, but this blog post is probably not the appropriate place to say it.

The exception to this is if you play up. If you play up against much higher rated opposition, this becomes tough to do, otherwise you should be at their rating! Playing up can help you gain experience against strong opposition, but if you find yourself just losing game after game, it really does you no good. My suggestion is to develop a pattern of strong consistency against lower-rated and equally-rated players. Once you can consistently take their money and rating points, move up.

I am convinced my slow, eventual grind to my current rating of 2350 could have been a lot quicker if I had been able to develop a greater psychological strength earlier on. (That, and better study habits. Isaac seems to be a lot better and more methodical at this!) I like to feel like I’ve improved in this area, as I have very few catastrophic results anymore. I feel like my approach has matured. Of course, I don’t claim to be great at this even now, as it is an ongoing process for all players. The next step is to increase my chances of super strong results, for which actual chess study plays a much larger role (go figure).

As I’m writing this, Hikaru Nakamura has notched his first ever classical win against Magnus Carlsen in round 1 of Bilbao. But perhaps even more remarkable is that Carlsen won all of the next three games to surge back to clear first. What I’ve noticed is that in the rare occasions that Carlsen does lose, he comes back with a vengeance, and often steamrolls his next opponents. That’s part of the reason why he is in a class of his own. He doesn’t let losses get to him. Instead, he uses them as fuel for the fire that is unleashed upon his upcoming foes. Be like Carlsen, channel that competitiveness, and GET PISSED OFF when things don’t go your way.

I have my share of 20 move demolitions, but the example I’m showing is the best display of the theme of resiliency:

post1.PNG

Liu, A (2360) – Xu, G (2284), Continental Open 2013, Position after 18. Kf2

I was coming off a tough loss in the previous round, having missed many opportunities to draw against a 2500+ player. This game looked like a forgone conclusion too, and I can’t remember ever having to defend such a depressing and sh***y position. It’s move 18, and not a single one of my pieces have left the back rank, except for my queen that is about to be pinned by Re1. However, I was determined not to lose, and tried to make the win as difficult as possible for my opponent.

18…Kd8  only move 19. Re1 Qf7 20.Qf4 Qf8 this looks even worse, doesn’t it? 21. gxf6 Nxf6 22. Rg1 Nbd7 23. Qg5 b5!? A move of desperation, but a very practical decision. I couldn’t wait for White to slowly build up pressure and crush me, and had to seek some kind of activity. 24. Nf4 Nb6 25. Ne6+ Bxe6 26. Rxe6 27. Qxg7+ Qxg7 28. Rxg7 Nfd7 29. Bh3 b4 30. Bf6

post2

White still has a tremendous position and is winning, as his powerful rooks and bishops paralyze my knights. However, I was able to avoid getting mated or suffering massive material loss, giving me a chance to keep fighting. Granted, my opponent doesn’t play with the best precision leading up to the time control, but I refused to die and played “annoying” chess.

30…Rae8 31. Rxe8 Rxe8 32. Rxh7 a5 33. Be6 a4 34. h4 b3 the only way to set problems 35. axb3 axb3 36. h5 Ra8 37. h6 b2

post3

White is only a couple of steps away from victory, and I had calculated in all lines that I was losing, but I held my breath….38. Bf5?? White tries to play it safe, but finally errs. The simple Bxb2 Ra2 Re7 Rxb2+ Kg3 Ra2 h7 Ra8 Bg8 would have won. 38…Rf8! I grab my opportunity and realize I am probably out of the woods. 39. Bxb2 Rxf5 40. Rxd7+ The computer actually still says Re7 is winning for White, but that is a tough move for a human to calculate thoroughly with little time, so White bails out. Kxd7 41. h7 Rh5 42. h8Q Rxh8 43. Bxh8 Nxc4

post4

I end up with a better endgame in which I was able to press, but alas, I missed a couple wins later on and the game ended in a satisfactory result of a draw, and I avoided two brutal losses in a row. 1/2-1/2

This kind of tenacity and resiliency is a widely seen attitude that generalizes to a life approach (see the Confucius quote at the beginning of this post). Besides Carlsen, there are many other examples:

-The Golden State Warriors never lost two games in a row in their magical 73-9 regular season run. They often blew the opposing team out of the gym in the next game after the games they did lose. Perhaps fittingly, when they finally started to lose multiple games in a row, they almost got eliminated by the Thunder and lost the championship to the Cavs.

-The five minutes after a soccer goal is scored is often said to be the most dangerous period of time for the team that just scored. The opposing team is often at its hungriest and most motivated to strike back in this period.

-Before his retirement and subsequent attempted “unretirement”, Muhammad Ali only lost three fights in his career. After every single loss, he won the rematch, often decisively. Ali is considered by many to be the Greatest of All Time.

Developing resiliency goes a long way. It’s difficult to do, but those that can master it achieve greatness.


Attacking Chess (Part 2): The Speculative Spectacle

In the first installment of our Attacking Chess series, we discussed the first rule that I have considered to be a must-know if a player wishes to have success.  If you haven’t read that yet, I suggest you check that out first before reading on (that article can be found here).

In the previous rule, we discussed situations in which the player should not shy away from moves or sacrifices that are not associated with a clear path to victory, especially if long-term positional or tactical compensation exists.  In this way, if the attack doesn’t finish the game off right away, there is still a fighting game in the road ahead.

However, we do not always find ourselves in these situations where we can always fall back on the ability to play on with compensation if an attack falls apart.  It is these specific situations that should` be prepared for and studied most – when an attack does not go through, and it leaves the player with an inferior position.  Yet, this does not always have to be the case – there is hope; it is here in these situations in which our next rule applies.

Rule #2:  When dealing with speculative sacrifices, it is better to have a bailout option available.

There might be multiple ways to accomplish this, but the most likely candidate to occur will be the perpetual check or the forced three-move repetition.  Giving perpetual checks is one of the simplest ways to end a game in a draw, especially if they are completely forced.  The ability to be able to end the game with no questions asked can become quite handy when conducting attacks, especially when material is being sacrificed.  Knowing that it’s impossible to lose because that draw is always available in the back pocket is a great feeling to have.  With this in mind, venturing a bit to try something can pay off in the end, as it did in this following game.

Byrne – Fischer (Third Rosenwald Memorial, 1956)


Byrne-Fischer
Figure 1:  A young Fischer during this game


I’d hardly be surprised if you, reader, have seen this game before.  It’s most famously known as the Game of the Century, and rightly so, when you see what happens.  In this game, Fischer was a mere thirteen (!!) years old when he played this game.  He was just becoming a promising young master at the time of this game.  Byrne, on the other hand, was one of the leading American chess players at the time.  In this game, Fischer (as Black) demonstrates noteworthy innovation and brilliant sacrificial play.  Get your popcorn out and enjoy the following.


July21_ByrneFischer
Figure 2:  Byrne – Fischer – Position after 15. Bc4


White has active diagonal pieces, and is ready to castle on the next move, but these characteristics are offset by the fact that the e-file is begging to have a rook on it and White’s king still sits in the center.  Fischer takes this difference to heart and goes all in before he can lose the chance.

15. … Nxc3!

The tactics all work out in Black’s favor.  White can’t take the knight with 16. Qxc3 due to 16. … Rfe8, setting a particularly painful pin; the bishop will fall.  16. Bxf8 doesn’t offer much better after 16. … Bxf8, and when the queen moves anywhere, 17. … Nxd1 will leave Black with the upper hand, and White’s king is still stuck in the center.  Note that 17. Qxc3 falls to 17. … Bb4 and the queen is lost.

16. Bc5

Attacking the queen, but also moving the only piece left on the e-file away from it.  This gives Fischer the chance to kick the king out of castle-zone.

16. … Rfe8+ 17. Kf1

This is what Byrne was banking on.  It appears as if Fischer has to solve the situation with the queen, whereupon Byrne can then capture the knight and be ahead with a comfortable material advantage.  Fischer, knowing that that is not an option, delves deeper into the position, hoping to find some way or another to save his position, if not turn the tables.  If you have not seen this game before, I encourage you to momentarily halt scrolling and try to predict the next move.


July21_ByrneFischer2
Figure 3:  Byrne – Fischer – Position after 17. Kf1


17. … Be6!!

I’d add more exclamation marks if I could, as you could probably write a whole book on this move if you really wanted to.  If this game is called the Game of the Century, then this move can certainly be called the Move of the Century.  Fischer offers his queen in exchange for a minor piece and a fierce attack for now, and depending on how he continues, he might receive even more material in return.  In two moves, Fischer is able to reposition his bishop and transform it from where it wasn’t doing much into a dagger raking through the most important (and vulnerable, from White’s perspective) diagonal on the board.  Sounds tempting, doesn’t it?  It was to Fischer.


July21_ByrneFischer3
Figure 4:  Byrne – Fischer – Position after 17. … Be6!!


18. Bxb6?!

Byrne accepts the sacrifice, hoping that he can outsmart the young thirteen-year-old in the ensuing complications.  Still, declining the sacrifice wasn’t so easy.  18. Bxe6 falls to the classic smothered-mate trick after 18. … Qb5+ 19. Kg1 Ne2+ 20. Kf1 Ng3++ 21. Kg1 Qf1+! 22. Rxf1 Ne2#.


July21_ByrneFischer4
Figure 5:  Byrne – Fischer – Position after 18. Bxb6?!


Other alternatives don’t work out all too well either – 18. Qxc3 Qxc5! 19. dxc5 Bxc3 leads to an endgame in which Black should win due to the extra pawn advantage.  However, 18. Bd3 was probably the lesser of the evils, but that should still leave Black with a slightly better position.

18. … Bxc4+ 19. Kg1 Ne2+

The point.  As of now, Black only has a piece and a pawn for the queen; although his pieces are almost optimally placed, there is still work to be done before anything can be made of it.  Fortunately for Black, he has the option to force a draw by perpetual check by the means of Ng3++, Ne2+, Ng3++ etc.  This leads me to believe that Fischer most likely stopped calculating after this position on his 17th move because he had the draw if he needed it.  There was no need to confuse himself by any means.  After reaching this position, he would then decide if he wanted to play on or take the draw.

July21_ByrneFischer5
Figure 6:  Byrne – Fischer – Position after 19. … Ne2+

20. Kf1 Nxd4+ 21. Kg1 Ne2+

Fischer demonstrates the classic “windmill” scenario, and it is quite a sight to behold.

22. Kf1 Nc3+

Around here is most likely where Fischer decided to play on, after calculating this combination.  The king is once again revealed to a check and the rook on d1 hangs.


July21_ByrneFischer6
Figure 7:  Byrne – Fischer – Position after 22. … Nc3+


23. Kg1 axb6!

Never mind the rook!  Taking the bishop with a tempo on the queen is a crucial intermezzo (meaning “in-between”) move.

24. Qb4

Note that 24. Qc1, trying to protect the rook, is not possible on account of 24. Ne2+ and the queen falls due to the fork.

24. … Ra4

Gaining another tempo on the queen and protecting the bishop on c4.  The purpose behind 20. Nxd4+ is now revealed, as the bishop on g7, which was seemingly doing nothing, now plays the crucial role of protecting the knight on c3.


July21_ByrneFischer7
Figure 8:  Byrne – Fischer – Position after 24. … Ra4


25. Qxb6 Nxd1

Black has received a rook and two pieces for the queen and is now ahead in material.  The rest of the game was just mop-up work for Fischer, who proceeded to win easily.  This game was a brilliant example where Fischer was able to take a speculative risk, knowing that if all else failed, he still had the draw card he could play as a last resort.  As an added bonus, Fischer also had the windmill motif available, which would have allowed Fischer to play even more moves before deciding whether he was better off playing on or resorting to the draw.  Fortunately for him in this situation, Fischer was able to reap the benefits of playing on and declining the ability to draw, as he so often did throughout his career.  Yet, not every game follows this same storyline.  There are numerous cases, if not more, when the aggressor will have to slow down and take the draw.  We will look at once such example.

Hellers – De Firmian (Biel, 2005)

Though these two players are not well known, it is the game that matters, and it serves its purpose.


July21_HellersDeFirmian
Figure 9:  Hellers – DeFirmian – Position after 15. fxe5


White has sacrificed a piece in order to gain time on Black’s pieces and hopefully open the e-file against the Black king.

15. … Nh5

Logical.  Black moves the knight and asks the White queen to make a decision.

16. e6!?

But no!  White embarks on a journey where there is no turning back.  He sacrifices the queen in order to open the files against the king.  It is yet to be seen whether it will pay off.


July21_HellersDeFirmian2
Figure 10:  Hellers – DeFirmian – Position after 16. e6!?


16. … Nxg3 17. exf7+ Kxf7

If the king moves anywhere else, the queen and king will be forked after 18. Ne6+.

18. Rxe7+ Kg8 19. hxg3

White spends some time to take some material back, but he still only has a minor piece for the queen.


July21_HellersDeFirmian3
Figure 11:  Hellers – DeFirmian – Position after 19. hxg3


19. … Qxg3

Best.  Black must activate the queen as it is Black’s best prospect of limiting White’s counterplay.

20. Ne6

Suddenly, White’s position looks very threatening.  Black’s under a mate threat when being up a load of material!

20. … Qe5

It is okay for Black to defend with the Queen since White cannot afford to return a rook and a piece for the queen.


July21_HellersDeFirmian4
Figure 12:  Hellers – DeFirmian – Position after 20. … Qe5


21. Rf1

Deploying the last piece into the fray.  So far, White has done everything correct after the sacrifice – put pressure on the position and use as many pieces as are available.

21. … Nf8 22. Bf5 Bc8

Putting maximum pressure on the e6-knight.  The one drawback is that it relinquishes control of the 8th rank.  White puts this to use.


July21_HellersDeFirmian5
Figure 13:  Hellers – DeFirmian – Position after 22. … Bc8


23. Re8 Kf7!

Believe it or not, this actually works.  Bringing the king out into the open and on the same file as an opposing rook is not the first move you would look at.  Yet, there is no beneficial discovered check, since the rook on e8 is en prise.  Though 23. … Bb7 looks like it gets the job done as well, Black will be in for quite the surprise when he is met with the astonishing 24. Bg6!!, and out of the blue, White is winning!  There are too many mate threats to deal with in too many different directions.  The only feasible way of defending this is 24. … Qf6, but it is not enough.

24. Re7+

White has come to realize that repeating moves is the best he has.  Although his position looks enticing to play on with, there is no real way to continue and stay in the game.  In fact, any other move leaves Black with an advantage.  It takes enormous self-control to make a decision such as this, when all the adrenaline is pumping; yet, slowing down and recognizing when it’s time to take a draw will be a vital skill to master for the future, if you have not already.  But, either way, this possibility was only available because White saw the possibility moves before, and realized that, if he couldn’t quickly find a reasonable continuation in the position, his safest plan would be to take the draw.


July21_HellersDeFirmian6
Figure 14:  Hellers – DeFirmian – Position after 24. Re7+


24. … Kg8 25. ½ – ½ Draw Agreed.

As we have seen through the investigation of these two game examples, it can tremendously pay off if we are able to prepare an option to force a draw in the case of a stalled attack; this can, in the long run, convert many would-be losses into draws.  Often, sacrifices do not have clear-cut winning moves following them.  If anything, those can’t really be called sacrifices, as they are merely just tactics.  We saw in Byrne-Fischer that Black’s queen sacrifice still required work to be done after in order to justify it.  However, Fischer made sure that he would have that ability to force a draw if he couldn’t find a way to continue.  Fortunately for him, Fischer had the windmill scenario to aid him in finding a winning continuation.  In Hellers-De Firmian, we saw a very similar situation, one in which White sacrificed his queen for oodles of minor piece activity.  Yet, in this situation, Hellers didn’t dare to play on after coming to the conclusion that there was nothing left for him in the position.  Though these two examples were the only ones presented today, keep in mind that there are numerous examples of such games around the world each and every day.  Hopefully, you will be able to apply this idea to one, if not more, of your future games.  In our next and final installment of the Attacking Chess series, we will investigate what will probably be the most important thing you need to know – patterns and motifs.  I wish you luck in your future scenarios dealing with speculative sacrifices, and, as always, I will see you later!

The Difficulty of Reaching Master

One of the more baffling phenomena in higher-level amateur chess is a curse that seems to befall many National Master contenders, sometime in the expert stage but particularly in the high 2100s. To be sure, there are always many players plateauing at all rating levels. But the horror stories of master hopefuls stagnating or crashing down after reaching the cusp of 2200 have stood out the most to me. Hibiki Sakai of UPitt tumbled down the 2100s shortly after reaching 2198 USCF in early 2013, almost 3 years before he broke master. Franklin Chen became a master after winning the 2016 Pittsburgh Chess Club Championship, but not before he’d broken 2190 twice and spent nearly 9 straight years in the high 2100s.

I haven’t been a member of the 2100+ club for too long and recently enjoyed a rapid swing into the 2150s, but a tournament I played last Saturday (in which I gained a whole rating point!) has me convinced that I have a long task ahead of me – more on this below!

So what’s taking us so long?

Soundness and Practical Skills

Due to my relatively little experience with serious competition and formal study, I don’t have the theoretical background that many other experts exhibit. Upon returning to regular competition in 2014, I wanted to adopt a playing style that would hold up as long as possible; since then my priority has been to play as soundly as possible according to basic tactics and strategic principles. It’s definitely not the only way to go; for example, some players (like Isaac) are drawn to the deeper positional side of chess early on, and some specialize in channelling their speculative energy into some very dynamic chess. But attention to fundamentals (despite the occasional lapses) has proven critical to my recent success, and as IM Alex Katz has confirmed, makes its mark in higher-level competition as well.

I’d say most typical chess troubles can be explained by not playing soundly enough in some way. Most serious players have likely heard the above many times, but judging from my conversations and games with lower-rated players (particularly in the Class B-C range), the overemphasis of extraneous theory in chess learning culture and failure to apply basic tactics (yes, you shouldn’t hang rook pawns at will!) and basic positional principles during games are often to blame. However, chances are that if you consistently execute a sound strategy in most “normal” situations (not an easy task by any means), you are well on your way to at least 1800 USCF.

At this stage, it can be more difficult to pinpoint what to improve. Most Class A players certainly have the game to give experts a hard time. Some Class A players do exhibit some prominent weaknesses (I’ve seen a decent amount of atrocious positional action at the 1900 level, often compensated by otherwise tricky play) but the difference between Class A players and experts is often shown most clearly in critical positions when one has to get the job done (for example, at 1950, I was being consistently outplayed by 2100s in pressure situations even when up material and time). I’ve noticed some players too readily accept time trouble blunders as acceptable losses. It’s not necessarily a fair reflection on Class A players, but does indicate the importance of maintaining quality play in critical positions is often underemphasized when discussing improvement.

As before, awareness of basic principles should always be a priority, but “practical” skills such as time management and mental strength are often underemphasized yet hugely important, and or me, were a major factor in breaking 2000 and beyond.

Consistency and More Consistency

In the previous section, I didn’t talk about consistency against lower-rated players (relative to oneself) as it’s a direct consequence of improving everything else I mentioned. However, it’s certainly important at any rating level – it’s hard to gain rating if you’re losing more than occasionally to opponents rated 200 points lower!

Most experts have the skills and experience to fend off a lot of trouble from Class A/B players without having to pull an Alex Katz-style swindle. However, it’s this increased tactical astuteness that makes the consistency task so difficult when climbing up the expert range. For example, now rated 2157 USCF, I’d have to score 3/4 against four 2050s to gain any rating at all. Given that I was rated 2037 merely 4 months ago, this isn’t the easiest task to accept. I’ve had consistently good games against other experts, but I make mistakes like they do, and as I learned back in my 1950 days, outplaying someone in the first 90% of a game isn’t a ticket to the win.

The other new challenge that comes with gearing toward master is… having to score against masters! This is pretty obvious, as one shouldn’t become a master without holding their own against masters, but somehow having to improve on my 50% score against masters in 2016 (unfortunately, drawing 2250s [or equivalent] won’t get me to master) was a little daunting to accept.

Overall, these realizations have created some personally unprecedented expectations; I’m certainly ready to tackle the challenges, but objectively I’ve got a difficult (yet hopefully rewarding) task ahead.

Finally, Some Chess!

Hardly the most egregious example, but it’s probably not a good idea to lose positions like the following, from my second round game in a local G/30 tournament last weekend, against Eastern PA master Christopher Yang:

Screen Shot 2016-07-19 at 00.29.07
Li (2156) – Yang (2244)

Black has sacrificed a pawn to reach this mutual time-trouble position. Both kings are in some danger; Black’s somewhat more so due to White’s ability to open the kingside at will. However, Black’s powerful knight and f-pawn are not to be ignored, since …f3 would seriously restrict any major piece action on White’s part.

25…Kh7 26. g5 Nf5! With 26…f3 stopped, Black quickly prepares …Ne3, seemingly to prevent White from using the g-file. The second reason is a little less obvious. 27. Qe2 Ne3 28. Qh5?!

Screen Shot 2016-07-19 at 00.53.40

Black prepared for an ending! In time trouble, it’s easy to forget that not all pawn-up, time-up endings are winning. It certainly takes some effort to untangle the situation on the kingside. It turns out White can’t avoid the ending, but had I been more aware of the challenges ahead, I would have chosen something more constructive like 28. Re1 instead. With 7 minutes to Black’s 4, the game continued 28…Qg4+ 29. Qxg4 Nxg4 30. Rf3 hxg5 31. Nxg5+ Kg6 32. Ne4 Rh8 33. h3 Ne3 34. R1f2 Rag8.Screen Shot 2016-07-19 at 01.05.35.png

Black has made some scary progress, but amazingly has no immediate threats yet! White has enough time to try an Exchange sacrifice on e3 with 35. Re2, which leads to a strange equality. Unfortunately, time trouble does some weird things to the human chess brain and despite still being up time, I panicked with 35. d4??, which lost immediately to 35…Kf5+.


My choice of G/30 games to describe the difficulty of reaching master might seem odd. I haven’t much choice in the matter, as it’s part of recent changes to the Pittsburgh Chess Club tournament program. However, I’ve become more appreciative of quicker games in the last few weeks, partially because I’ve performed better than I ever have, but also because of how they mirror critical situations in longer games. Obviously they aren’t a perfect simulation of long games, but even playing longer games that don’t spill into time trouble bears some resemblance to playing under pressure, since most people aren’t quite as alert 3 hours into a game as they are at the beginning.

Fortunately, my game against Chris was my only loss of the day. Unfortunately, it was soon to be overshadowed my last-round draw.

Thompson (2047) – Li (2156)

Zack is a friend who is locally known for playing 1. b4 and a trickiness that compensates for his self-declared shaky hold on the chess fundamentals. In a rematch of our G/30 meeting from last month, the game began:

1. b4 e5 2. Bb2 d6 3. e3 g6 4. d4 Bg7 5. dxe5 Nc6!

Screen Shot 2016-07-19 at 01.34.38
Thompson (2047) – Li (2156)

I’d remembered this from analyzing our last game; an interesting idea to avoid having to take on e5 in an awkward fashion. Aside from playing 1. b4, White hasn’t done much wrong yet, but his position is looking kind of ridiculous already. 6. Bb5 Bd7 7. Bc3?!

Screen Shot 2016-07-19 at 01.36.57

I’m usually wary of these kinds of single-purpose moves unless the reason is particularly good. Even if White intends Nd2 from the start, Bc3 isn’t exactly the most robust way to defend b4 and doesn’t contribute to holding e5 (interestingly, 7. Nf3!? does hold the e5 pawn for the moment, due to 7…Nxb4 8. Bxd7+ Qxd7 9. Bc3! followed by 10. exd6, which is quite different from the Bc3 position above). Instead, the game continued 7…dxe5 8. Nf3 Nge7 9. O-O a6 10. Bc4 O-O 11. Nbd2 Nf5 12. Rb1?

Screen Shot 2016-07-19 at 01.44.24

This probably belongs in the same single-purpose category, but more pertinently it’s not really consistent with 1. b4. As long as White is playing it, it makes more sense to press the queenside now that he’s developed, before b4 starts sticking out too much. In fact, the immediate 12…Nd6 13. Bb3 Qe7 stops b5 and threatens to cause trouble on b4, and it’s not clear what White is doing on b1.

Things went downhill after 14. Nc4? Nb5 15. Ba1 and although Black can’t take on e5 just yet, 15…Bg4! causes too many problems for White.

Screen Shot 2016-07-19 at 01.54.26

Rather than deal with the upcoming …e4 White opted to jettison b4 with 16. h3 Bxf3 17. Qxf3 e4 18. Qg4 Bxa1 19. Bxa1 Nxb4 leaving Black up a clear pawn.

I later won another pawn, but in time trouble opted to simplify into a pawn-up major piece endgame with 7 minutes to White’s 3 (sound familiar?). The problem with craving simplicity in a dominating position is that some pretty big wins are likely to be missed. The bigger problem is that the actual positions may not be won in the end.

Screen Shot 2016-07-19 at 02.05.17
After 32…Qxe3

White played the seemingly obvious 33. cxb5 and I replied with 33…axb5?? The question marks aren’t for the resulting position, which is still clearly winning, but for missing 33…Rd2! 34. Qc1 Qe2 (several other moves win in a similar fashion) 35. Rg1 Qe5+ 36. Kh1 Qd5.


Screen Shot 2016-07-19 at 02.10.18

White is completely busted as 37…Re2 and 37…Re3 (depending on if White bothers to prevent Re2) cannot both be stopped.

Both of us stopped notating shortly after the skirmish at move 33, but I distinctly remember the last chance Zack gave me:

Screen Shot 2016-07-19 at 02.17.28

Perhaps the miss at move 33 was forgivable. Certainly not …Rd2?? (threatening mate but hanging f5; instead, …f4+ wins as Black will force the king to the first rank and either be able to trade rooks or win the h3 pawn easily).

My point wasn’t to complain about messing up so much as it was to confirm that experts do suffer from these kinds of mistakes (one of the points of Chess^Summit was to produce content from a more mortal perspective than that of grandmasters playing near-perfect games). In this case my opponent suffered quite a bit from his offbeat opening play and personally, overcoming seemingly simple mistakes like the ones above is going to be important for reaching the next level.

However, it’s possible that the Round 4 swindle was deserved due to the way I won my previous game…

Li (2156) – Yaskolko (1972)

My opponent, Maxim Yaskolko, is a strong local 13-year old who’s been sitting on the cusp of 2000 for a few months. I’d broken even with him in three games from 2014 and had played blitz with him during the lunch break to try to confuse him; however, if anyone was confused, it was probably me.

1. e4 c5 2. Nc3 d6 3. g3 Nf6 4. Bg2 Nc6 5. d3 g6 6. h3 Bg7 7. Be3 a6 8. Qd2 Bd7. The insertion of …a6 and …Bd7 is a little unusual; more normal is …Rb8 followed by rushing the a- and b-pawns. However, the opening isn’t so time critical and committing White to an early Qd2 does limit the ways White can deal with an attack on the b2-pawn (see later).

Screen Shot 2016-07-19 at 02.51.36
Li (2156) – Yaskolko (1972)

9. f4 O-O 10. Nf3 b5 11. O-O b4 12. Ne2 Ne8. Here’s the little nuance (intended or not) to Black’s earlier move order; White often plays Qc1 in these situations, but usually White hasn’t committed to Qd2 yet.

Screen Shot 2016-07-19 at 02.55.39

Unfortunately, 13. Rb1 gets awkward after 13…Qa5 so I settled on 13. c3 and preparing for the opening of the b-file. Instead after 13…Rb8 14. g4 Qb6 it didn’t occur to me that 15. c4 and 15. d4 were very legitimate options. 15. c4 completely closes off the queenside, giving White all the time necessary to pursue the usual kingside pawn storm, but I was a little wary of the long-term consequences, since White’s bishop isn’t the best ever. 15. d4 looked a little weakening and I didn’t want to risk getting blown apart in the center in a G/30 game. Instead, I played 15. Rac1 and faced the dilemma of how to deal with a2 after 15…Be6.

Screen Shot 2016-07-19 at 03.00.31

16. c4 is still an option, but I had doubts that Black wanted to keep a bishop stuck on the queenside. This wasn’t a very good assumption since there wasn’t really any other point to 15…Be6, and it turns out Maxim had calculated out …Bxa2 more than I’d thought. But I gambled with 16. f5?! Bxa2 17. Ra1 bxc3 18. bxc3 Bb3.

Screen Shot 2016-07-19 at 03.11.29

In situations where intuition plays a lot more of a role, there’s likely to be more inconsistency in a nontrivial series of moves, whether that’s due to tactical oversight or just poor planning (something that I am personally not good at). Indeed, over the next few moves I straddled between harassing the light-squared bishop and making gains on the kingside. 19. Rfb1 a5 20. Bh6 Qa7 21. Nc1 a4? 22. Kh1?


Screen Shot 2016-07-19 at 03.17.17

Far too slow, and Black takes control of the game. Both of us missed 22. Nxb3! Rxb3 (22…Bxh6 23. Qxh6 is more critical but with fxg6 and Rf1 to follow, White should gain the advantage with proper play) 23. Rxb3 Bxh6 (23…c4+?? 24. Be3) 24. Qf2!

In the game, I finally had to come to terms with not being able to take advantage of Black’s awkward bishop. After 22. Kh1? we continued 22…Qc7 23. Bxg7 Kxg7 24. h4 Nf6 25. Ne2!?.

Screen Shot 2016-07-19 at 10.13.56

Objectively this is kind of silly (Stockfish evaluates the positions over the next few moves as around -2.5), but I was down a clear pawn and had 7 minutes to Maxim’s 14. A rushed attempt at a kingside attack was, practically speaking, the only real try. 25…Nxg4 26. Nf4 Nge5 27. fxg6 hxg6 28. Ng5 Qd7?!.

Screen Shot 2016-07-19 at 03.26.48

This spoils nothing, but it’s an overreaction to White’s shallow Rxb3/Ne6+ threat. It’s important (as I’ve learned before and relearned in my last-round game) not to flock to defensive-looking moves to convert a possibly dangerous position. In this position, Black had the more active 28…Qa7! daring the king to step back to g1; with …Rh8 coming, Black’s king safety problem is just an illusion, compared to White’s.

The real mistake came after 28…Qd7?! 29. Bh3 e6??.

Screen Shot 2016-07-19 at 03.31.33

Black’s best was 29…Qa7 as similarly discussed last move. In one move, due to trying to keep the queen closer to the defense of the king, Black has created enough counterplay opportunities for White to equalize. After 30. d4! Nc4 31. Qg2 Qe7? (31…Qe8 was relatively best, but White has some tricks on f7 that I won’t go into) 32. Ngxe6+! Black finally fell apart with 32…fxe6??

Screen Shot 2016-07-19 at 03.36.23

Black felt the need to make me prove my time trouble moves, which proved fatal. As in, checkmate-level fatal. After 33. Qxg6+ Kh8 34. Qh6+ Qh7 35. Ng6+ Kg8 36. Bxe6+ Rf7 37. Bxf7+37…Qxf7 fails to 38. Qh8# so Black had to jettison the queen and got mated in a few more moves.

Screen Shot 2016-07-19 at 03.39.50
After 37. Bxf7+

(To Maxim’s credit, he bounced back in the last round with a surprising upset against NM Yang and broke 2000 for the first time.)


Though I was happy to turn the game around in such an exciting way, it wasn’t comforting that it was necessary. In Round 1, due to some very dubious pawn grabbing, I found myself in a losing position on move 17 against a 2007-rated opponent but managed to pull off a win due to his severe time trouble. So I ended up winning two games I absolutely shouldn’t have won and failing to win two games I probably should have won (fittingly, I broke nearly even in rating, gaining a point in the process).

The issue wasn’t one of the particular games. It’s true that I had chances in the two games I didn’t win, but it was also possible that the two games I “won” would have given me 0.5/4 for the day. Ouch! If you’re looking for consistency, my performance isn’t the best place to start.

So the most important lessons weren’t shown by the ratings. While everyone is expected to have good/bad days, the bad days are less forgivable in the master contender pool. It’s clear I have room to improve with regards to the consistency necessary to become a master, but it will certainly be a worthwhile journey.

Meeting a new Najdorf

Opening theory in chess is constantly evolving. However, being the stubborn person I am, my personal repertoire has barely changed since I first began playing tournament chess. Never the type to want to learn and understand extensive theory, I relied upon relatively rare lines to throw my opponents off. For example, I have always played 6. h3 against the Najdorf Sicilian, and while this opening worked beautifully in the beginning of my chess career, its efficiency has decreased as the line itself became more well-known and as I reached a higher level of play.

h3 Najdorf
Position after 6.h3

About two weeks ago, I was participating in the US Girls Junior Championship, where ten of the top girls under the age of 20 are invited to play in a round robin tournament. There, I had three games against the Najdorf and while I won two out of the three games, the game where I lost made me realize that with the right preparation, I could easily be outplayed straight from the opening. This realization made it evident that I needed to learn something new against the Najdorf. Upon asking around and researching on my own, I’ve realized that not only has opening theory itself changed, but so has the way in which we acquire opening knowledge.  Recently, grandmasters have been using correspondence games as a source for opening theory. In the annotations for a game between Caruana and Gelfand (which was, in part the inspiration for the subject of this article), Caruana says of his 14th move, “This had been played before by correspondence players. I didn’t fully understand the move, but I figured I should listen to them!”

In looking through correspondence games myself, I found a recurring variation in the Najdorf that seems to be gaining popularity; the 8…h5 variation in the Be3 Najdorf. The variation itself is very suitable for correspondence chess as it entails a lot of positional maneuvering and long-term planning. While I am not the most positional player, I still find the variation appealing due to its constricting nature, as white essentially aims to eliminate black’s counter-play.


Najdorf h5
Position after 8…h5

1. e4 c5 2. Nf3 d6 3. d4 cxd4 4. Nxd4 Nf6 5. Nc3 a6 6. Be3 e5 One of the mainlines — the others being …e6 and …Ng4 7. Nb3 Be6 8. f3 h5 A trending line nowadays. The obvious goal is to stop white’s king-side expansion; one of the central ideas in the mainline with opposite-side castling. The old mainline is 8…Be7 9. Qd2 O-O 10. O-O-O with white aiming for a king-side attack and black aiming for a queen-side attack (See Anand – Topalov, Stavanger 2013). 9. Qd2 Nbd7 10. Nd5 Bxd5 The more common variation – here white pursues similar goals to the variation with the knight taking instead: 10… Nxd5 11. exd5 Bf5 12. Na5.

Najdorf Na5
Position  after 12. Na5

The idea behind this variation is that white will opt for queen-side expansion with c4, b4, a4, and eventually a break with c5. Black will often opt for central play with an eventual e4 in conjunction with potential king-side play. In this position, the key recent game at the GM level was between Caruana and Nakamura (while Na5 is moved later in this game, it serves as the inspiration for the earlier Na5 line). Here, black has three main options: Be7, Qc7, and Rb8. Against 12…Be7, white should play normally as black is not creating any eminent threats. For 12… Rb8, white should make sure to stop black’s counter-play before developing naturally: 13. a4 Be7 14. Nc4 O-O 15. Be2

Najdorf f4
Position after 18. f4!

With 12… Qc7 13. c4 b6 (13… Be7 14. Rc1 Rc8, although 14…e4 is probably an improvement over the game
continuation (Zakhartsov -Bratus, Voronezh 2008), but white still holds a slight edge after Be2, 0-0, and b4 with the same queen-side expansion.) 14. Nc6 Nb8 15. Nxb8 Rxb8 16. Be2 Be7 (16… g6 Here, a game between two masters: Madl and Gerard, illustrates the queen-side expansion that is essential to white’s opening strategy). 17. O-O Bg6 18. f4! +=


Najdorf g4.png
1-0 Jensen – Krivic, ICCF 2014

Now, let’s return to what happens if the bishop takes back: 11. exd5 g6. Here, 11…Qc7 is also possible, to be followed by 12. c4. Should black play 12…g6, white should try to relocate his knight to its ideal square on c6 via c2 and b4. Another possible continuation is 12…a5 13. a4 b6 14. Bd3 g6 15. O-O Bg7. Here, white’s plan deviates as it becomes difficult to pursue queen-side play as black has locked down the b4 and c5 squares. White’s attention thus shifts to the center and king-side:  16. Rae1 O-O 17. Nc1 Nc5 18. Bc2 Na6 19. b3 Nb4 20. Bb1 Na6 21. Ne2 Nd7 22. Bh6 Qd8 23. Nc3 f5 24. Nb5 Nac5 25. Bc2 Qe7 26. Be3 h4 27. g4 (1-0 Jensen,E (2495)-Krivic,D (2528) ICCF 2014). 12. Be2 Bg7 13. O-O b6 14. Rac1 O-O 15. h3 Re8.

Najdorf Rc3
Position after 12. Rc3 +=

Caruana recommends 15…Nh7, but after 
16.c4 f5 17. Bd3 Bf6 18. f4 exf4 19. Bxf4 Be5 20. Bxe5 Nxe5 21. Nd4 Qf6 22. Bb1 Rae8 23. Rc3 
+= White’s knight has two potential squares on c6 and e6 and the queen-side majority yields an advantage. Should black play 15…Qc7, white should focus more on the center and king-side (A worthy game to look into is Jónsson,D (2538)-Magalhães,L (2540) ICCF 2014).


16. c3 While 16. c4 might seem more logical, it lacks a future after a5. 16…Kh7 (16…Qc8 17. Kh2 Qc7 18. g4 Qb7 19. Rcd1 Nc5 20. Nxc5 bxc5 21. g5 Nd7 22. Bd

Najdorf Qc7.png
Position after 17. Qc7

3 += Black’s bishop is essentially trapped by his own pawns and white has the bishop pair and more space) 17. Rfe1 Qc7 (17…Ng8 is met with 18. g4 Bh6 19. g5 Bg7 20. Bd3 Ne7 21. Be4 Rc8 22. Kh2 with white looking to relocate the knight on b3 and looking for more play on the queen-side) 18. Bf1 Qb7 19. Rcd1 Nc5 (19…Qc7 20. a4 Qb7 21. Kh2 e4 22. f4 Rac8 23. Kg1 Ra8 24. c4 Nc5 25. Nd4 Nfd7 26. Qc2 Bxd4 27. Bxd4 a5 28. Re3 Rac8 29. b3 += 

Najdorf b3.png
Position after 29. b3 +=

White has an advantage with the bishop pair and a more favorable pawn structure) 20. Nxc5 bxc5
21. Bc4 e4 22. f4 Nd7 
(22…Ng8 23. Bf2 Rab8 24. b3 f5 25. Be3 Ne7 26. Rb1 a5 27. Red1 While white does not necessarily have an advantage here, his position is easier to play with space, the bishop pair, and a potential break on b4) 23. Bb3 Qb5

Najdorf Bb3.png
Position after 23…Qb5

(23… Rab8 24. Ba4 Red8 25. Rb1 f5 26. Bc6 Qc7 27. Qe2 a5 28. Rec1 += White has a tiny advantage here with better placed pieces, the bishop pair, and a queen-side majority) 24. c4 Qb4 25. Qxb4 cxb4 26. Ba4 Rad8 27. Re2 += In this endgame, white has a small edge and should be trying to play g3, move the king towards the center, place the light-squared bishop on c6 and play for a c5 break. Should …Nc5 happen, which should capture with the dark-squared bishop and then double rooks on the d-file and push through using the d-pawn.

Najdorf final position.png
Final Position

Overall, the …h5 variation poses an interesting problem to white, as he or she must switch strategies from the traditional king-side attack to a more positional game in the center and on the queen-side. In the Nxd5 variation, the knight maneuver Na5 to c4 in conjunction with a4 and queen-side play is essential to white’s strategy. White should also aim to contain black’s central counter-play with a timely f4. In the Bxd5 variation, white’s plans are more long-term and often the queen-side pursuit will not work out, in which case, one must focus one’s attention on the center and king-side. In many variations, white does not necessarily have an advantage, but the bishop pair and extra space provide for easier play and a potential advantage in the transition to the endgame. The variation on the whole contains fascinating positional planning, and has become a line I can’t wait to try in tournament play.


Making the Most of a Tough Week in Philly

FullSizeRender
This cover of Chess Life, sent to me by my coach after the tournament concluded perhaps best described my performance relative to the amount of progress I have made in recent months.

I think I could have also tried the title The Quest to Break 2000 Backwards or Philly Phailures, but I hardly think that this is an appropriate way to describe my first tournament back since the US Junior Open. As I mentioned in my last post, I pushed myself to play in the top section of the World Open, pitting me against the toughest level of competition I had ever encountered over the board. Across the six games I played (I had three half point byes), I had the longest in tournament losing streak of my career (five – six if you include the final round of the US Junior Open!), and in a majority of the games, I was simply outclassed by my opponents on both sides of the board. To put things simply, by my own personal historic standards, this year’s World Open could have very well been one of the worst tournaments of my career.

But I would like to think that this is a shallow understanding of my overall performance. Sure, I had my failures this tournament, but what my stay in Philadelphia showed me is that there is an entire realm of chess I had never seen before and that in the eyes of a Grandmaster, I am once again a beginner. But this is okay – learning something new means finding something you have never seen before, and this performance is another step in the age-old process of becoming a better chess player. What do I mean?

IMG_4701
Three of our Chess^Summit authors participated in this year’s World Open – Beilin, Alice, and myself. Vishal was unable to attend but he was here in spirit!

After completely collapsing in the first four games of this tournament, I got a call from my coach in which he told me the opening repertoire I had counted on since breaking 2000 would no longer cut it at this level competition, and I would need to improve and find better openings to get more competitive positions. Bam! A new weakness had been discovered in my play, and despite my progress, that problem started with move one (well, metaphorically). I can probably make master without fixing my repertoire, but seeing as my ambitions are much higher than this, I will be revamping my openings with the hopes of returning to the World Open next year with a much more competent result. I have no idea what this means for my current goal in the short-term, but I’d like to think that if I can persevere, I can still achieve great things despite my not-so-young age…

Persevere. That’s a strong word – and the biggest positive I can hope to take away from my experience in Philadelphia. Around the time my coach called, my parents, who have always been supportive of my chess, offered to let me withdraw and pick me up early from what was quickly turning into a miserable result. Somewhat stubbornly (perhaps the same trait that makes me a chess player), I declined with two games left to go. My confidence had taken a serious blow after quickly reaching lost positions in each of my first two games, and after two more humbling defeats, I was quickly realizing that as a positional player, it was somewhat foolish to think I could have fared well against a level of competition that understood my very strength better than me. For my last two games, I decided to focus on two aspects of my game that I previously stated I wanted to work on the most: calculation and mental fortitude.

IMG_4679
Trying to relax between rounds. Just like how Iceland was finding out it had a long way to go before competing with teams like France, I too was having my own humbling experience

Sure, I was reaching worse positions out of the opening, but I knew the only way I could have any chance was to be strong and focus on making the best moves I could every move. At this point I was very aware of the real possibility of losing all of my games, as well as falling far below 2100 – though as I’ve mentioned rating no longer matters to me if I’m improving. For today’s post, I want to share my last two games, as they play into a greater story going into my last round.

My fifth game was both a blessing and a curse. Faced with the Veresov, my limited opening knowledge meant I had to calculate from move four, draining my time and causing an unforced error on move 19. While such a quick loss would be discouraging to many, I took it as a positive because I had succeeded to get out of the opening with no prior knowledge and reached an arguably better position. As I tried to describe to my dad, I was flying! Unfortunately, it was just a little too close to the sun… Here we go:

Arthur–Steincamp (World Open, 2016)

1.d4 Nf6 2.Nc3 d5 3.Bg5 Bf5 4.f3

Screen Shot 2016-07-06 at 11.07.41

Back in January when I played in the Boston Chess Congress, my 2300 rated opponent played 4. Bxf6, which was what I was expecting when I played 3…Bf5 at the time. Following my thought process from that game, I played the same move, the idea being that if White wants to take on f6, he better do it before I play …e7-e6. By playing 3…Bf5, I can play …e7-e6 without making a bad bishop. But now, six months later, it’s a different time and different opponent. With 4. f3 I was out of book, and my only weapon was my  brain. 4. f3 is the second most common move played in this position and has a concrete idea. White will take on f6 to make way for an e2-e4 central push, hoping to gain a lead in development as well as a structural advantage in turn for the bishop pair. At first, I liked 4…Nbd7, but quickly recognized the “fork trick” we all see as a child with 5. Nxd5 Nxd5 6. e4 and so forth. In our post-mortem, my opponent said this is a line (indeed! It is the most common move), but with no prior knowledge, such an attempt would not be practical. At this point, I realized how critical the d5 pawn was to my position, seeing as it was my only hold on the center. In an effort to be solid, I opted for 4…h6, a move Spassky chose back in 1981 at Linares and won a convincing game with as Black. Of course, I did not know this at the time, but if a great like Spassky played this move, then I must be on some sort of right track. My opponent played a move that has never been played at the Grandmaster level, but this is likely because the Veresov rarely finds its way into the top, if ever 5.Bxf6 exf6 6.e4 Be6 7.Bd3 c6

Screen Shot 2016-07-06 at 11.24.31

I spent some more time here to calculate various …c7-c5 lines. I think here, it’s already important to see that 7…dxe4 8. exd4 Qxd4?? loses immediately to 9. Bb5+ and the queen is lost. This idea is important because many simplifications where the d-file opens will meet the same fate. For example, one of the first lines I saw 7… c5 8. dxc5 Bxc5? 9. exd5 Bxd5 10. Nxd5 Qxd5?? 11. Bb5+ and again we see the same pattern. Of course, I had found the improvement 8…d4 followed by capturing on c5, but this was all moot because White can take on d5 first and the same tactical problems persist. I took the more solid route, since 7…c6 ensures that with trades on d5, I will maintain the bishop pair, which is presently my only real advantage in the position. 8.Nge2 Bb4

Screen Shot 2016-07-06 at 11.30.48

This move kicked off the rapid consumption of my time, as the decision to place this bishop here on b4 or d6 was an important one. My gut originally ruled out this move because this pin doesn’t last long, and spent a significant amount of time thinking about 8…Bd6 to stop Nf4 ideas. 9. exd5 cxd5 10. Nb5 0-0 should be equal, but I found a good resource for White with 8…Bd6 9. Qd2 and now the idea of Nf4 is a real idea and it is not quite clear why I’m going to give back the pair of bishops along with two structural weakness.

Screen Shot 2016-07-06 at 11.33.19
If White executes this idea, my d-pawn becomes isolated and keeping the bishop pair become doubtful thanks to the pressure on d5 and the eventual threat on Nc3-b5.

After a while, I reconsidered the text move, and realized it asks White to do something about the pin (which is committal since now I can castle), but the real point is that if a2-a3 and b2-b4 my bishop will go to b6 and attack the dark squares since White doesn’t have this bishop anymore. Then the king will look bad on g1 and White will have to do something about the d4 pawn. I think I spent about 15 minutes here, but as the engine has informed me, this was the correct decision! Since this position has never occurred in a Grandmaster game, I’m curious how much my opponent knew in this position. In our post-mortem, he said that I even have to play this move, which suggests that he was aware of this position, or is simply a strong player – or perhaps both! 9.O-O O-O 10.Kh1 Re8

Screen Shot 2016-07-06 at 11.38.03

After the game, my coach told me here that I have 10 moves that are absolutely appropriate to play in this position, which I guess suggest I spent too much time here trying to find the silver lining. However, up to this point in the tournament, I had failed to establish such a solid position by move 10 which makes this position a small victory for me personally. That being said, I think the insertion of this move was critical for the future course of the game. First, I am fully prepared for the e-file to open with my rook on e8, but I also give my bishop two options in case of retreat: a5, and the path I took during the game, f8. Though the bishop may seem misplaced on f8, it is a long range piece and is just active, while also providing my kingside with some form of defense. I spent some time here trying to develop my knight, but I concluded that if 10…Nd7 11. exd5 is well timed because now the position opens and now my knight seems misplaced. My opponent said this is what he would have played if my knight had moved at this point, regardless of d7 or a6. Having established full equality, my opponent decided to change the pace of the game with 11.Ng3, allowing me to play 11…dxe4 and break up White’s center.

Screen Shot 2016-07-06 at 11.45.31

Without a knight on f6, I had to make sure that I wasn’t opening myself to any kingside attacks, but the aggressive 12. fxe4?! Qxd4 13. Nf5 Bxf5 14. Rxf5 failed to impress, as White is down a pawn and has an imaginary attack. This move put me below 50 minutes to make move forty, as I had to find an effective way to meet 12.Bxe4 as d4-d5 is threatened. Quickly I saw that if White succeeded to trade his d-pawn for my c6 pawn, my lack of development would leave me in a worse endgame, as well as tactical problems on b7. So I had to find my next move as well, 12…Qa5 =+

Screen Shot 2016-07-06 at 11.50.23

At this point, I’d like to believe that I have solved all of my opening problems, sans the knight on b8, while also asking White questions of my own. On top of threatening to win a pawn on c3, I’m preparing to play …f6-f5 to attack the bishop and open the f6 square for my knight. I also had some strategic ideas here of doubling the c-pawn in the case of 13. Qd3, and then using the c4 square with a …Nd7-b6-c4 maneuver with some serious queenside pressure. This move also acts as prophylaxis, stopping d4-d5 because tactically I can play …Re8-d8 and win material. At this point in the game, I was already somewhat confident that I could finally get the position I had yearned for all tournament, but my clock was already of some concern… With some engine analysis, both sides are playing well thus far, as we are both selecting one of the computer’s best move with each turn, keeping the game around equality. 13.Nce2 Bf8

Screen Shot 2016-07-06 at 12.01.49

Because 13…f5 would have been met with 14. c3, I decided now would be the best time to relocate the bishop, seeing as it no longer has a purpose on b4. This move revives the threat of …f6-f5, followed by quick development from Black. I thought White’s best plan was to slowly build the position with 14. c3 (as played in the game) but followed calmly with b2-b3, and eventually c3-c4, which would once again establish a strong center. As the game showed, trying to expand on the queenside favored me as it created some weak squares like c4. 14.c3 f5 15.b4?! Qa6!

Screen Shot 2016-07-06 at 12.06.45

A critical find, highlighting the positional importance of 10…Re8. The f5 pawn is not hanging because after 16. Bxf5? Bxf5 17. Nxf5, the knight on e2 does not have enough defenders and White loses a piece. By provoking this move, I’ve also managed to create a big positional weakness in White’s camp, the c4 square. An example line to prove this would be 16. Bd3 Bc4 17. Bxc4 Qxc4, and in addition to White’s weak light squares, Black now has the added idea of bringing a rook to e3, as well as …g7-g6 to protect f5 and play …Nd7-f6. My position isn’t winning, but it plays itself, unlike White’s. I believe White chose the best move in 16.d5 given the complications, and my lack of time at this point (around 30 minutes for 14 moves!).

Screen Shot 2016-07-06 at 12.13.00

One of the reasons this move is so strong is because if my rook were to leave my back rank, White can play Qd1-d8 in some lines forever freezing my mobility. For example, 16…fxe4 17. dxe6 Rxe6 18. Qd8! is strong, and Black’s win of material is irrelevant after 18…exf3 19. Rxf3 Rxe2 20. Nxe2 Qxe2 because now I only have one piece that can move, while White can quickly activate his rooks and win the game.

Screen Shot 2016-07-06 at 12.16.33
Position after variation 20…Qxe2. Black has no moves!

In this position, I thought it was important to keep enough pieces on the board, as that will be the only way to take full advantage of the weak c4 square and establish counterplay. I decided on the more practical 16…cxd5 because now I can bring my knight to c6 and finally complete development. I haven’t suffered because of this lack of activity, but there’s no reason to delay this any further. 17.Bd3 Qd6 18.Bxf5 Nc6 19.f4 g6??

Screen Shot 2016-07-06 at 12.20.01

And a perfectly good position slides out of reach. Needing to play at roughly a minute a move until move forty, I cracked under pressure here, thinking I could hold tactically, giving myself enough time to bring my bishop to g7. My opponent, a friend of Grandmaster Joel Benjamin and famous coach in New York, said after the game that every move should have two good reasons to make it – one is simply not enough! In this case, he was more than right. While I probably should have seen the ensuing tactic, my position is already falling apart after the trade takes place on e6. In reality, my position would have been a lot more optimistic if I played my other candidate move 19…Rac8 or had found various endgame positions after 19…Bxf5. Of course I can’t say I would have won, after all, there is a price to pay for not knowing openings! 20.Bxe6 fxe6 21.Qd3 Ne7 22.Ne4

Screen Shot 2016-07-06 at 12.30.08

The oversight – not only am I worse, I can actually resign here because the bishop cannot help me hold the crippling position since all my pawns are on light squares. I would go on to play a few more moves, but that was more inertia than me actually thinking I had a chance. Of course in severe time trouble, it’s easy to miss “Maurice Ashley moves” like these, but in the future, I will have to do better to ensure a better result.

I played really well for 95% of this game, but as we all know, chess is cruel and every move counts. While it’s no fun to have a lost game on the 22nd move, I was proud of my ability to be accurate in the opening and be resourceful in unfamiliar territory. But my work with the Veresov wasn’t done yet. I had two half-point byes prior to my last round game, but my final opponent had seen this game and thought he could replicate my time trouble with a different take on the Veresov.

IMG_4707
With my roommates for the weekend and long time friends, Jeffrey and Matthew. We all had our own tough experiences at the World Open, but that didn’t stop us from having fun!

I guess psychologically he had hoped this would be enough to give a final punch to a player who in his eyes was extremely weak (how else could you see a 0/5 player?). I’m not really a fan of this strategy, as it’s not like I had forgotten why I set my structure the way I did, but also I don’t think the Veresov was in my final opponent’s repertoire. Personally, I don’t like to prepare completely new openings unless I know enough about what my opponent plays over the board – just ask Chess^Summit colleague Beilin Li! So now with over 24 hours of rest heading into my last game, I was determined to play to the best of my ability and save myself from a disappointing showing. I had already decided to withdraw from the Philadelphia International, since my coach and I decided it would be best to go home and fix my opening problems rather than have these lessons retaught. Luckily for me, I was able to conquer my last round curse quite convincingly.

Wettasinha–Steincamp (World Open, 2016)

1.d4 Nf6 2.Nc3 d5 3.Bf4 Bf5 4.f3 e6

Screen Shot 2016-07-06 at 12.51.32

With the bishop on f4 and not g5, my position is a lot more flexible, allowing me to play this move since e2-e4 is currently not possible. Because of this, I had already envisioned my plan for the middlegame, which meant I could play quicker and respond to my opponent’s threats when needed. My plan is to play …c7-c5 (now possible thanks to my e6 pawn), develop my knight to c6, and then see what my opponent does to make more positional decisions. 5.g4 Bg6 6.h4 h6 7.e3 c5

Screen Shot 2016-07-06 at 12.54.55

If you’ve read my posts prior to the Chess^Summit relaunch, you’ll see that I’m often a big believer in opening principles. While my opponent has gained space on the kingside, his king will have to make some critical decisions, while I have yet to make any positional commitments. As promised I’ve continued with my plan, and carrying it out has taken minimal time. White now decided to trade off light squared bishops which certainly doesn’t hurt my position. 8.Bd3 Bxd3 9.Qxd3 a6

Screen Shot 2016-07-06 at 12.58.58

Making sure that I can recapture on c5 without allowing the nasty Qd3-b5+, winning a minor piece. Funny story here. The following morning as I was confirming my room cancellation and preparing to leave for Richmond, I ran into my opponent, who proceeded to tell me that this move was a blunder because he can play his king to f2, and because of the weak b6 square, I’m as he put it “simply lost”. I was extremely skeptical of this, but figured there was likely some sort of engine work behind this and brought it up with my coach on the train ride home. With further analysis, lost is not only a strong word, it’s completely incorrect. My opponent’s idea of playing Ke1-f2 and then opening the e-file is dangerous, and if anything is just unclear. I had no such hunch during the game, as a solid position held by principles typically prevails against one that does not. I guess it was the typical chess player hubris that exists after losing. Sure this Ke1-f2 improvement is much better than 10.O-O-O?, but it does not punish hundreds of years of conventional thinking. 10…Nc6 11.Nge2

Screen Shot 2016-07-06 at 13.06.36

With plenty of experience in race positions out of various openings, I was already optimistic about my winning chances – and not without good reason. During this point in the game, I remembered a quote from GM Greg Serper a few years ago at Castle Chess Camp where he said that Soviet players used to joke that the extra “O” in queenside castling notation also is recorded on the final result as a loss for that side. Using the last round win I had in New York as a base example, I knew that to have more success in a race position, I needed to find forcing moves and find the most accurate move order. Every move my opponent spends defending is a move he can’t attack the kingside. 11…Qa5 threatening …Nc6-b4 12.Kb1 c4 13.Qd2 b5

Screen Shot 2016-07-06 at 13.13.41

So far every move has been forcing, and now …b5-b4 threatens to trap the knight. My thought with this move order was that if 11…c5 12. Qd2 Qa5, White has a little bit more flexibility (though not much) to choose a move here since he hasn’t played Kc1-b1 yet. By getting him to play the standard prophylactic move, the c3 knight has no safe squares. That opening time advantage my opponent was hoping for? Instead of only having 20 minutes until the 40th move, I’ve only used twenty. I started to calculate a lot more from here, but that’s because I had a slight suspicion that my game would never make it that far if played accurately. 14.Nc1 Bb4

Screen Shot 2016-07-06 at 13.19.09

As my coach would later point out, 14…b4 should also work, but during the game, I thought this got rather messy. I liked this move because it provokes the mistake made in the game, 15.a3? but the point was that should 15. N1e2 Be7! be played, now the threat on the c3 knight is revived, and White must choose between 16. Nc1 or 16. a3, meaning I win a tempo or create a serious weakening of the queenside. I wanted to be able to connect my rooks before going all in, so that a kingside assault would be even less effective from White. I briefly considered sacrificing on a3, but not having access to b8 meant that this attack was more hopeful than concrete, so I reverted to my original plan 15…Be7 16.Qh2?

Screen Shot 2016-07-06 at 13.23.46

At this point in the game, I was instantly reminded phrase I find myself saying often to 1500 rated players: Tricks are for kids! This case is no different. White’s one move threat (Bf4-c7 trapping the queen on a5) is easy to see but now makes it much harder to play a move like g4-g5, as the queen would be left exposed on an open h-file. This move gives me time to play …Ra8-a7! which means I can put my rook on b7 in the future, making sacrifices on a3 a very real possibility. Once White plays this move, there’s no going back, and it was at this precise moment I knew I could win, maybe even by force. 16…Ra7 17.Bd6 trying to stop …b5-b4 pushes Rb7 18.N1a2 further reinforcement of b4 Kd7! -+

Screen Shot 2016-07-06 at 13.29.28

With the trade of dark square bishops, not only do I trade off White’s best piece, I can bring my h-rook into the game and use the b8 square! White doesn’t have any attractive options here, as moving the bishop back to g3 means crashing through with …b5-b4, and going to c5 only delays problems as I can consider trading on c5 then pushing the b-pawn, or playing …Rh8-b8 and winning. 19.Bxe7 Kxe7 20.e4 b4 21.axb4 Nxb4 22.e5

Screen Shot 2016-07-06 at 13.34.09

When I saw this move, it felt like my opponent was resigning by getting rid of his only true dynamic resource. Without any counterplay, I had a hunch that this game had only a few precise moves left before I win. I entertained myself a little by considering leaving this knight here and just winning on the queenside, but with the way the weekend had gone (and let’s face it, the way conventional players play), I continued to deprive White of any counterplay. 22…Nd7 23.Nc1 Rhb8

Screen Shot 2016-07-06 at 13.37.02

I was considering 23…Nd3, and it should be promising too, but it’s a much stronger threat now with two rooks on the b-file. My opponent’s move loses immediately, but what else can he do?

24.Rd2 Nc6 Threatening the c3 knight, and then …c4-c3, winning a rook. 25.N1a2 Rxb2+ 26.Ka1 Qa3 0-1

Screen Shot 2016-07-06 at 13.39.04Once again, the simplest solution is the best solution, as the impulsive move, 26…Nb4 hangs b2, and 26…Rxa2+ 27. Nxa2 Nb4 28. f3 might even be winning for White. My opponent resigned as …Rxa2+ and …Qb2# are coming, and I have the added threat of …Nb4 should he find anything to stop it (there isn’t). So finally a win in the last round – something that I wish had come earlier, but I rightly had to suffer in order to earn.

My experience at the World Open gave me a new found respect for chess. Here I was, some Candidate Master from Virginia thinking I could simply pull a few upsets and have yet another impressive result. While my various preparation helped me in critical moments in each of my rounds, this result shows me that there is a long ways to go until I can play with these guys, and I’m sure once I fix my repertoire, there will be some other problem that needs to be ironed out – this is chess.

IMG_4709
After a tough week, there is only one direction – onward!

On my train ride home, I received an email, and before I knew what it was, I realized it was the ratings report from the USCF. While I have vowed to not look at my rating, I think this slip up shows that there is always a sign of hope when we persevere. With a significant drop, my rating is exactly 2100, which offers me two lessons. First, never stop fighting! Even on our worse days, we will be rewarded in the most obscure ways. While a number shouldn’t have to tell you that, it’s certainly nice to know that the system “rewards” perseverance. The second lesson? Read the email subject line – that stuff’s there for a reason! Thanks for reading this far if you’ve made it here – this is easily the longest post I’ve ever written. Until next time!

Anatomy of a swindle (and how to avoid one)

It is often said that the first sentence of an article is the most difficult to write. I agree, so I’ll just skip it!

My name is IM Alexander Katz, probably best known for my uncanny ability to win games from massively worse positions. This is probably a quality earned by way too many hours of online bullet, but it’s a useful skill to have nonetheless; throughout my career, I’ve managed to win games with computer evalutions as low as -145. It seems logical, then, that I should write something on that subject.

Of course, it’s impossible to consistently execute these types of game-reversing swindles without help from the opponent, no matter how many practical traps and complications one manages to create. So while there is a certain art to constructing a masterful escape, there is a straightforward (but not simple!) way to avoid it: constant awareness.

The reasons for this are simple. As chess players, we are subject to certain attractions; to selection biases coming from two competing — but not unrelated — sources. The first is the pursuit of beauty; from the incredible feeling one gets when executing a beautiful sacrificial attack. Everyone loves to end a game in such a way, even to the point that some (the gambiteers among us) will structure their entire gameplan around the possibility of creating one. But it is dangerous to get attached to this desire for a simple reason: everyone remembers their beautiful sacrificial mating attacks, but nobody remembers all the times the opponent simply takes all the material and stifles a yawn.

Still, while we are attracted to the beauty of a stylish finish, we are also defined by our pursuit of simplicity: our desire to end games with as little risk and effort as possible. Sometimes this approach is justified, as there’s no reason to enter unnecessary complications when one has a safe edge. But all too often, it results in the exact opposite: by conceding something in exchange for apparently simplicity, suddenly the opponent may be in a much better position to create complicated counterplay.

Swindles are built off of these two principles: the chess player is both over- and under-confident at different points of the game. Determining which state the opponent is in — and how to best exploit it — is the hallmark of the swindler.


Let’s see some examples of these phenomena in action.

LarsonKatzUSCL

Larson – Katz, USCL 2014

Clearly Black has outplayed White from this position, and holds all the advantages one could hope for from this opening. The c5-square, normally a point of serious contention, is firmly under Black’s control. White’s pieces — especially his rooks — are staring into thin air while Black is preparing to start an assault on the White king. All in all, though the computer gives the cold-blooded 0.00 evaluation, practically speaking Black has excellent winning chances.

Unfortunately, I chose instead to lash out in the search of an aesthetic finish:

19… b5?? 20. bxc6 b4 21. cxd7 bxc3 22. Rxc3 Nxd7

and here I was forced to realize that my “combination” had resulted only a slightly worse position, where my b-file counterplay was barely sufficient to balance the pawn deficit. Shortly thereafter I overpressed and was quickly punished.

The cause for the loss here wasn’t a miscalculation, or time pressure, or any other of a number of excuses we tell ourselves to mask the true reason: the loss was due to a massive failure in judgement. One needs to retain objectivity in all positions — even the ones that are clearly in his or her favor — to maximize the score.


This last game an example of over-confidence; pressing the position too hard to force a “fun” finish. The opposite — playing too safe and allowing counterplay — is just as deadly:

KatzFranciscoUSCL.png

Katz – Francisco, USCL 2014

In this position I found a strong combination:

15. exd6 cxd6 16. Bxe7 Nxe7 17. d5! Bg4 18. Bb5

where White is simply up the exchange for no compensation.

KatzFranciscoUSCL2

Katz – Francisco, USCL 2014, position after 23… Bxb2

Just a few moves, White needs to decide whether to continue with 24. Rab1 or 24. Nxf5. Both options are still winning of course, but I was afraid of the complications that might result from 24. Rab1 Nxd6 25. Rxb2 Re8. Without thinking much more, I immediately played the “safe” option

24. Nxf5? Bxa1 25. Ne3 Bd7 26. Qxa7 Be5

when suddenly Black has some very annoying compensation for the pawns due to the two bishops aimed at the white king.

Had I taken the time and effort to actually analyze the alternative line, I probably would have found

24. Rab1 Nxd6 25. Rxb2 Re8 26. Nf6+! +-

which is, of course, a very simple win. Instead, as we both drifted into time pressure, Black’s counterplay became stronger and stronger until I wasn’t able to keep my grasp on the position to the point that I almost lost. However, in an amusing display of irony, my opponent also backed out into the “safe” option and forced a perpetual check when a win was available.


That about covers the pitfalls. Now let’s see how one can avoid them!

KatzKachieshviliNxd4

Katz – Kacheishvili, USCL 2016

In this position, Black — a strong grandmaster — has just sacrificed the exchange to combat the center. White can certainly take a “safe” approach, playing something like 16. Qh3 and trying to make use of the extra exchange later on, but this would give Black unnecessary counterplay against the e5-pawn. In fact, it turns out that Black would be no worse if White took this approach.

Instead, it is necessary to not be lazy and instead charge forward into the complications:

16. Qh5! g6 17. Bxg6 hxg6 18. Qxg6 Qg7 19. Qe8+ Qf8 20. Qg6+ Qg7 21. Qxg7+ Kxg7 22. Rc1 Nc6 23. O-O Ndxe5 24. Rc3!

Normally I would have included a diagram somewhere in the middle of that long line, but I choose not to this time because it is necessary to see the entire variation before entering into these complications. So much for lazy play!

KatzKachieshviliRc3.png

Katz – Kacheishvili, USCL 2016, position after 24. Rc3

The point is that Black’s pieces are simply too poorly placed despite the nominal material advantage, and Black’s king is in serious danger. White won shortly thereafter.


Now, an article about swindling wouldn’t be complete without a full-blown swindle, so let’s explore one now:

KatzGetzUSCL.png

Katz – Getz, USCL 2012, position after 51… Rf8

It’s not hard to see that White is completely busted: he’s down a pawn (and a key one at that), his bishop is horribly placed, and there is no real counterplay to speak of. In fact, the position is close to resignable. Well, close.

Instead of rolling over and awaiting Black to figure out a way to crash through, it’s important to get something of one’s own going. After all, things can’t get too much worse! This motivates White’s next move:

52. g4!?

Positionally suicidal of course, but practically necessary to even hope to achieve anything.

52… hxg4 53. hxg4 g5?

The first mistake, caused by lazy play. Black’s intention is clear: to prevent White from playing g5 himself. But had Black taken a bit more time here, he would have realized that g5 is not half as dangerous as the threats Black can make with a move like 53… Qb5! (threatening Rh8 and Ne2+, d3, etc.). Of course, the game move is winning as well, but now White has a plan he can put together:

54. Kg3!?

Another seemingly silly move, but necessary to get some counterplay going. The idea is to use the h-file in conjunction with the weaknesses Black has just created (on the light squares) to at least annoy the opponent.

54… Qb5 55. Rh1

KatzGetzUSCL2

Katz – Getz, USCL 2012, position after 55. Rh1

Here, Black panics in view of the upcoming Qf5, though it is simply not dangerous. A line such as 55… Rf7 56. Qf5 Ne2+ 57. Kf3 Nf4 illustrates this well: White is simply getting mated and cannot generate real threats. But it scared Black nonetheless, causing him to prevent it with

55… Ne2?! 56. Kf3 d3??

which finally allows White to complete the swindle:

57. Qa7+ Rf7 58. Rh7+!!

KatzGetzUSCL3.png

Katz – Getz, USCL 2012, position after 58. Rh7+!

and Black was forced to settle for the draw.


Of course, it is impossible to perfectly avoid and execute swindles, and it is generally a fruitless pursuit to try. But there are basic principles that are immediately applicable to one’s own play: setting maximum problems for the opponent, remaining alert at all stages of the game, and so on. These help even when not hopelessly behind!

In any event, it is important to be aware of one’s own selection biases, because it applies to many more cases than a simple style of play. It is easy to ignore the real reasons behind a loss, and thus never contend with them, while remembering all the flashy victories one accumulates over a career. This is a very dangerous approach to the game, and perhaps the most prominent reason for stagnation.

Anyway, it is often said that the last sentence of an article is the most difficult to write. I agree with this one too, so I’ll just skip it as well. Thanks for reading!


Attacking Chess: More than Meets the Eye

Hi everyone, I’m Vishal Kobla.  For those of you who don’t know me, I reside in Northern Virginia.  I started playing chess relatively late – my first tournament was when I was two weeks shy of 10. Two weeks after I turned 10, my rating was a novice-like 467, but since then, I’ve been able to progress through the ranks quite well, and I currently find myself in the mid-2100s (for the past year or so).  I play mostly in local open tournaments in Virginia, Maryland, and Washington, D.C.; I sometimes get the opportunity to travel around the country to play in national tournaments.  My most recent nationals was the 2016 National Junior High Chess Championships in Atlanta, GA in April where I had my fourth straight top-10 finish.  My best performance at a national tournament was at last year’s Junior High, in which I placed 4th but tied for 1st overall with five other players and became a National K-8 Co-Champion.  As of now, my next goal is to achieve the title of National Master, which means breaking the 2200 rating barrier.  With the experiences and help I have obtained along the way in my career so far, I hope to reach that soon, so I can move on to the next goal and continue my career.  I would also like to take this opportunity to thank Isaac for starting Chess^Summit and giving me the opportunity to be a part of this as a co-author and provide a platform to express my thoughts. Alright, enough about me – let’s talk about some chess.

Every up and coming chess player dreams of the day where he or she will be sitting across from a Master and is able to execute a stunning sacrifice to take over the game.  I’ll admit, I had those moments too.

The following game showed similarities.  I was playing at the Virginia State Scholastic Chess Championships during the first weekend in March this year when my dad informed me of an interesting progression of events that had occurred while I was playing my last round game.  Everyone else on my team had finished their games up to that point and was counting on me to finish strong in order for the team to be able to get a trophy.  The position was as follows against the highest rated player in the section, WFM Jennifer Yu, the 2014 Under-12 Girls World Youth Champion.

July7_KoblaYu
Figure 1:  Kobla – Yu – Position after 24. Re3!

Around this point, my dad asked one of the lesser experienced players to go check out my game and see how it was going.  When he came to the board, I couldn’t really tell what he was thinking; yet, according to my dad, he thought I was getting crushed, most likely due to the material disparity he saw.  Skeptical, and knowing that I would have most likely resigned already if I had been down that much material with no compensation, he asked a well-known friend, who was at about the same skill level as I was, to see if he could evaluate my game any better.  When he returned, his opinion was that I was at least equal and may have been better.  The discrepancy in evaluation is an interesting byproduct of gaining experience and skill in the game.  As a player gets better, he or she will be able to study the position based on more factors than just the material count – and that is what has to be mastered if a player wants to become that attacking magician. Chess is more than meets the eye!

After conducting research on many of the game’s [widely regarded] most famous attacking games, I have come up with what I believe are the unwritten rules of attacking chess with a sacrifice that every chess player should know.  We will discuss the first of those in this week’s article.

Rule #1:  Never discount a move or a set of moves solely because it “loses” material.

We’ve all been told not to be afraid to sacrifice material if we think it’s justified.  Yet, in positions where sacrifices are speculative, it becomes much harder to convince your brain to go through with that.  Note:  More about speculative sacrifices will be discussed in the next rule.

Here is that game with Yu once again, but during the calm before the storm.

July7_KoblaYu_2
Figure 2:  Kobla – Yu – Position after 12. Qg3

Both sides have developed their pieces and staked control in the center.  The one difference?  White has safeguarded his king, while Black’s is still stuck in the center.

12. … b4

Attacking before the king is safe.  A different plan of action with, 12. … 0-0-0!? is an interesting possibility that could be considered, as in Spassky – Fischer, World Championship 1972, Game 15.  With the king still stuck in the center, this move allows a tactical shot:

13. Nd5!

July7_KoblaYu_5
Figure 3:  Kobla – Yu – Position after 13. Nd5!

13. … exd5

Forced.  Any other capture or move leaves White with an advantageous position.  This type of knight sally is a thematic sacrifice in many Sicilian lines.  The point is that White wants to get to the king before it can castle into relative safety.

14. exd5

Prying open the e-file against the king.

14. … Kd8 15. Nc6+!

July7_KoblaYu_6
Figure 4:  Kobla – Yu – Position after 15. Nc6+!

Opening up the d-file now

15. … Bxc6 16. dxc6 Nc5!

July7_KoblaYu_7
Figure 5:  Kobla – Yu – Position after 16. … Nc5!

The best move in the position.  16. … Qxc6 is not recommended due to 17. Bxf6 Nxf6 (17. … Bxf6 18. Be4) 18. Qxg7.

17. Bh4 Rg8 18. Bxh7

July7_KoblaYu_8
Figure 6:  Kobla – Yu – Position after 18. Bxh7

18. … Rh8

18. … Nxh7 falls to 19. Rxe7.  White is already down one piece, so what does he do? 

19. Qxg7!

Sacrifice another!  The queen must find an entryway into the fray.

19. … Rxh7 20. Qxf6!

July7_KoblaYu_3
Figure 7:  Kobla – Yu – Position after 20. Qxf6!

The queen is untouchable.

20. … Rxh4 21. Qxf7 Rh8 22. Re5

July7_KoblaYu_9
Figure 8:  Kobla – Yu – Position after 22. Re5

22. … Rf8 23. Qg7 Na4 24. Re3!

July7_KoblaYu
Figure 9:  Kobla – Yu – Position after 24. Re3!

We have reached the position from earlier.

Two pieces were sacrificed earlier, and in return, White received open files, a weakened enemy king stuck in the center, enormous piece activity, and a few pawns as compensation.  Yet, there is no clear win in the near road ahead; this itself might be enough to deter the willingness to sacrifice such a large amount of material of some players.  At one point, I was like that, too.  However, with the experience I’ve gained through playing many games, and the knowledge of many top-level games, I’ve been able to train my brain to look at more than just material – i.e. piece activity, coordination, and king placement; and I hope that this article will be able to help in doing just that.

Despite no upfront winning move available at first, I do have a clear plan – Double the rooks on the e-file, tie down Black’s pieces, and push my kingside pawns, all while keeping Black’s knight out of play.  The game continued:

24. … Ra7,

This adds a defender to the bishop in preparation for my next moves.

25. Rde1 Re8 26. f5

July7_KoblaYu_10
Figure 10:  Kobla – Yu – Position after 26. f5

Black’ s pieces are all tied down to defensive posts, while I will just push the f-pawn down the board.  Surprisingly, there already isn’t much Black can do .

26. … Qxc6 27. f6 Rc7 28. R1e2!

This is much better than 28. fxe7+, after which Black can escape White’s attack with 28. … Kc8 29. Qg4+ Kb7 30. Qxb4+ Nb6 and the only thing left is an unclear position.

28. … Qb5 29. f7!

July7_KoblaYu_11
Figure 11:  Kobla – Yu – Position after 29. f7!

The rook is worth more than the bishop!  Once again, taking the bishop allows Black to escape the pressure.

29. … Nb6 The knight finally finds its way back into play, albeit a bit too late. The point is that after 29. … Rf8, White can effectively end the game with 30. Rxe7!, and Black’s position falls apart.

30. fxe8/Q+ (30. h4! was better, when Black is still paralyzed. Nonetheless, this move still leaves with a better position.)

July7_KoblaYu_4
Figure 12:  Kobla – Yu – Position if White plays 30. h4!

Despite the advantage, I was not able to win the game in the end, as my opponent played accurate defense after that and with a time control of G/90, we soon agreed to a draw.  In the many times a position like this has occurred, she was the only one that was able to hold the draw, so hats off to her for being able to defend such a position – not many can do that in their time in this line.

Keep in mind that this rule does not only apply to games at master level.  Numerous top-level games have been played in which grandmasters were not afraid to “lose” material in order to conduct an attack.  We will look at one such game.

Anand – Svidler (World Chess Candidates, 2016)

July7_AnandSvidler
Figure 13:  Anand – Svidler – Position after 17. … dxe4

Most people in this position would opt for the mundane 18. Bxe4 and would try to grind out the rest of the game up a pawn.  However, after 18. … Bxe4 19. Rxe4 Qd5, the position yields nothing for White.  Instead, Anand opts for the beautiful

18. Rxe4!

He reasons that giving up the exchange for the pawn and the unopposed Spanish bishop is more than adequate compensation for the rest of the game, even when no forced win exists as of yet.  Svidler, seeing that many variations after taking the rook could be forced, decides to go in another direction.

18. … Nb3?!

July7_AnandSvidler_3
Figure 14:  Anand – Svidler – Position after          18. … Nb3?!

This move was most likely based on a miscalculation.  The rook now gets a free elevator lift to the kingside, and Anand does not forgive.

19. Rxa8 Bxa8 20. Ng5! Nxc1 21. Qh5!

July7_AnandSvidler_2
Figure 15:  Anand – Svidler – Position after 21. Qh5!

Forsaking material balance in order to go for the king!

21. … h6 22. Qxf7+ Kh8 23. Rg4

July7_AnandSvidler_4
Figure 16:  Anand – Svidler – Position after 23. Rg4

Game over.  There is no stopping Qg6.

23. … Qa5 24. h4!

The last accurate move needed to seal the deal.  If 24. … Qe1+ 25. Kh2 Ne2, then White defends any last chance for Black with 26. Nh3! and White wins after the ensuing Qg6.

July7_AnandSvidler_5
Figure 17:  Anand – Svidler – Position if White plays 26. Nh3!

Black Resigned.

As we have seen, when a position warrants an attack, we should not be afraid to sacrifice some material in order to start up that attack.  Often, the material is a small price to pay in regards to all the compensation that the position could receive back, as we saw in my game against Yu and in the game between Anand and Svidler.  These two examples are not the only ones out there, especially at the top level.  If a little research is conducted, numerous examples of players fearlessly start an attack by playing that ignition sacrifice.  More often than not, they come out on top.  If you see an opportunity to attack, by all means, go for it.  It might just pay off in the end.

I will present more rules in my next post in about 2 weeks! Please do leave any feedback! Bye for now, and I wish you good luck in your future attacking games!